Data wiping refers to the process of securely and permanently erasing all the data stored on a hard drive, making it virtually impossible to recover. It goes beyond simple file deletion or formatting, which merely mark the space as available for new data, leaving the original data intact and recoverable with the right tools.
Why You Need To Wipe Your Sensitive Data From Your Drive?
- Protecting Your Privacy: In a world where cyber threats and hacking attempts are on the rise, safeguarding your personal data is crucial. Sensitive documents, financial records, and personal photos are often stored on our devices, making them prime targets for malicious actors.
- Preventing Data Leakage: Even when you delete files or format a drive, remnants of data can still be left behind. When selling, donating, or recycling your device, these residual traces could potentially be recovered, leading to data breaches or identity theft.
- Complying with Regulations: Data protection regulations like GDPR (General Data Protection Regulation) impose strict guidelines on how personal data should be handled. Properly wiping your hard drive ensures compliance with these regulations and avoids potential legal repercussions.
Wipe Your Sensitive Data Using Remo Drive Wipe
In order to erase the data beyond recovery,the disk space occupied by the deleted data, must be overwritten with new data, for a minimum of three times.
The purpose of Remo Drive Wipe software, is to completely remove the sensitive files and their contents from your hard drive, by carefully overwriting (Sanitizing) each and every sector of your physical or logical drive with new contents. Once a drive has been sanitized, it cannot be recovered using any recovery, or file restoration software.
Remo Drive Wipe is one such utility, that erases sensitive data from both, the physical and the logical drives.
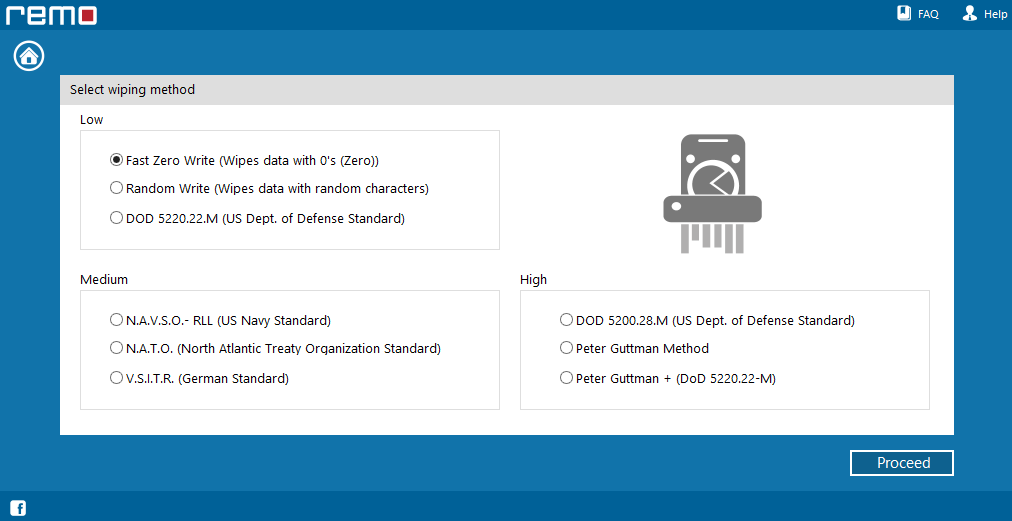
To wipe your hard drive completely,you can select from the various sanitizing methods available, and initiate the sanitization process.Remo Drive Wipe is equipped with nine sanitization standards prescribed by the US Department of Defense, the US Navy and other government agencies around the globe. You can select from them, any one file sanitization method, based on the desired security level.
The 9 sanitization standards available for sanitization are:
- Fast Zero Overwrite
- Random Overwrite
- US Navy, NAVSO P-5239-26 – RLL
- US Department of Defense (DOD 5220.22-M)
- DOD Standard 5220.28 STD
- North Atlantic Treaty Organization – NATO standard
- Peter Guttman Secure Deletion
- German:VSITR
- US Department of Defense (DoD 5220.22-M) + Guttman Method
Download this tool now and follow the steps given below, to successfully wipe all the data from your hard drive.
Steps to Wipe Sensitive Data Using Remo Drive Wipe
Step 1: Launch the application from the desktop shortcut or Start menu. The main window will appear, showing all connected logical and physical drives.
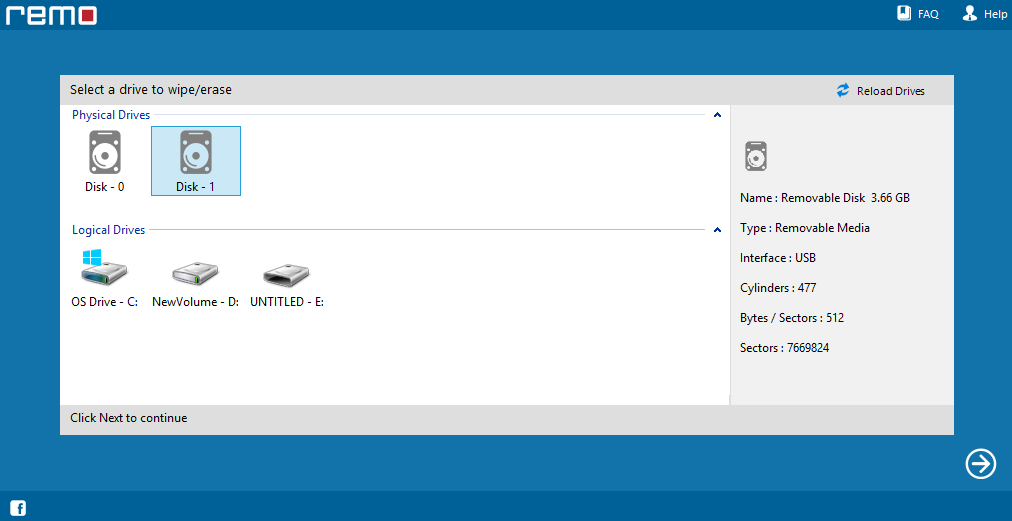
Step 2: Choose the logical drive with sensitive data or the physical drive to sanitize. Click "Next." A window will appear to select sanitizing methods categorized by security levels.
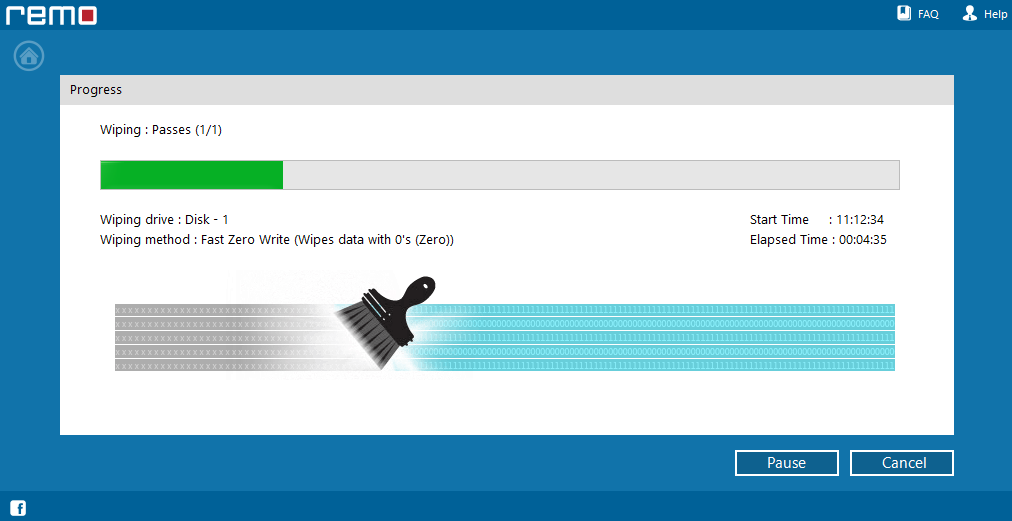
Step 3: Select the desired method and click "Next." A confirmation window will appear. Click "OK" to proceed. The software will start sanitizing the selected drive. After completion, a message confirming the process will be displayed.
Conclusion
Keeping your private information safe goes beyond just deleting files. Using tools like Remo Drive Wipe ensures that your data stays confidential even when you no longer have your drive or computer. Follow these steps to protect your privacy and stop data leaks.