Windows 10’s new Photos app has a lot of new features as an image editing tool. Well, if you don’t want to pay for costly image editings tools such as Photoshop or Lightroom, this little tool can assist you – up to an extent.
But many of the habitual Windows users are against one action from Microsoft – that replaced Windows Photo Viewer as the default application to open images. It’s the new Photos app that replaced Windows Photo Viewer. And unfortunately, there are no easy ways to roll back this action. But, you can do it, if you’re willing to take some risk.
Case 1: For Users Upgraded from Windows 7/8 to Windows 10
If you’ve upgraded from any of the previous Windows versions to Windows 10, things won’t be a disfavor to you. Just search for Windows 10 Settings. Once you have entered the settings menu, choose the System option. There you can find the Default Apps tab. From here, it’s possible to change the default Photo Viewer from Photos to Windows Photo Viewer.
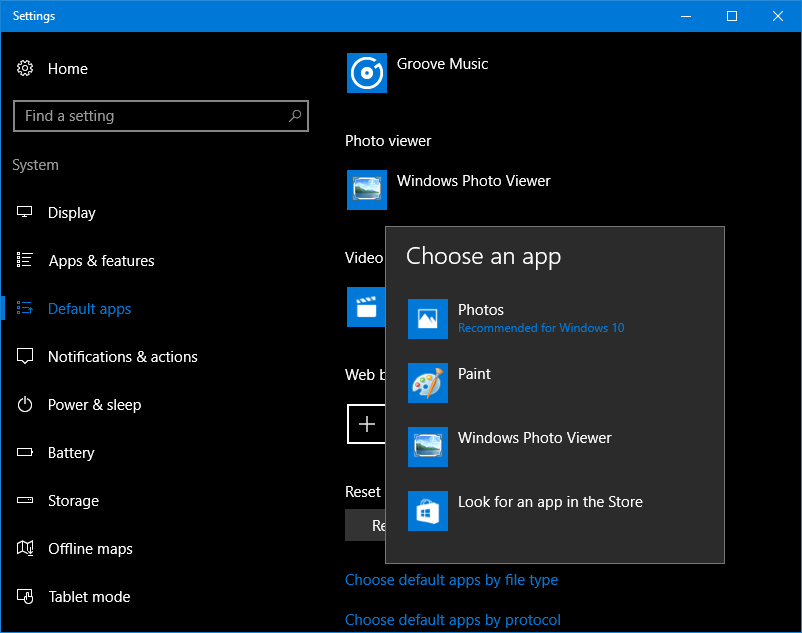
Change to Windows Photo Viewer and exit menu. That’s it, now all the image files will be opened with Windows Photo Viewer by default.
Case 2: I’ve Done a Fresh Windows 10 Install/Purchased a Windows 10 PC
If your situation is like this, you need to do some registry tweaks to get Windows Photo Viewer on your PC. Here’s how to do that.
- Copy the following code into a notepad and save it as a .reg file.
Windows Registry Editor Version 5.00
; Change Extension's File Type
[HKEY_CURRENT_USER\Software\Classes\.jpg]
@="PhotoViewer.FileAssoc.Tiff"
; Change Extension's File Type
[HKEY_CURRENT_USER\Software\Classes\.jpeg]
@="PhotoViewer.FileAssoc.Tiff"
; Change Extension's File Type
[HKEY_CURRENT_USER\Software\Classes\.gif]
@="PhotoViewer.FileAssoc.Tiff"
; Change Extension's File Type
[HKEY_CURRENT_USER\Software\Classes\.png]
@="PhotoViewer.FileAssoc.Tiff"
; Change Extension's File Type
[HKEY_CURRENT_USER\Software\Classes\.bmp]
@="PhotoViewer.FileAssoc.Tiff"
; Change Extension's File Type
[HKEY_CURRENT_USER\Software\Classes\.tiff]
@="PhotoViewer.FileAssoc.Tiff"
; Change Extension's File Type
[HKEY_CURRENT_USER\Software\Classes\.ico]
@="PhotoViewer.FileAssoc.Tiff"
- Double-click on the newly created file to add it to Windows Registry.
- Now you can see that your default program to open image files has changed to Windows Photo Viewer. You can even revert back to the Photos app whenever you want by going into the default program settings.
Case 3: Windows Photo Viewer in the 'Open with' Menu
Another way to use Windows Photo Viewer to open your images is by adding it to the 'Open with' options.
- Right-click on any picture and select Open with option.
- From the menu, choose Windows Photo Viewer to view your photos.