Transferring Outlook emails to the hard drive or copying Outlook files to an external hard drive is quite easy and can be done in a few clicks. If you’re wondering how you can save Outlook emails to an external drive, then you’re at the right place.
To Transfer your Outlook data to an external drive, there are 3 methods that we can use:
Before you head back to Outlook data to an external hard drive, you need to first understand where Outlook data files are stored.
Where is Outlook Data Stored?
Outlook data files are of two types, PST(Personal storage tables) files, and OST(Offline storage table) files. When you create an Outlook account, the default PST file is automatically created.
PST file stores a copy of the entire mailbox information such as emails, contacts, notes, and calendars, that is stored as a local copy on your computer.
Transfer or Backup Outlook data to an External Hard Drive
If you want to save the Outlook data to any drive, say Flash drive or hard drive, or even if you want to migrate Outlook data new computer you can do it easily with PST files. If you want to move Outlook data from one drive to another drive then you can do that too.
Method 1: Transfer Outlook Data with Import/Export Feature
To transfer or backup Outlook files to External Drive, Use the in-built Import/Export feature in Outlook.
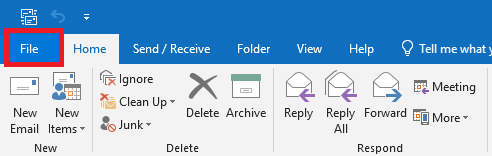
- Open the Outlook application and click on the File tab.
- Click on the Open & Export option on the left-hand side.
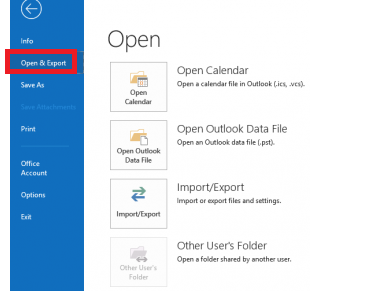
- Once you click on Open&Export, select the Import/Export option.

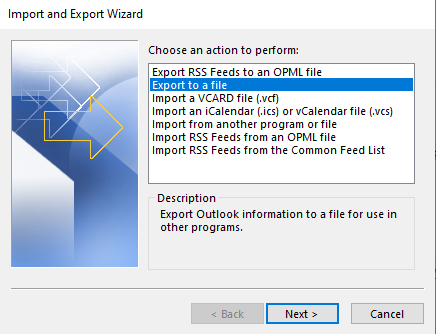
- Then select the Export to a File option. And click on Next.
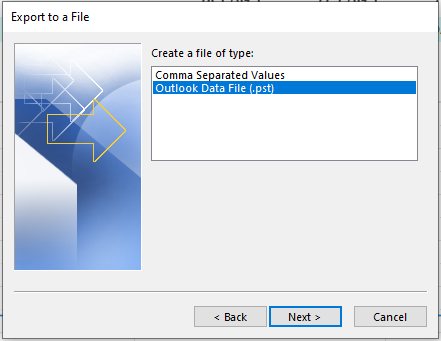
- Then select Outlook Data File (.pst) option to move data with the .pst file and then click on Next.
- Then select the attributes you would like to export and hit Next.
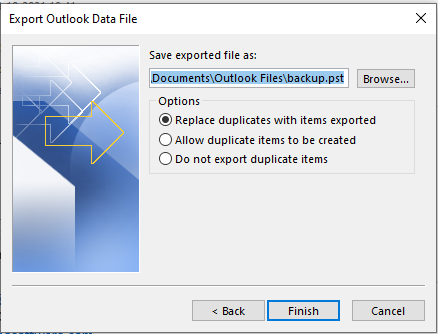
- Select the Browse option and select the destination of the file to be stored, name the file as you like, and then click on Finish.
- Then the .pst file will be stored in the destination through which you can copy it to the external drive.
You can easily export Outlook data using the above steps.
Method 2: Transfer or Backup Outlook files by Copying Outlook Data Files to External Drive
If you are wondering how to backup Outlook to an external hard drive, follow the listed methods. To copy Outlook files to an external hard drive, find the location of the PST file on your computer. Then you can easily copy the data to an external drive or a flash drive. You can also change the location of Outlook data files from your computer and move files from one hard drive to another.
Follow the steps below to find the location of your PST file and copy Outlook emails to the hard drive:
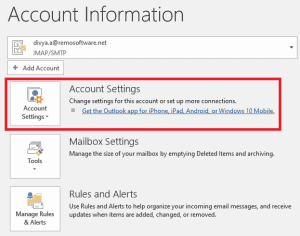
- Open the Microsoft Outlook application, select on the File tab, and then select Account Settings.
- Then click on Data Files and then you can find the location of the Outlook file.
- Click on Open File Location to check the path of the Outlook files.
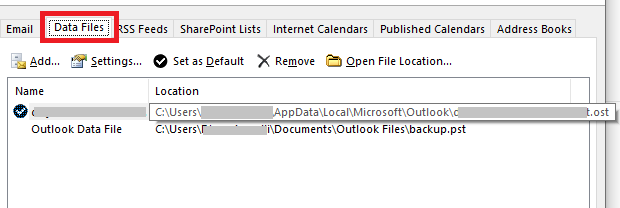
- Then copy the Outlook data file from this location and paste it onto an external hard drive or flash drive.
if you want to avoid copying data often, there’s an automated way to save Outlook data files Use Remo Outlook Backup and Migrate tool for automated timely backups.
Method 3: Transfer or Backup Outlook files With Remo Outlook Backup and Migrate Tool
Remo Outlook Backup and Migrate tool is a safe and easy utility. It helps you backup, restore and migrate data without any limitations in a quick and hassle-free way. By using this tool you’ll overcome the exhaustive Outlook Import/Export process and easily export Outlook data or emails to an external drive.
Follow the steps below to copy Outlook data files automatically to an external hard drive.
- Click on the Download button below and Install the Remo Outlook Backup and Migrate tool.
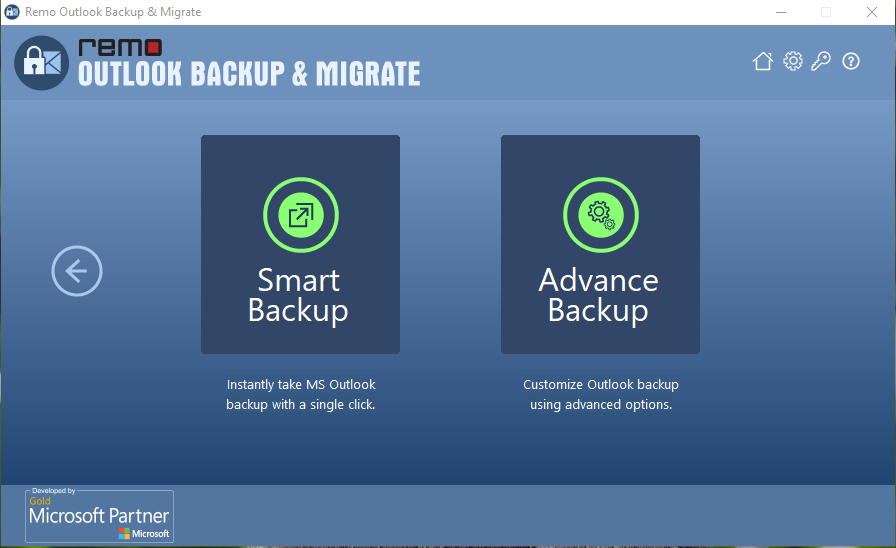
- Then Launch the tool and click on the Backup.
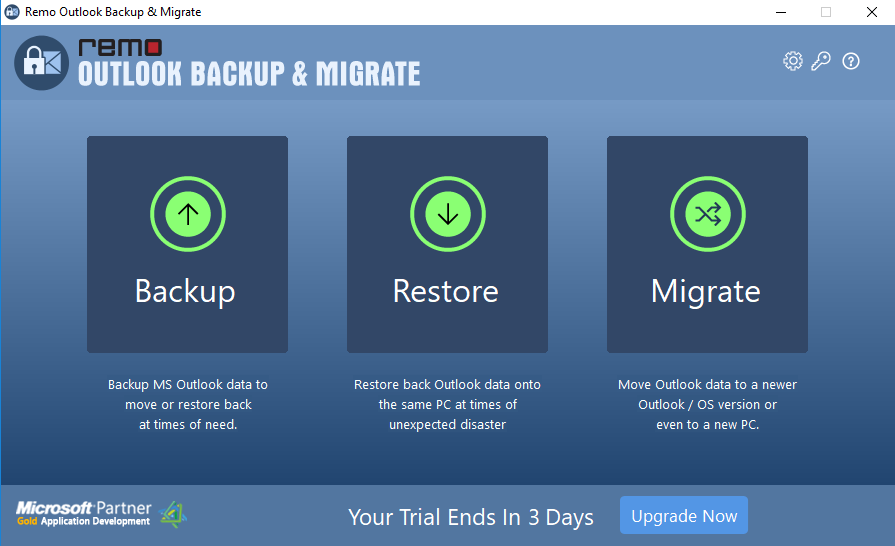
- Within the next screen choose from Smart Backup and Advanced Backup.
Smart Backup allows a complete backup of Outlook items that includes attributes like emails, journals, contacts, notes, etc. with Outlook rules and settings. Whereas, with the Advanced Backup option, you can select the Outlook attributes that are important to you and you would like to take a backup of them safely.
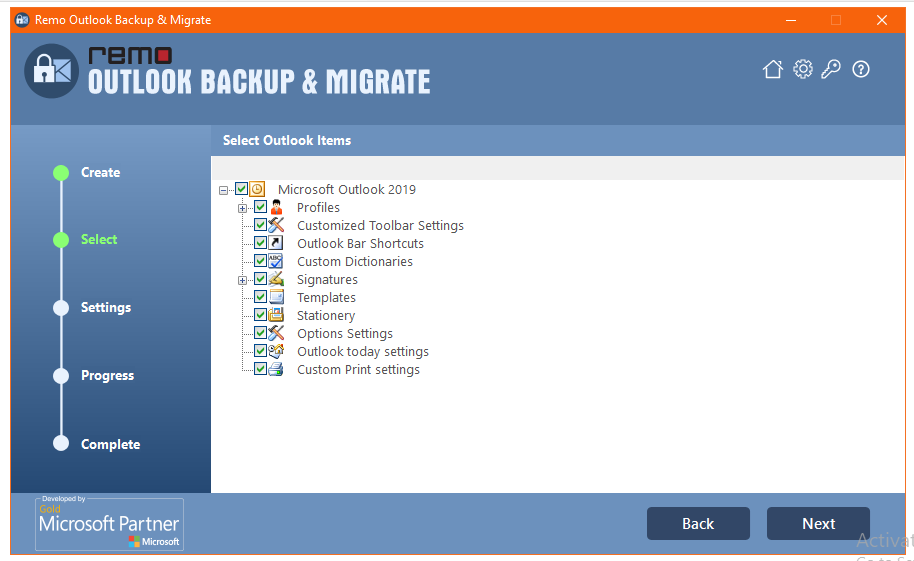
- If you select Smart Backup, Then just click on Next to begin the backup. If you select Advanced Backup then select the attributes you would like to backup and then click on Next.
- Once the backup is completed, click on View Report. And save the file to an external hard drive.
Conclusion:
The aforementioned three methods will help you move Outlook emails to the external hard drive. While manual methods need time and effort and can be tiresome in case you’re facing troubles with manual methods, opt for Remo Outlook Backup and Migrate tool to make data transfer effortless. Tell us using which method you could transfer Outlook emails to a hard drive effortlessly in the comment section below.
Frequently Asked Questions
It's fairly easy to save your Outlook data on an external hard drive You can do so by-
1. Copy and Paste the PST file from your hard disk onto your System.
2. Open Outlook.
3. Open Import/Export settings from the file menu.
4. Import the PST file.
Yes, you can save your emails on a USB drive. However, it is always advisable to ensure that your USB device has an ample amount of space.
The steps mentioned below showcase an effective way to save individual outlook emails-
1. Double-click on the Outlook email.
2. Go to the file menu and use the Save as option.