Are you finding trouble with grainy or blurry images and wondering how to fix them? Photoshop is a reliable and well-known photo editing software that can fix most photo-related issues. This article will help you understand how to fix grainy and blurry images in Photoshop.
Grains are often seen in a photo due to high noise levels and low brightness or due to some faulty settings. . On the other hand, blurry images are low in quality and have a very minimal definition. Let us understand the common problems with these photos.
Fix Grainy and Blurry Images on Photoshop
The following article you will understand 2 effective methods for how to Fix Grainy Or Blurry Pictures from Photoshop.
- Fix Grainy images using the Noise Reduction feature
- How to make the blurred picture clear using Photoshop.
What makes photos Grainy and Blurry?
There are various photographic conditions that make your image grainy or blurry. This is dependent on numerous scenarios.
- Grainy Photos - In the case of grainy photos, the noise level is comparatively higher than usual, having a higher noise level affects the sharpness and clarity of the image. The following are the factors that contribute to the grains in the images.
- ISO - ISO plays an important role while the lighting is low in your camera, the higher the ISO is, the higher the noise level in a camera will be. This impacts on the picture being grainy and reduce the sharpness and quality detail of the picture
- Light Condition - Light condition plays a very important role, as the brightness of the picture is determined by the lighting of the near surrounding. For instance, when you take a selfie or a picture during an eve or night, the light condition influences the brightness, and the outcome of the photo is usually grainy
- Camera type - The type of camera being used is also influential towards a grainy picture, a camera having small sensors tends to reduce the sharpness of the image. These types of cameras have very low sensitivity in low-light places.
- Blurry Photos - As we all know blurry images have very low image quality and no definition at all. Let us understand the usual reasons for blurry or shaken images.
- Blurry photo due to movement of the camera or subject - The image often turns blurry when the subject in the prime focus or the camera moves while the picture is being captured. Likewise, the range of motion cameras also influences the photo of the primary target.
- Out of focus - When the lens is not aligned according to the subject, the image turns out blurry once captured. It can also be that the focus is not on the primary object or person, the images could be blurred as it merges with the background
In the section below you will understand simple solutions on how to fix grainy and blurry images on Photoshop effortlessly. The solution has separate solution methodologies on how to fix the Grainy or Blurry pictures.
"I was shooting the photos in low light due to improper ISO settings and all the images had turned blurry. Can anyone please help me fix the blurryphotos?" - User Query from Quora
Yes, you can easily fix the issues by properly understanding about the ISO settings and there are other fixes you can try to fix the blurry or grainy images.
100 ISO(sensitivity of the camera's sensor) works in bright sunlight but can cause blurry photos on cloudy days, in the shade or indoors.

With respect to the shutter speed you can check with the different ISO and lens zooming settings.
- 100 ISO at 5.6 zooming of the lens = Shutter Speed 1- 15th of a second
- 200 ISO at 5.6 zooming of the lens= Shutter Speed 1- 30th of a second
- 400 ISO at 5.6 zooming of the lens= Shutter Speed 1- 60th of a second
- 800 ISO at 5.6 zooming of the lens= Shutter Speed 1-125th of a second
How do you make a Grainy picture clear in Photoshop?
Steps to Fix Blurry Images on Photoshop
Step 1: Open Photoshop and import your grainy/blurry photo. Unlock the Backdrop layer in the Layers panel by clicking the lock button next to your photo layer.
Step 2: Duplicate the layer by pressing Command + J (Mac) or Control + J (Windows) when the photo layer is chosen. This will create an identical layer to which we can apply the sharpening. This manner, we can quickly switch between before and after, or modify the opacity to blend the sharpness exactly. The Layers panel should look like this after duplicating your background layer.
Step 3: The Unsharp Mask is a sharpening tool in Photoshop that works well for sharpening blurry images to help remove blur. Go to Filter > Sharpen > Unsharp Mask to use the Unsharp Mask.
This window will show once you pick Unsharp Mask. Set the amount to 150% and the threshold to 0. The radius should then be adjusted. Begin with one pixel and gradually increase the radius. Increase the radius till the amount of sharpness feels appropriate for the image. The radius may need to be anything between one and 25 pixels depending on the size of the photo and how blurry it is.
Step 4: Once you've dialled in your Unsharp Mask settings, click OK and let it load. Once loaded, you can make final tweaks to your photo and adjust the parameters. In the Layers panel, select the eye symbol. To view the effect of the Unsharp Mask, toggle the layer on and off. If the effect appears too strong, use the opacity slider in the Layers panel to lessen it.
You can also try fixing the Blurry images using the Below Features in Photoshop
Unsharpen Feature to fix Blurry Photos
- Open the Grainy Photos and apply Unsharp Mask (found under sharpen filter)
- Follow the given setting: 150% radius and Threshold 10 and Save
- Go to edit and select Fade Unsharp Mask
- In the pop-up menu change from Normal to Luminosity
By using Noise Reduction feature
Being a reliable photo editing application, Photoshop can help you fix photos with high noise levels of your grainy image effortlessly. It is also capable of enhancing certain photo attributes like sharpness, brightness, etc.
- Open your grainy image in Adobe Photoshop
- On the top bar, click on Filter>Noise>Reduce Noise
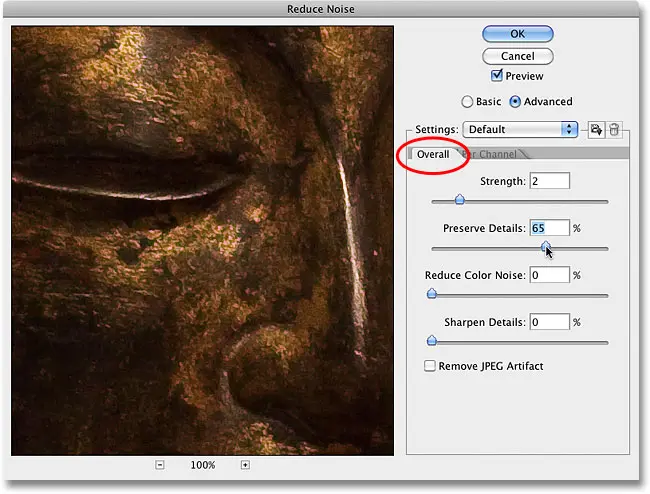
- In the Reduce Noise window adjust the three sliders – Strength, reduce Colour noise, and Sharpen Details until you get to reduce the grains and obtain the required quality.
- You can view the outcome in the Preview box on the right side by checking the Remove JPEG Artefact box
- Click OK and save the edited image.
By using High Pass Filter
- Let's look at how to use the High Pass effect in Photoshop to sharpen an image. You can accomplish the following by clicking on the image that needs sharpening.
- Launch Photoshop and open your image. Working on a separate layer is usually recommended, as I explained in the Unsharp Mask It's essential for the sharpening process. This is due to the fact that sharpening is accomplished by blending the original image with the layer with the high pass filter.
- Once you have selected a New layer drag and drop the Background layer and make a Copy of these layers.
- Now you can try converting to Smart Object.
Try Smart Sharpen Filter
In this feature, the sharpening is accomplished by blending the original image with the layer with the high-pass filter.
- Open Photoshop select a New layer, drag and drop the Background layer and make a Copy of these layers.
- Now you can try converting to Smart Object.
This method is useful since it allows you to return to the filter and tweak it, despite the fact that you won't be able to see the effect before applying it.
How to make a Blurred Picture Clear using Photoshop
Photoshop has an automatic camera shake reduction tool, which is helpful in making a blurry image clearer and better.
Use the automatic camera blur reduction option
- Open the blurred image that needs alteration.
- Select Filter > Sharpen > Shake Reduction. Photoshop automatically analyses the region of the image best suited for shake reduction, determines the nature of the blur, and advises on the appropriate corrections to the entire image. The corrected image is displayed for your review in the Shake Reduction dialogue.
Blur trace
Photoshop provides you with blue trace option to reduce the blurry part of the image in the various side of the picture. This option has multiple effects on it.
Advanced blur trace
This option allows the user to make the finest blur shake reduction on Photoshop and make the picture brighter and clearer.
Blur Trace Bounds
The Blur trace bounds setting allows the user to adjust the value of the bund size of the blur trace.
As you know, PSD files are sensitive file formats that are liable to suffer from data loss and corruption easily. Remo PSD repair comes handy to fix the corrupted PSD file effortlessly.Remo PSD repair works on the read-only mechanism and the tool is inbuilt with advanced algorithms that can fix your corrupted PSD file within a few clicks.
Note: If you are looking to recover deleted or unsaved Photoshop files, we wrote a comprehensive article that covers everything you need to know on the same. check it out.
Some Quick Tips for Fixing Blurred Images
- Utilising the unsharp mask on the entire image can result in some unnecessary sharpening on soft regions, so utilising a layer mask can help you limit that sharpening. Ideally, you should only brighten the topic and leave the background alone.
- Don't excessively Zoom in on the images.
- For the unsharp mask settings, there is no one-size-fits-all approach. Each photograph will necessitate a unique set of settings. Adjust the radius after you've set the amount and the threshold. After you've adjusted the radius, you may go back and change the quantity to make the sharpening fit your photo properly. Oversharpening is the only method to make a blurry/grainy image worse. Remember that the unsharp mask increases the contrast of your photo's edges, so be careful not to overdo it.
Tips for Avoiding Images Getting Blurry or Grainy
- Now you have fixed the blurry or grainy images, make sure you follow the tips mentioned below to avoid the picture getting blurry in future.
- When photographing in low light and increasing the shutter speed to provide more light, one general rule of thumb is to avoid having a shutter speed that is slower than your focal length. When shooting handheld, this approach is very critical.
- Even if you dislike using a tripod, it is an excellent technique to ensure a sharp image. Using a tripod forces you to think about your composition and take your time before focusing on your subject. Once you've set your focus on a tripod, you can disable autofocus (if you're photographing a stationary subject) so the camera doesn't hunt for focus every time you snap a picture. A tripod will also assist in keeping the camera still while filming.
- Most cameras allow you to zoom in on the photo on the back LCD screen. By zooming in, you may immediately detect any focus or composition issues. Try to do this after every photo you take so that if you need to reshoot, you can simply do so without wasting too much time.
- Eye Autofocus is featured on many modern cameras. This is a modern technology that detects people and animals' eyes to guarantee that they are perfectly focused. This will assist you in achieving excellent focus and avoiding blur in your photograph. Eye Autofocus, like any other type of autofocus technology, isn't flawless, so be sure to inspect your photographs after you shoot them to verify sharpness.
Summary
The article summarizes the simplest methods for fixing a grainy or a blurry picture. The noise level and the shake reduction features play a vital role in fixing the picture or making it look less grainy. But by using Photoshop, you will be able to fix any grainy, blurry image only to an extent. Most of the problems can be prevented by following certain precautions while capturing the picture like adjusting the ISO or using Auto mode.