Adobe Photoshop is an extraordinary application from which you can add essence to a memorable photo of your choice. If you are one of the users who is looking forward to adding color to a black and white picture, this article is for you.
There are several applications that allow you to color a black and white photo, but the range and the preciseness which is obtained by Adobe Photoshop is incomparable to any other application. Let us understand how to do it in Photoshop in the below section
How do you add color to a black-and-white photo in Photoshop?
- Add color and adjust the contrast
- Select Neutral filter
- Download and turn on colorize
Add color and adjust the contrast
Step 1: Open the Black and white Photo
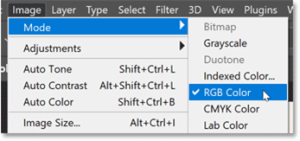
Step 2: Verify if the image is on RGB color
Step 3: Boost the contrast if the image is faded
Step 4: Duplicate the Background layer - Go to the layer panel click on the Background layer and drag it down onto the + New Layer icon
Step 5: Double-click on the copy’s name to highlight it, rename the layer “Contrast”, and then press Enter on a Windows PC, or Return on a Mac, to accept it: Double-click on the copy’s name to highlight it, rename the layer “Contrast”, and then press Enter on a Windows PC, or Return on a Mac, to accept it:
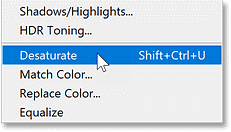
Step 6: Desaturate the image - If your image has a color tint to it like mine does, and you want to remove it (which can help to improve contrast), then go up to the Image menu, choose Adjustments, and then Desaturate
Choose the Auto Contrast command
- To enhance the contrast, go to the Image menu and choose Auto Contrast:
- If Auto Contrast made some areas too bright or too dark, then before moving ahead, go up to the Edit menu and choose Fade Auto Contrast:
- Then lower the Opacity of the Auto Contrast command to fade according to your preferences
Select the Neural Filters
- Go to the Filter menu and choose Neural Filters:
- This opens the Neural Filters workspace along with the image
- If you can’t see your entire image, go to the toolbar along the left of the workspace and double-click on the Hand Tool icon to fit the image
Download and turn on Colorize
- The Neural Filters panel on the right lists all of the filters we can choose from. The official filters are in the Featured section, while the Beta section gives us early access to filters that are still a work in progress. As of Photoshop 2022, Colorize has been upgraded from Beta to Featured.
- But before we can use a filter, we first need to download it. So if a cloud icon appears on the right of the Colorize filter’s tab, click the icon to download the filter:
- Once the filter is downloaded, the cloud icon will turn into a toggle switch. Click it to turn the Colorize filter on
These are some of the ways by which you can accomplish your task by using Adobe Photoshop; however, some users may find it difficult to use this application because this program is equipped with many advanced features. Eventually due to many advanced features users may at times inappropriately use the application which results in the corruption of photos. But don’t worry, if your Photoshop file is corrupt because of the Remo Repair PSD tool that can easily repair a corrupted Adobe Photoshop file with all its layers and color modes intact.