When dealing with computer storage, managing partitions is a crucial task. Partitions are separate segments on a hard drive that can hold data independently. Over time, you may need to extend a partition to accommodate more data without the risk of losing any existing information. This article will tell you how to extend a partition on Windows and Mac computers without losing data.
What are Partitions?
Partitions divide a hard drive into individual sections, each behaving like a separate drive. These segments are useful for organizing data and running multiple Operating Systems on one physical disk.
Types of Partitions
Different partition types exist, including primary, extended, and logical. Each serves a specific purpose and has unique characteristics.
- C Drive (Primary Partition):
- The "C" drive is the primary partition where the Windows operating system is usually installed.
- It stores system files, programs, and user data.
- Windows allows you to have only one primary partition labeled as "C" on each hard disk.
- Extended Partition:
- An extended partition is a special type that serves as a container for logical partitions.
- It doesn't hold data directly but allows you to create multiple logical partitions within it.
- Used when you need more than four partitions on a single hard disk.
- Logical Partition:
- Logical partitions are created within an extended partition.
- They provide additional subdivisions beyond the primary "C" and other primary partitions.
- Used to organize data and store files separately from the "C" drive.
- Macintosh HD (Primary Partition):
- Equivalent to Windows's "C" drive, it contains the macOS operating system and user data.
- Typically labeled as "Macintosh HD" or the name you provided during macOS installation.
- Only one primary partition for macOS is allowed per hard disk.
- APFS Volume (Logical Partition):
- Apple File System (APFS) allows you to create multiple volumes (partitions) within a single container.
- Each APFS volume acts as a logical partition and can store data and applications or be used for specific purposes.
Why Extend a Partition?
As data accumulates, you may encounter instances where a partition runs out of space. Extending an existing partition is a more practical solution than creating a new one. Here are some reasons why you need to extend a partition.
- Maximize Disk Space: Extending a partition helps you fully utilize your hard drive's capacity, avoiding wasted space.
- Preserve Data: Extending a partition doesn't require moving or deleting data, ensuring no loss of valuable files.
- Easy Management: Dealing with a single, larger partition is simpler and more organized than handling multiple smaller ones.
- Enhanced Performance: A larger partition can improve system performance by reducing fragmentation and access delays.
3 Proven Methods to Extend A Partition On Windows and Mac
Method 1: How to Extend A Partition On Windows 10/11?
To extend a partition on Windows 10/11, follow the below simple steps:
- Search for "Disk Management" in the Start menu and select the tool.
- Find the partition you want to extend with adjacent unallocated space.
- Ensure unallocated space is next to the target partition.
- Right-click the target partition, select "Extend Volume," and follow the wizard's instructions.
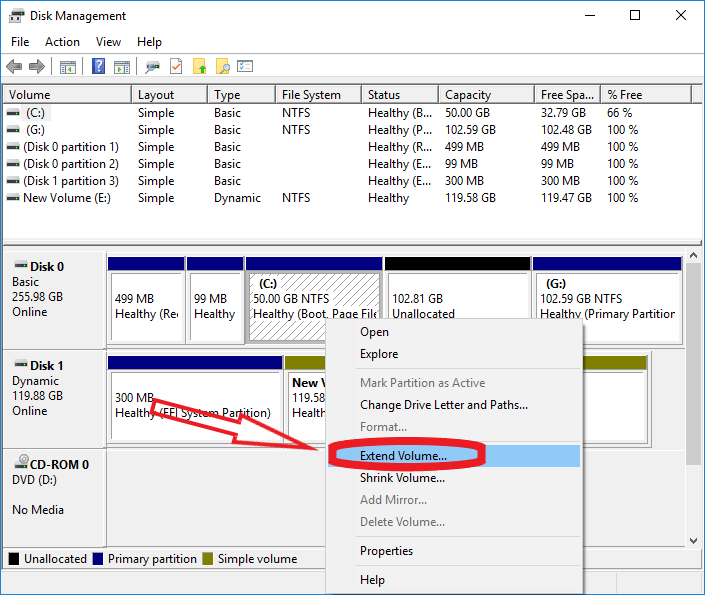
- Review changes and click "Finish" to extend the partition.
Method 2: How to Extend a Partition/Volume on macOS?
Follow the simple steps below for extending a Mac partition using the Disk Utility tool.
- Go to "Applications" > "Utilities" > "Disk Utility."
- Locate the partition with adjacent unallocated space.
- Ensure unallocated space is available next to the target partition.
- Select the target partition, go to the "Partition" tab, and resize it using the unallocated space.

- Double-check the changes and click "Apply" to extend the partition.
Method 3: Extend a Partition using Free Third-Party Partition Management Software
The most effective method to extend a partition is by using third-party partition management software. GParted is a recommended free tool for this purpose.
- Download GParted from https://gparted.org/
- Create GParted live media if using Windows or Mac OS.
- Boot from GParted media by restarting your computer.
- GParted software will start automatically.
- Identify the target partition to extend with adjacent unallocated space.
- Right-click on the target partition, choose "Resize/Move," and allocate unallocated space.
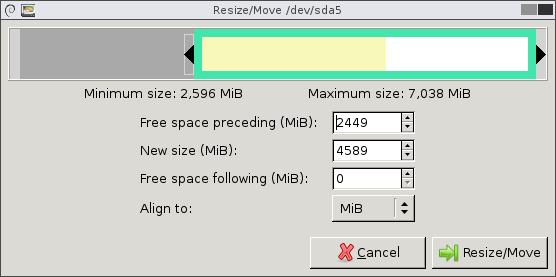
- Double-check changes and click "Apply" to extend the partition.
Note: Make sure you Always back up your data before making any partition changes to avoid any data loss. In the event of data loss, you can always rely on the best partition recovery tool, which is the Remo Partition Recovery tool.
Common Challenges While Extending a Partition
Disk Errors: Learn how to troubleshoot and address disk errors that may arise during the partition extension process.
Insufficient Free Space: Find alternative solutions if there is insufficient free space to extend the partition directly.
Data Corruption Risks: Understand the potential risks associated with partition extension and how to minimize the chances of data corruption.
Conclusion
Extending a partition is a valuable skill that helps you manage data efficiently. Following the outlined steps and best practices, you can safely extend partitions without losing data. Remember to back up your data before making any changes to ensure your important files remain safe.