What is RAW File?
RAW as the name suggests is an image file in its purest form, uncompressed, unprocessed, and unchanged. RAW files are captured by digital cameras or the scanner’s sensors. Clicking photos in RAW guarantees you an extraordinary image detail of large-size file(s) with lossless quality.
Since RAW image files are unprocessed, so they can’t be printed, moved, or even edited using a graphics editor. So the image file has to be processed prior to conversion for easy storage, additional manipulation, and printing.
In short, it means that you have extremely high-quality images that can be edited, compressed even converted into any file format in a harmless way.
Important Point: Raw files are not actual images. Confused? Allow us to clarify. RAW files are actually a type of file known as a raster file.
What Are Raster Files?
What is common between JPEG, JPG, GIF, PNG, TIF, TIFF, and BMP? All of these image files are examples of raster files.
All images are made of thousands of pixels. Raster files are no exception, the number of pixels that raster files use is fixed. So resizing the image makes them blurry and distorted.
Since RAW files are not actual image files, you can’t move them freely or if you want to edit or modify those files you first need to import them into any appropriate photoshop software or change them into any other file format such as JPG or JPEG.
If you are curious to know the difference between JPG and JPEG files, kindly read this article.
This article has everything you need to know about opening RAW image files on Windows, Mac, and Android.
So without wasting any more time, let's start.
How to Open RAW Files In Windows?
Discussed here are a few simple ways to open RAW files in Windows 11, 10, 8, and 7.
Method 1: Install RAW Image Extension On Windows system to Open RAW Files
Method 2: Open RAW Files in Lightroom
Method 1: Install RAW Image Extension To Open RAW Files on Windows 10
Microsoft has a built-in extension that can be used to open RAW image files. RAW Image extension can be installed from the Microsoft Store for free. The main advantage of using this extension is that it let you open and view RAW files in the photos folder
Here’s how to open nef files in Windows 10, moreover you can also open and view other RAW file formats such as cr2, cr3, arw, dng, raf using this application.
Step 1: Download and install the RAW Image Extension from the Microsoft store.
Step 2: Once the extension gets installed on your Windows system. Navigate and open the folder where you have saved your RAW files.
Step 3: Double-click on the image file that you want to view.
Step 4: A new window will appear on your screen asking how would you like to view your file.
Step 5: Select the Photos option and click on the OK button.
The selected RAW image file will be directly opened in the Photos app.
If you are wondering how to open cr2 or cr3 files in Photoshop? Go through the next section to find the answer.
Method 2: Open RAW Image Files in Lightroom
Adobe Lightroom is not just an image editing tool, in addition to helping you give more character to your RAW photos. Lightroom can also help you find, manage, organize, and import your RAW Image files.
Go through the following section to find out how to open CR3 of Canon, ARW of Sony Camera, or any other raw file formats in Photoshop.
How To Import RAW Images Files in Lightroom?
Step 1: Connect the device where you have stored your RAW image files. A new window will pop up on your screen once your device gets recognized.
Step 2: Select the device from where you want to import the RAW photos.
Step 3: Select the photos that you want to import into Lightroom
Step 4: You can do any of the following things:
- Move: You can move the files from the original location and shift them to Lightroom.
- Copy: Take a copy of the original RAW files
- Add: This means that the file is restricted to move, and the user can work on the file in Lightroom.
- Copy as DNG: Copy the original files in Adobe file format to Lightroom.
Step 5: Check the Build Smart Previews option and rename the copied files.
Step 6: Set the necessary Develop Settings option.
Step 7: Type something about your files (also known as metadata) and also choose the keywords associated with the file.
Step 8: If in case you are working on copied files, select a location where you want to save the copied files.
Step 9: Click on the Import button to complete the import process.
Importing the raw files is just one part. If you want to export the RAW files from Lightroom, kindly follow the steps explained below.
How To Export The RAW Files On Lightroom?
Step 1: Go to the library, select the image files that you want to export, and click on the Export button.
Step 2: Under the File Setting tab, change the image format to either original or change it to any other format, such as TIFF, PNG, DNG, JPEG, etc.
Step 3: Decide where you want to export the edited image files.
Step 4: Click on Export, and you will find the edited image in the selected location.
Since we have just talked about Lightroom, you can also go through this article to find out how to open RAW files on Camera RAW.
Refer to this article to find out how to use Lightroom 6.
How to Open RAW Files on Mac?
If you are wondering how to open CR3 files on Mac or ARW files. This section has everything you need to know about how to view RAW Files on Mac.
Method 1: Open RAW Files in Photos Application
This section has everything you need to know about Viewing RAW image files in Photos on Mac.
So importing RAW files into the photos application is the first step in the process of viewing RAW files on a Mac.
How to Import RAW Image Files into Photos?
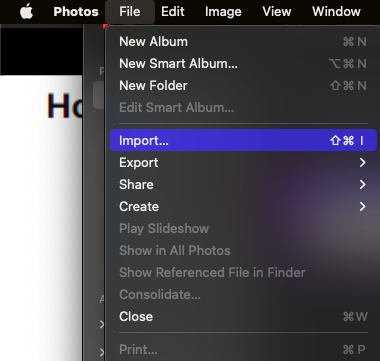
Step 1: Launch Photos.
Step 2: Choose File, then Import.
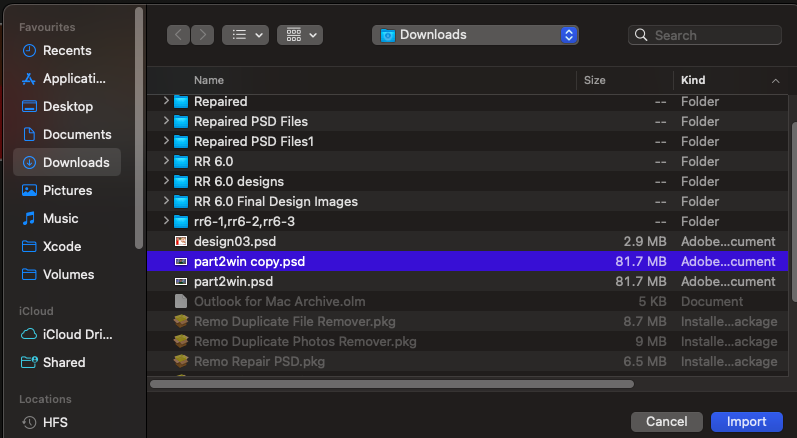
Step 3: Go to the folder where the files you want to include are located.
Step 4: Select the single file, then click Import.
Step 5: Select the group or the folder if it is for numerous files, then click Review for Import.
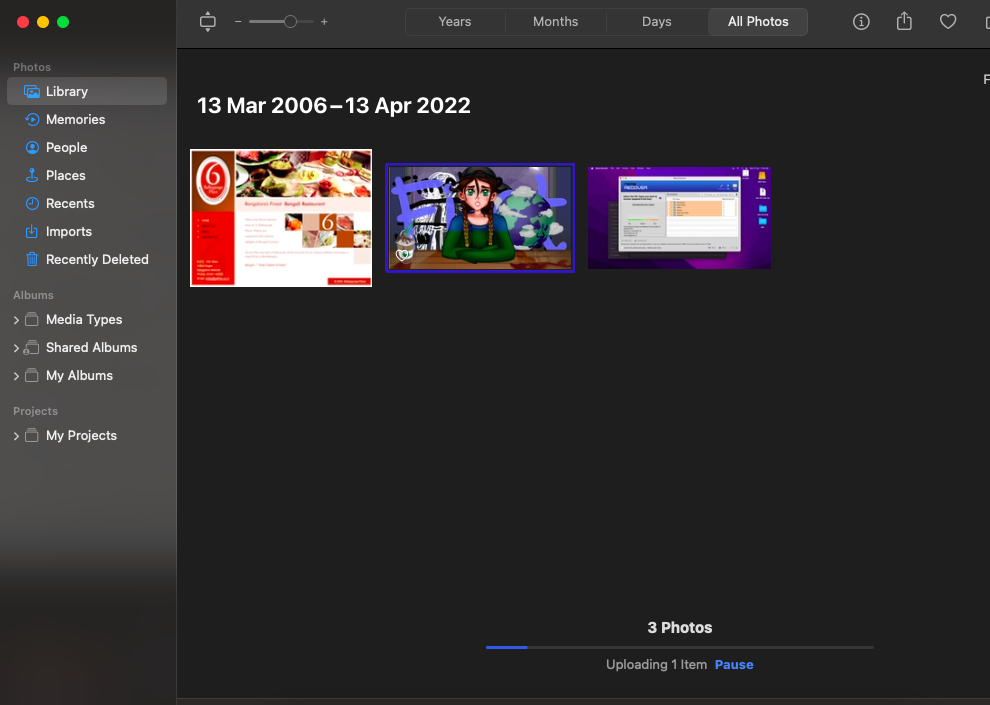
Step 6: Select the photographs you want to preserve in the Import view, then click Import Selected.
Importing RAW image files in photos just allows you to view the RAW files. If you want to know how to export the edited RAW files. Keep reading the next section.
Keep in mind that you can group the images when sorting the folder in the directory view. Usually, this will distinguish between files with the JPG extension and RAW photos, which are commonly listed under the heading "MetaImage."
Photos will treat the two as one image and group them together if you want to import both the JPEG and RAW versions of the same shot. When this happens, it labels the thumbnail "JPEG + RAW" to indicate which is being used.
Whether this label is missing, you can make it show by selecting Metadata from the View menu, checking to see if File Type is checked, and then selecting View again.
Where two file types for the same image are grouped together, this sort of labeling will also be seen throughout your whole collection of photographs.
How to Change JPEG to RAW in Photos Application?
Users are typically shown JPEG files rather than RAW files by default in Photos. It's easy for the application to handle because it's a prebaked and smaller file, especially when viewing pages of thumbnails.
You should view the RAW file rather than the JPEG while editing the photo.
So, how do I change JPEG files to RAW files?
- Choose the desired image or photos, or double-click to display the image in its entirety.
- Use RAW as Original is a menu option after selecting Image.
- As an alternative, right-click the photographs you want to use and choose Use RAW as Original.
The wording of the label on Photos also reveals which of the two file formats is being shown for an image. The file type being displayed is the front-most one.
When the label reads "JPEG + RAW," you are viewing the JPEG version of the image. Similarly, if the label says "RAW + JPEG," the image is RAW.
If you are curious to know how to spilt a RAW + JPEG image using Lightroom, kindly refer to this article.
How To Export the RAW Files in Photos?
You should export your edited photos for viewing once you are done with them in Photos. Depending on why you want to move the image from Photos, you might need to take different actions.
Scenario 1: You can use the standard exporting procedures if you wish to export the altered image. To do this, choose File from the menu, then click on Export, followed by clicking on Export 1 Photo.
By taking that path, options to output the altered image in various sizes, file formats, and quality levels will become available.
Scenario 2: You may alternatively drag an image from Photos to the macOS desktop and export it as a JPEG with the default settings.
You can only export versions of the images with the modifications baked in, not the raw RAW image, using either method.
Scenario 3: By choosing File, Export, and then Export Unmodified Original from the menu, you can export the RAW file. By doing so, a new window will open with additional options and adjustments for the file name and subdirectory format.
When choosing this option, two files will be exported: the original image and a second in the XMP format. The file may have received additional metadata since it was initially published to Photos, such as new location information and keywords, which are included in the second file.
How to Open RAW Files on Android?
RAW image files are of extremely high quality, the image file reflects exactly what the sensors in the camera see, without changing or altering the original file.
As we have already discussed in the earlier part of the article, you can’t view RAW files. The only way to view the RAW image files captured on any android smartphone is by making use of any good RAW Files viewer application.
Here’s a list of applications that can help you open, view, and edit RAW files on your Android smartphone.
- Adobe Photo Express:
Undoubtedly the best application for fast and quick editing. Looking for anything serious? We highly recommend you upgrade to adobe creative cloud.
- Adobe Photoshop Lightroom CC:
Adobe Lightroom CC is also available on Android. With over 100+ million downloads. It's one of the most sought-after photo editing software. The app offers a bunch of advanced features and RAW photo editing support. Which makes it best suited for serious photographers.
- VSCO: Photo and Video Editor:
VSCO lets you capture RAW images or allows you to add and edit them. Although the application is free, you have to pay to unlock some features. However, you do get a free seven-day trial period to fully experience the application.
- Open Camera:
The best open source camera application that can help you unleash the photographer within you. For starters, it can help you capture RAW images and videos using the front or back camera of your smartphone. Moreover, it can also help you edit your photos including modifying the white balance, exposure, and ISO. You can also add text and time stamps on your photographs.
- Photo Mate 3:
An all-in-one camera application for your android smartphone. Right from editing, viewing, organizing, as well as browsing. Photo mate can help you do all of that and much more.
Conclusion:
Here we end our discussion on opening and viewing RAW image files on Windows, Mac, and Android. We have talked in depth about importing and exporting files in Lightroom. Also Discussed here are the top 5 applications for RAW image file processing on Android.
This article has everything you need to know about how to open RAW files in photoshop. Hope you found this write-up useful.
Frequently Asked Questions
As discussed earlier in the article, RAW image files are untouched, unprocessed, and unchanged. The image reflects exactly what the camera sensors see. This means you get the highest image quality, and you can easily correct under or overexposed parts of the image. One of the best things about RAW images is their non-destructive nature. You can edit a RAW image file a hundred times without altering the original file.
Sending RAW files has always been troublesome. Due to its large file size freely moving them is almost always a demanding task. Here are a few ways you can do it.
Save the RAW files on a storage device such as a hard disk or memory card and hand over that device to your counterpart.
Make use of tools like Dropbox or Google Drive or OneDrive to move files whose size limit is less than 20 GB.
Follow the steps explained here to easily convert RAW files to JPEG.
Step 1: Open the Photoshop application, and click on the File, followed by Scripts > Image Processor.
Step 2: Find and pick the RAW files you want to convert.
Step 3: Choose a location to save the generated JPG files.
Step 4: Select the file format in which you want to save the RAW files.
Step 5: You also have the choice to perform an action on all of the RAW files in the last stage, saving them all in the chosen format. This might also save a tremendous amount of time. Include the ICC Profile as an alternative (International Colour Consortium) which by default is always checked.
Step 6: Once you are done, simply press RUN to start the conversions.
RAW is usually a preferred choice of pro photographers. Whereas JPEG is a safe bet for seasoned picture-takers.
Both have their own advantages and drawbacks.
Starting with JPEG:
Known as a standard file format in the world of digital photography. By default digital cameras shoot images in JPEG format.
Images get automatically processed by the camera and settings like white balance, color saturation, tone curve, color space, and sharpening gets applied to deliver a final image, that can be used right out of the box. This helps the cameramen take photos quickly and consistently.
JPEGs are compressed files, hence giving you the flexibility to capture more and more images without worrying about the storage space.
Drawbacks include:
Loss of details, very limited color options, lower dynamic range.
RAW files:
High quality of the image, high level of brightness, more colors, high dynamic range, process and edit the files as per your needs.
Drawbacks include:
A large file size, Processing of the image is required, and using a compatible is necessary to open and view RAW files.
So based on your needs you have to choose between RAW and JPEG formats.
We recommend you choose JPEG when you want easy and fast shots and go with RAW when you want more detailed and sensational images.