I as a technical writer, heavily depend on my Macbook Pro to meet all my deadlines. However, a few weeks ago I notice that my Laptops performance was not up to the mark.
So to improve the performance of my Macbook, I recently carried out a factory reset by following guidelines available on the internet. However, the methods that I followed led me to lose my data. After spending some more time on the internet it did not take me long to realize that this was a very common issue that Mac users faced. After a lot of trial and error, I was able to compile a few effective methods that allowed me to protect my data during and after a Factory reset and decided to share the knowledge I gained in the form of this article. If you are someone who is looking to factory reset their Macbook, will be able to do it without worrying about losing their files.
What is a Factory Reset?
Also known as a Hard reset or Master reset, a Factory reset will restore your Macbook to its original state by erasing all your data and applications that were previously stored on your device.
Benefits of factory resetting your Macbook
Factory resetting is a great way to maintain your Macbook’s health as it clears all clutter, leaving you with a Macbook that runs faster and smoother. I could use Factory reset as a surefire way to solve any software or configuration issues that I am unable to solve such as a Black screen of death.
Risks of factory resetting your Macbook
When we factory reset our Macbook, there are high risks of data loss If we do not securely back up our data beforehand. I would also recommend that you keep your Mac plugged in throughout the process to avoid complications.
Part 1: Protecting your Data Before Restoring your Mac to Factory Settings
Factory resetting my Macbook would delete all my data. So to counter this I made use of two different methods to ensure that all my data is well protected during the factory reset process.
- Backup data on your Mac using Time Machine
- Log out of all Apple Based applications
Important: In my case, I made use of an external hard disk. Whenever backing up huge volumes of data, I would recommend that you use an external storage device that has the same or more storage than the internal SSD of your Macbook Air or MacBook Pro, and always ensure you make your external storage device compatible with Mac OS before use by formatting it first.
Backup data on your Mac using Time Machine
I decided to back up my data using Time Machine. What is Time Machine you ask? Well, Time Machine is a Backup Mechanism that has been developed by Apple to back up data, It has been designed to work with both local storage devices and network-attached disks. It is most commonly used with external disk drives connected using either USB or Thunderbolt.
To start the Time Machine backup process, connect an external storage drive to your MacBook, and follow the steps mentioned below.
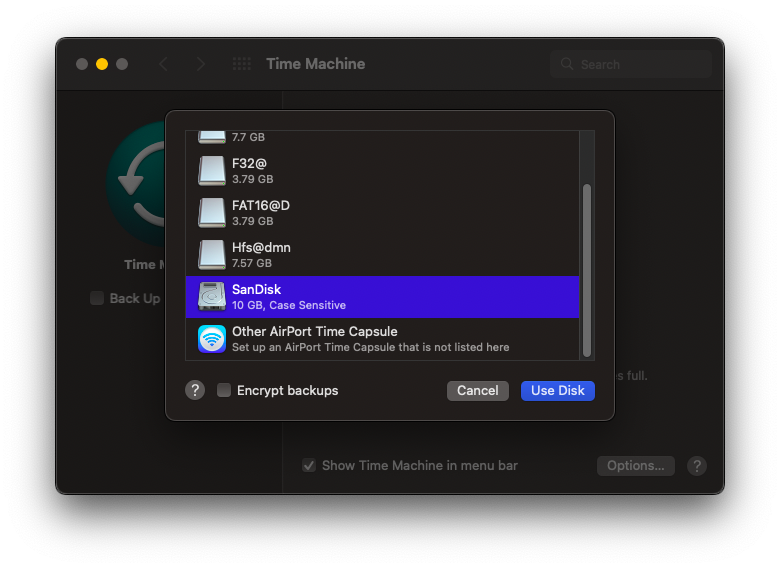
Step 1: Connect your external storage device, When a window is prompted with how to use this drive, select Use as Backup Disk.
Step 2: If no window is prompted while inserting the external drive, search for Time Machine, and then click on Select Backup Disk.
Step 3: Select the backup preference and then follow the on-screen process. The Backup will be created.
Note: The initial Time Machine backup will take some time, so do not assume that the backup has crashed or frozen. Wait patiently. If you continue to face issues, you can try troubleshooting Time Machine to get it to work.
After I safely backed up all my data using Time Machine, I took a few more precautionary measures that are mentioned below
Log out of all Apple-based applications
Whether you own a Macbook Pro, Macbook Air, or iMac, To avoid login issues after a factory reset, I would advise you to sign out of all your applications.
- Sign out of iTunes from your MacBook Pro, MacBook Air, or iMac.
- Turn off the File Vault after you remove files from it before turning it off.
- Log out of iMessage.
- Log out from iCloud before resetting your Mac.
PART 2: Format Macbook Drive
While formatting may bring you similar results to that of a factory reset, formatting a drive overwrites the storage device with random data making an attempt to ensure that the deleted data can never be recovered whereas, a factory reset will only delete all user data and settings while keeping the operating system intact.
I find that formatting your Macbook Drive is very suitable if you plan to give your laptop away, or wish to prevent the possibility of your deleted data being recovered in the future. You can format your Macbook drive by following the steps below-
Steps to Format Macbook using Recovery Mode
To reset your MacBook Pro without losing data, click on the Apple menu and click on Restart. Follow the next steps as given below.
Step 1: Hold Command + R until the MacBook’s utility window has opened. Else click on the menu bar and type Disk utility.
Step 2: Select Disk Utility and click on Continue.
Step 3: Select your startup disk (usually labeled as Macintosh HD) and click on Erase which will be present at the top toolbar
Step 4: Select the format as macOS Extended (Journaled) and click on Erase.
Step 5: Wait till the MacBook is completely reset, and then go back to the Disk Utility’s main window.
Step 6: Select Reinstall macOS and click on Continue.
Step 7: Make sure you are connected to a WIFI before proceeding with reinstalling the macOS.
There can be instances where you do not have a backup that you can rely on. In such cases, I usually turn to data recovery software such as Remo Recover Mac as it is really easy to use and does not require a lot of technical knowledge. You can try it for yourself by downloading now!
PART 3: How to Factory Reset Mac?
Factory resetting your Macbook can be risky as it deletes all your system's data. If you have not backed up your data yet, I have provided the instructions above. However, If you have already backed up your data, updated your Mac OS, and logged out of all Apple-based applications good job! Now let us proceed to reset a Macbook. In order to do so you can follow the steps provided-
Steps to Hard Reset Macbook
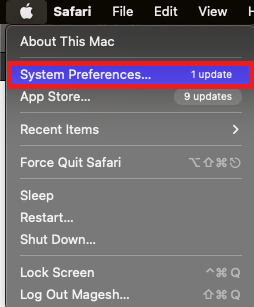
Step 1: Open "System Preferences" and then click on "System Preferences" on the Menu Bar.
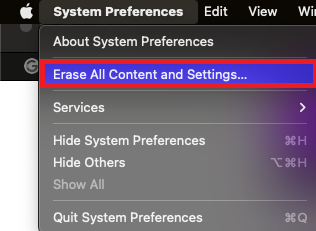
Step 2: Now, select "Erase All Content and Settings".
Step 3: Enter your MacBook's password and click on OK.
Step 4: Now follow the prompts accordingly.
Step 5: Once the prompts have been selected and confirmed for resetting, your MacBook will restart.
Step 6: After the MacBook restarts, click on the Apple logo located in the menu bar and Click Shut Down.
Once, the macOS is successfully reinstalled, your MacBook will be reset to factory settings and the performance will be as fast as it is new. Now, to wrap things up with a bow, we shall proceed to restore our data from the backup.
PART 4: Restore Data on Your Macbook After Factory Reset Using Time Machine
Once the MacBook is turned on after the factory reset, connect your external storage drive where you have backed up data using Time Machine and follow the steps mentioned below.
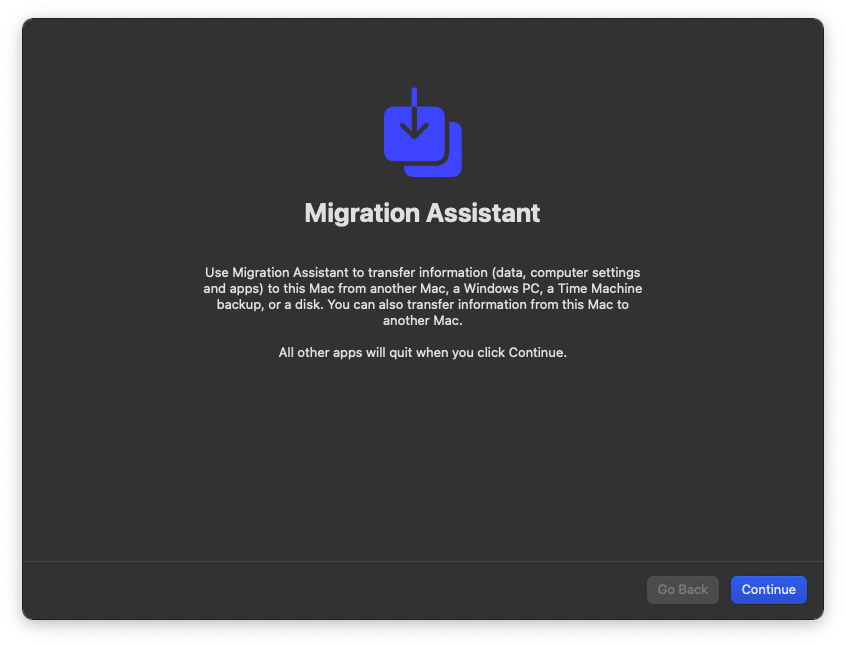
Step 1: Open Migration Assistant and click on Continue.
Step 2: Select From a Mac, Time Machine backup, or startup disk and click on Continue.
Step 3: Click on the applications, programs, and files that you want to back up and click on Continue.
Mac Migration Assistant tool is a great way to move data from an older Mac to a new Mac. Refer to this article to find out how to do it.
Pointers To Remember
- Make use of an external storage drive such as an external SSD or Harddisk.
- Format the External Storage device with Mac OS before use.
- Ensure that the Storage device used has a storage capacity that is equal to or greater than your Mac SSD.
- Keep your Macbook plugged in throughout the factory reset process.
If you are curious to know how to set defaults in Mac, then follow the solutions mentioned in this article.
To Conclude
Alas, you have successfully performed MacBook SSD data recovery. I hope that this article was able to guide you and make the factory process a little easier to carry out. If you do not have a backup, you can always make use of the Remo Recover Mac software to recover files that were deleted due to formatting.
Note: Refer to this article to learn how to reset the memory of Mac Pro.
Frequently asked questions
Also known as a Hard reset or Master reset, a factory reset will bring your Macbook to its default state by erasing all your data and applications that were previously stored on your device and restoring all default settings.
A factory reset will delete all your data and restore your OS to default settings. Formatting a drive would do the same but also overwrite the drives with zeros to keep the chances of recovering deleted data to a minimum.
Yes, you can reinstall macOS on your MacBook Pro or Air without losing any data but you should properly follow the reset procedure. With the help of Disk Utility, you can erase the data and volume to proceed with the reinstallation of your macOS.