Recently when I tried to send an email on Outlook, I received an error saying Outlook cannot send email. I tried to resolve this error by trying the different methods, which I am going to discuss in this article. Before Moving on to the methods to Fix the error, let's understand what is error 0x80042109 in Outlook.
- What is the Error 0x80042109 in Outlook?
- How to Fix Outlook Can’t Send Email in Outlook?
- Method 1: Resend the Message
- Method 2: Check Network Connection
- Method 3: Create a New Email Profile
- Method 4 : Turn on Authentication
- Method 5: Change your SMTP port:
- Method 6: Control your antivirus or firewall settings.
- None of the Above Methods Worked? Try Remo PST Repair Tool
- Tips for Using Outlook and Protecting Emails?
What is the Error 0x80042109 in Outlook?
The error code 0x80042109 usually appears when sending emails from Microsoft Outlook. The outgoing emails fail to reach the recipient, and you receive an error message Outlook cannot send emails or they may bounce back saying "Mail delivery failed returning message to sender". Keeping this issue of not being able to send emails on Outlook aside, all the other features of Outlook seem to be unaffected.
Error Outlook cannot send emails occurs because of various reasons which are mentioned below.
Why are Emails not Being Sent in Outlook?
- Excessive Junk Files
- Pending Updates of Outlook
- Incorrect account Settings
- The issue in the Mail Server is because of a poor internet connection
- Incomplete Installation of Outlook
- Corrupt email or PST
Now that we have understood the causes for emails not sending in Outlook. We will look into the various methods to fix the error cannot send emails in outlook but can receive emails.
How to Fix Outlook Can’t Send Email in Outlook?
You can follow the below mentioned methods to easily fix Outlook can’t Send Emails
Method 1: Resend the Message
- Right-click the email stuck in the Outbox, Click on Drafts folder
- Click the Drafts folder and click Send
- Check the sent folder. If the message can still be found in the outbox, proceed to the next step
Check if the recipient's email address is typed correctly. If you misspelled the recipient's email address, it could stop Outlook from sending.
Method 2: Check Network Connection
Outlook will not send emails if you are not connected to the internet. Make sure you have an internet connection.
To check if you are connected to the internet, check the lower right-hand side of the Outlook screen. If it says Working Offline, Disconnected, or trying to connect, you have not connected to the internet.
Here’s what to do:
- Disconnect and Reconnect your internet connection
- Make sure you have an active internet connection
- Click the Send/Receive tab
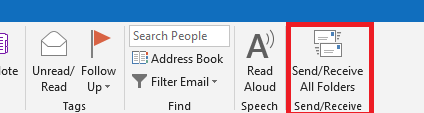
- Confirm that the email has left the Outbox folder and is in “check to see if the message is now in the Sent folder or still in the outbox
Method 3: Create a New Email Profile
Creating a new email profile is easy. You can delete the old email profile if you wish. This can be done in less than 5 minutes. The first thing to do is to Exit Outlook, then follow these steps carefully to create a new profile:
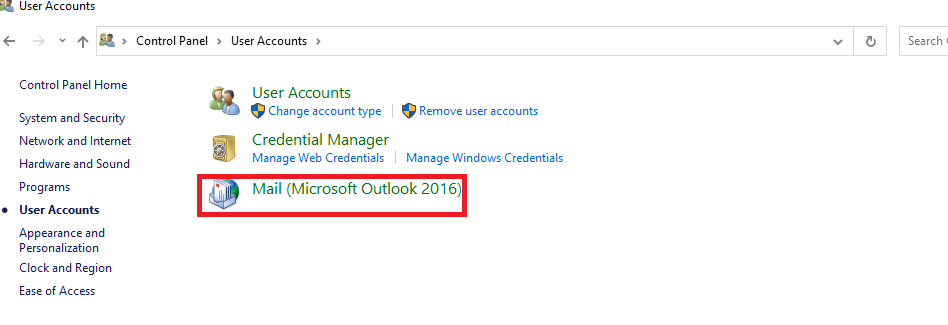
Step 1: Type Control Panel in Windows search and click Control Panel.
Step 2: Click User Account, then click Mail.
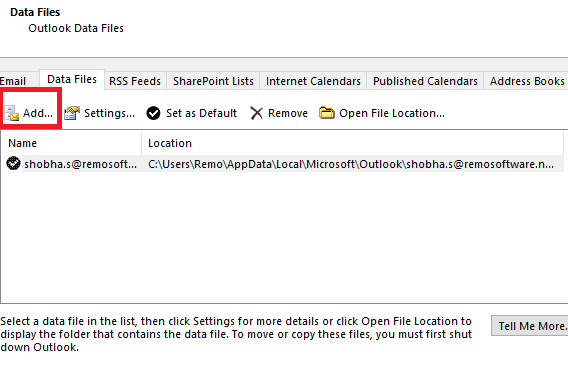
Step 3: When the Mail window opens, click Add.
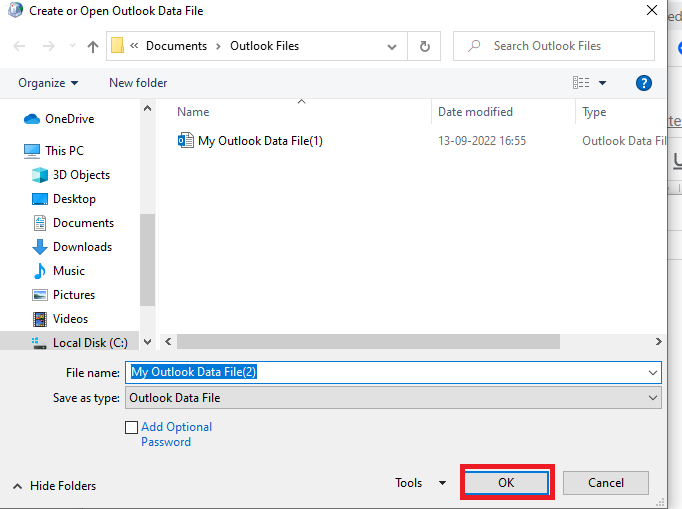
Step 4: Enter a new profile name and click on OK.
Step 5: Click Manually Configure Server Settings A new window will appear, click on internet email and click on the Next button.
Step 6: Next a dialog box with the name Internet E-mail Settings will appear.
Step 7: In the Account type settings set POP3 as the parameter.
Step 8: Hit Next and click finish to complete the settings.
Step 9: To use this profile in Microsoft Outlook, launch Outlook, click mail.
Step 10: Click on profiles, select the profile you created and click OK.
The above steps will fix the issue.
Method 4 : Turn on Authentication
Turning on authentication in Outlook is another way to fix Outlook cannot send email. To turn On Authentication:
- Go to Internet Email Setting in Outlook.
- Select the Tools menu in Outlook.
- Go to Email Accounts.
- Click View or change existing e-mail accounts.
- Click Next.
- Select an email account.
- Click on Change.
- Click on More Settings a new window will appear.
- Click the Outgoing Server tab.
- Check the option My outgoing server (SMTP) requires authentication
- Click Use the same setting as my incoming mail server and then click OK.
Click Apply and Click Finish to complete the setup
Method 5: Change your SMTP port:
The outgoing mail server uses normally port 25, but some ISPs may block it due to the increasing spam traffic that’s been passing through it. You can use then port 587 or 465.
Method 6: Control your antivirus or firewall settings.
Sometimes an outgoing mail server can conflict with the computer’s protection systems. So verify that your firewall or antivirus are not blocking it, setting up a proper exception rule
None of the Above Methods Worked? Try Remo PST Repair Tool
Incase if there is any fault in PST, you can try Remo Repair PST. Remo PST Repair Tool is the safest software to repair PST. The software is built with a robust scan algorithm and it works with read only mechanism to ensure safe PST repair.
Steps to Repair PST File
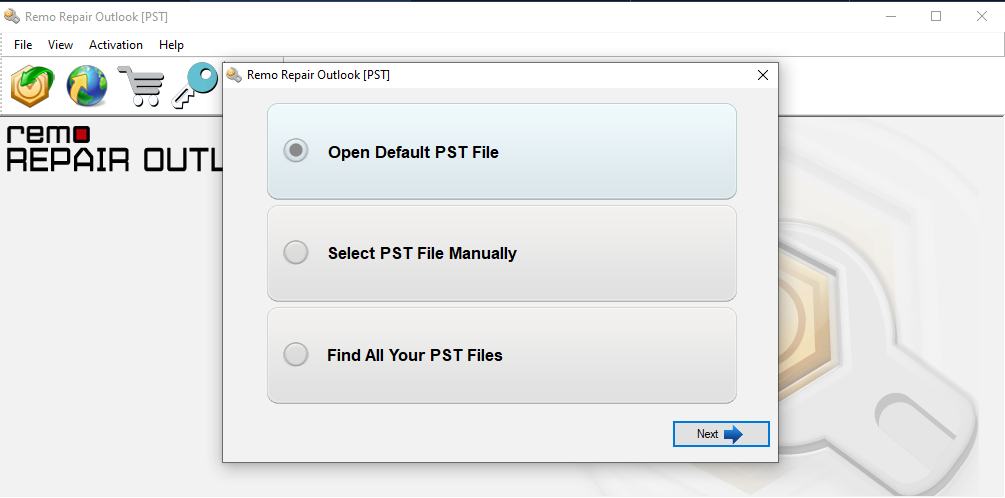
Launch the Remo Repair PST tool
- Select Open Default PST File
- Select Smart Scan option and click on the Browse button
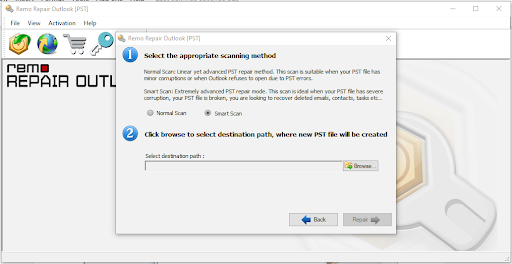
- save the repaired PST file and click on the Repair button.
Tips for Using Outlook and Protecting Emails?
By now, you would certainly be able to fix the Outlook can send emails by following the above-mentioned methods. Furthermore, consider following these tips to protect your emails
- Set up 2-factor authentication: To protect your email account, make sure the two-factor authentication feature is enabled. In this way, every time someone tries to access your account, they would have to verify it by entering a one-time generated code. The code would be sent to your phone and thus it will minimize the chances of getting your account hacked.
- Verify all the trusted devices: Outlook lets us add some trusted devices on which we can simply login without entering the authentication code all the time. Just go to your account's security settings and make sure that only reliable devices are added here.
Keep changing your password: Make sure that you have a secure alphanumeric password for your Outlook account. Also, consider changing the password of your account every few months to ensure that it won't be leaked.