AutoComplete is one of the most underrated features of Outlook. Without realizing it, we extensively use the Outlook AutoComplete list to send emails daily. It saves time by suggesting the most relevant email ID to the partially entered address in the To, Cc, and Bcc sections of the send mail window; therefore, you can avoid manually looking for a previously entered mail ID or email address.
At the same time, AutoComplete can also be unfruitful and may land you into trouble by suggesting a different sender or a misspelled email address. This doesn’t mean that you have to disable AutoComplete as a whole. This write-up is compiled to give a few valuable pointers that help anyone master the art of maintaining an AutoComplete list.
What benefits can you reap from regularly maintaining an Outlook AutoComplete list?
- The most significant advantage of the AutoComplete feature is that your AutoComplete list will store up to 1000 entries in a system file with an extension “.NK2” called nickname list or nickname cache. Hence, if you have sent mail to a recipient that does not exist in your contacts, there are chances that you might find the mail address in the auto-complete list.
- By managing your .In the NK2 file, you can prioritize which suggestions to show up and which ones to eliminate. This way, you can make space for the important ones in the future and move Outlook data file to a new computer quickly.
- Additionally, if you regularly monitor the .NK2 file by correcting it, the misspelled mail IDs stored in AutoComplete are eliminated, eradicating the chances of a wrong send.
How to efficiently use Outlook AutoComplete feature
Not all Outlook users would like an AutoComplete list popping up while composing essential emails. So, let's begin by understanding how to enable or disable the Autocomplete feature in Outlook.
How to disable or enable AutoComplete in Outlook?
1. Select Options from the File menu in Outlook.
2. Choose the Mail tab on the left side of the window.
3. Under Send messages, find the Use Auto-Complete List option to suggest names when typing in the To, Cc, and Bcc and check the box to enable AutoComplete.
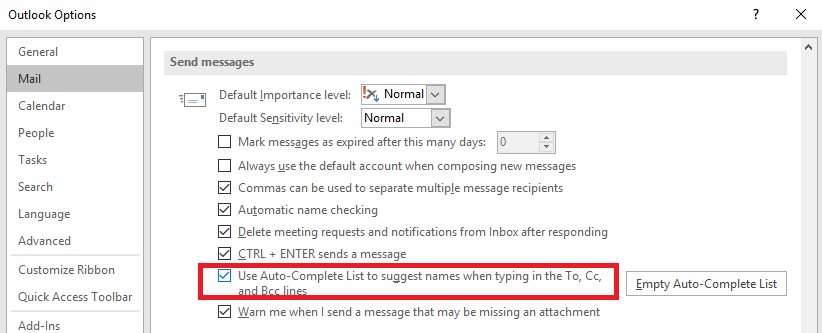
4. Uncheck the box to disable AutoComplete.
Rollback from recent people feature to the old format of AutoComplete
With the update in 2017, AutoComplete took the form of the Recent People section, showing five results as suggestions with pictures. Apart from a better visual experience, this feature makes the whole experience of auto-fill a bit cumbersome. With only five suggestions, a more significant portion of the contact information must be typed in to find the exact one needed. On the other hand, the old format of the AutoComplete list populates up to fifty easy-to-find results.
Note: Before you follow the below-mentioned procedure, create a restore point or backup registry, just to be cautious.
Here’s how to roll back from recent people in Outlook
1. Type regedit in the search bar and select Run as administrator, as shown below.

2. Copy the path below and paste it in the text box just below the file tab, as shown in the picture below, and hit enter.HKEY_CURRENT_USER\Software\Microsoft\Office\16.0\Outlook\Options

3. Now, on the right half of the screen, double-click on the DisableAutoCompletUpdate and change the Dword: Value to 1. This will revert the changes done by the Outlook update and bring back the old AutoComplete list.
Clear the existing Autocomplete list
When you start working with a new department or organization, you will no longer need many entries in the current list. The best action in this situation would be to clear all the entries.
Note: Before you clear the AutoComplete list, export Outlook contacts to a new computer or version to account for all the unsaved contacts in the list. You can also choose to remove them one by one individually, which will be talked about in the below sections, or choose to clear the entire list according to your discretion. This subsection only talks about clearing the whole AutoComplete list.
How to clear the AutoComplete list?
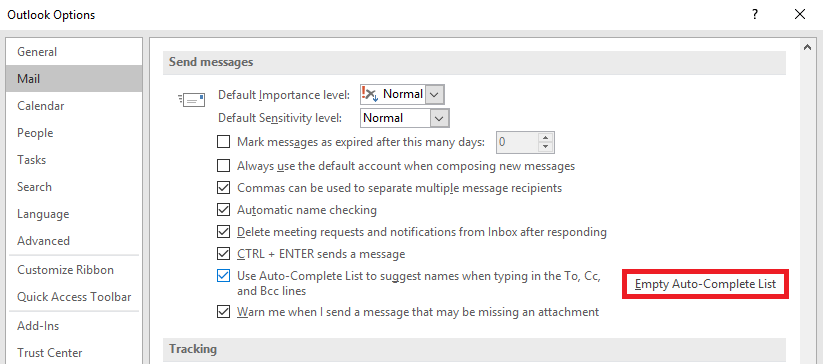
1. Go to File and select Options
2. Select Mail from the left side of the window
3. Under Send messages, click on Empty Auto-Complete List.
Refine your Auto-Complete to manage the entries efficiently
To work as designed, Auto-Complete does not only save valid email addresses. All the misspelled or incomplete entries are also added to the list.
You may also have a few items on the list that you no longer need from the .NK2 file uses the steps below to remove specific entries in the AutoComplete list.
1. Type in the alphabet or name that returns the suggestion you want to remove.
2. As you move your cursor over the suggestion you want to remove, click on the X to delete the suggestion from the list.
3. This will remove the email address from the AutoComplete list only and not from contacts.
Increase the Capacity of your AutoComplete list
As mentioned above, the number of entries is limited to one thousand in every Outlook version except for Outlook 2007, which is two thousand.
You can increase the limit to your desired number using the method below. However, it is not a recommended method as it might increase the chances of the nickname cache getting corrupted and untested.
If you still want to increase the number of entries despite the risk involved, ensure you have a backup of the registry as a precaution.
1. Press the windows button on the keypad, type in “Regedit,” and select the suggested run command.
2. Go to the following registry path using the subkey:
HKEY_CURRENT_USER\Software\Microsoft\Office\16.0\Outlook\AutoNameCheckNote: The value 16.0 in the above path should be replaced by 15.0 for Outlook 2013, 14.0 for Outlook 2010, 12.0 for Outlook 2007, and 11.0 for Outlook 2003 respectively.
3. Go to the Edit menu, click on new, and then click on DWORD value.
4. Enter the text MaxNickNames and hit enter.
5. Now select Modify from the edit menu and enter the desired value of the limit.
6. Exit registry editor.