Migrating data from my old Mac to a new Mac has been the reason why I have always stalled buying a new one. I finally bought a new Mac pro 16” and moved the data from an old one to it. This is a breeze to do thanks to Migration Assistant. In this article, I shall describe how I successfully migrated all my data using Migration Assistant and how I have explored other options like Time Machine that can be equally effective in Mac data migration.
If you have to move all your data manually, it can be a time-consuming process. You’ll have to move data from your old Mac to an external drive, then from the external drive to the new Mac. You can move your Library file (on your Mac’s drive) from one Mac to another. Even then, you’ll probably have to enter passwords, email addresses/passwords, and the like on your new Mac. However, you can avoid such hardships, thanks to Migration Assistant.
However, Migration Assistant can help move all this data — passwords, email addresses, and passwords — from your old Mac (iMac, MacBook, etc) to your new Mac. Migration Assistant is an Apple utility that easily lets you move data, user accounts, computer settings, and apps from one Mac to another — or from a drive backup. As of OS X Lion and later, it can also migrate contacts, calendars, email accounts, and other files from Microsoft Windows.
What is a Migration Assistant?
Migration Assistant can be used during the initial setup of a new Mac, which is the easiest, fastest way to set up a new computer. However, you can run it manually on a Mac you’ve already set up.
Does Migration Assistant transfer everything?
You should note the Migration Assistant doesn’t transfer the operating system of the old computer to the new one. What’s more, apps and utilities that are part and parcel of the operating system (such as Safari) aren’t transferred.
This means if for whatever reason, the Mac that you’re migrating data to has a version of macOS that’s older than the Mac you’re transferring data FROM, you’ll have to upgrade the operating system on the first computer (which I’ll refer to simply as “new Mac” from now on) in order to complete the migration process. The good news: Migration Assistant informs you that you need to do this, so you can handle the task during the migration process.
How to Transfer Files from Mac to Mac Using Migration Assistant?
Here’s how to use Migration Assistant on Mac.
Step 1) On your new Mac
° Go to the Utilities folder in your Applications folder and launch Migration Assistant. Or you can launch it via the Launch bar. Click Continue.
° Migration Assistant will ask you for permission to make changes. Enter your administrator password, then click OK.
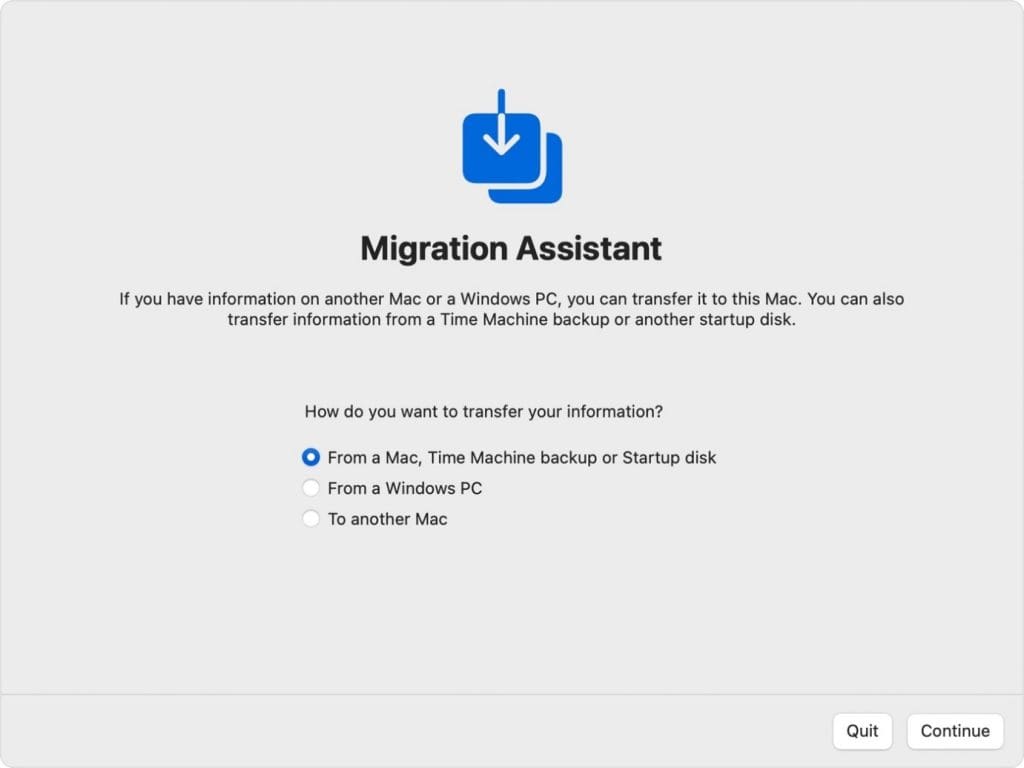
° When asked how you want to transfer your information, select the option to transfer from a Mac, Time Machine backup, or start-up disk. Then click Continue.
Step 2) On your old Mac
° Open Migration Assistant, and click Continue.
° When asked how you want to transfer your information, select the option to transfer to another Mac. Then click Continue.
Step 3) On your new Mac
° When asked to select a Mac, Time Machine backup, or other startup disk, select the other Mac. Then click Continue.
Step 4) On your old Mac
° You’ll see a security code; make sure that it's the same code shown on your new Mac. Click Continue.
Step 5) On your new Mac
° Select the data you want to transfer to the old Mac.
° Click Continue to start the transfer. If like me, you have lots of data that needs transferring, you can expect a long migration period. My most recent transfer of information from my old Mac to my new one took over three hours.
I’d recommend setting up the migration process during the evening or other times when you’ll be away from your Macs for a while. DO NOT implement the process if, for instance, you’ll need your Mac during a busy period in your work day.
After Migration Assistant is done, quit Migration Assistant on both old and new Macs. You can now log in to the migrated account on your new Mac and begin using it.
As mentioned, another option for setting up a new Mac is using Time Machine. If you’re not using it, you should as it’s not only helpful in setting up a new Mac, but it could save you a world of grief in the event of a disaster.
The app allows you to back up files on your Mac that weren’t part of the macOS installation, such as apps, music, photos, documents, system preferences, user info, and more. When Time Machine is turned on, it automatically backs up your Mac and performs hourly, daily, and weekly backups of your files.
When you use Time Machine, the utility also saves local snapshots you can use to recover previous versions of files, even if your backup disk is not attached. These snapshots are created hourly, stored on the same disk as the original files, and saved for up to 24 hours or until space is needed on the disk.
Note: Check out this article to find out how to recover lost photos on Mac after update.
How to set up Time Machine?
And if you haven’t set up Time Machine on your Mac, you definitely should. Here’s how:
° Connect an external storage device. (A Thunderbolt device will give you the best performance.)
° Open Time Machine preferences from the Time Machine menu in the menu bar. Or choose Apple menu > System Preferences, then click Time Machine.
° Click Select Backup Disk.

° Choose the name of your disk and click Use Disk. Time Machine immediately and automatically begins making periodic backups.
° If you want to start a backup manually, without waiting for the next automatic backup, choose Back Up Now from the Time Machine menu in the menu bar.
Time Machine is great for data recovery. Another great option for doing this is Remo Mac Data Recovery App. The free-to-download utility allows you to:
° Recover files, photos, and videos or any files that have been lost or deleted;
° Recover data from extreme data loss scenarios such as lost volumes or formatted volumes on Macs;
° Recover data from APFS, encrypted APFS, HFS+, HFS, exFAT, etc.;
° Accomplish data recovery from Mac-supported storage devices such as hard drives, SSDs, USB drives, SD cards, etc.
Moreover, the tool is relatively safe to use. Download and try the tool for free now!!!
Conclusion:
This article has everything you need to know about transferring data from an old Mac to a new Mac. Hopefully, you have found this piece of write-up helpful. If you have any additional questions or queries. Kindly drop them in the comment section below.