
The newest version of MacOS is finally here. If you are curious to know more about Mac Ventura. Then is article has everything you need to know about upgrading to Ventura. Starting with is your Mac machine compatible to run macOS 13, and we have also answered the most asked question on the internet. How to upgrade to Mac Ventura without losing data? We have also in this article a sure-shot way to recover deleted, lost, or missing files during or after the new macOS installation process.
Without wasting any more time, let's jump right into it.
Table of Contents:
- Why should you Upgrade to Mac Ventura?
- Is your MacBook or iMac compatible with Ventura?
- How To Upgrade to Mac Ventura without Losing Data?
- How To Upgrade to Mac Ventura?
- How To Recover Files Lost After Installing Mac Ventura?
Why Should you Upgrade to Mac Ventura?
Mac users are in dilemma whether they should upgrade to Ventura or keep using Monterey or Big Sur and wait for some more time.
Ventura is a feature-loaded Operating system, here are the most impressive features.
- Camera Continuity
Most webcams do not offer high-quality and high-resolution images. Which forces the user to pay a few hundred additional bucks and get external webcams.
Apple has solved this issue by letting users connect and use their iPhones as webcams. Which results in better and high-quality images and crystal-clear video and facetime calls.
- Revamped Apple Mail
Apple's very own Mail utility has also been improved with a lot of exciting features which puts Mail in the likes of Gmail, Outlook, and other Mail service providers.
The newer features include scheduling emails, and unsent emails, auto-detects the missing attachments, and informing you of them. Improved search makes it extremely easy to search for emails, contacts, and other attributes effortlessly.
- Spotlight is now designed to work more smoothly
You can now flawlessly search for the location or the people in the images. With just one search to get all the information you need using rich results, you can now find a specific image that contains any particular text using Live text.
Let us also have a quick look at the reasons why you shouldn’t Upgrade.
- Few third-party applications might not be compatible with the latest versions
- The tool might also not let you utilize a few features. The earlier versions of any OS is called developer beta version, followed by a final release called public beta.
- The newer version might also have a few bugs and glitches.
Now that you are aware of the pros and cons of upgrading to Ventura. and if you have decided to install Ventura OS of your Mac machine. Then lets quickly check the compatiblity of your system with the macOS 13.
Is your MacBook or iMac Compatible with Ventura?
No matter how good is the newer version. It also comes with certain requirements. Following is the list of all Macbooks and iMacs which can be upgraded to Ventura or macOS 13.
- MacBook 2017 or later
- MacBook Pro 2017 or later
- iMac 2017 and later
- iMac Pro 2017 and later
- MacBook Air 2018 or later
- Mac Mini 2018 or later
- MacPro 2019 or later
- Mac Studio 2022
In short, any device you have bought post-2017 can run Ventura.
If you are wondering if you will lose your data after updating your Operating system.
Then the short answer is at the same time yes.
The reasons for data loss can be anything such as bugs and glitches, or hardware problems.
Interruptions during the installation process, improper installation of the OS, loss or no space on the disk, etc. The end result is always one thing Data loss.
Worried about losing data after upgrading to the latest macOS aka Ventura?
Then we recommend you go through and follow the next section to find out how to upgrade to the latest version of Mac without having to worry about losing data.
How To Upgrade To Mac Ventura Without losing Data?
The easiest way to make sure you don’t lose data. Is done by taking a backup of the entire system and saving it on any external device or the cloud. Once done with the upgrading process, restore the backup and you are good to go.
And what better way to take a backup than utilizing a Time Machine?
Now that you know how to upgrade to mac ventura without losing data. Lets start the OS upgradation process.
How To Take a Backup of MacBook or iMac Using Time Machine?
Time Machine is a built-in backup utility in Mac systems. That lets users take backups of files as folders that can be restored and used in the unfortunate events of data loss.
2 Easy Steps To Take Backup Using Time Machine
Step 1: Select the Appropriate Hard Drive
Select any external hard drive that has enough space to store your entire data. Also, make sure the drive is formatted with macOS compatible file system.
Step 2: Put up the Time Machine and Begin the Backup Process
- Connect the drive to your Mac system.
- Find the System Preferences option, followed by clicking on Time Machine
- Choose the Select Disk option and choose the drive which you have connected.
- Check the Back up Automatically option. This allows the Time Machine to automatically create backup files. Also select show Time Machine in the menu bar option.
- Once the Time Machine setup process is completed, the Utility will start to take a backup of the entire system.
Now that you have taken a backup and saved the files on an external storage device.
It's time to upgrade your OS.
How To Upgrade Your MacOS to Ventura?
Follow the instructions mentioned below carefully to install Ventura.
1: Launch System Preferences after clicking on the Apple icon from the top-left corner of your screen.
2: Find and select the Software Update option to verify it the update is available or not.
3: Find the latest version available and click on Upgrade Now option.
4: Agree to the Software License Agreements.
5: The installation process begins, it might take a few minutes to a few hours to complete the upgradation process.
6: Once done, your Mac will restart itself.
There you go, you have now successfully upgraded to Mac OS 13.
It’s time you restore the backup files. Follow the next section to find out how.
How to Restore the Backup Data Using Time Machine?
Step 1: Restart your Mac system where you have installed the new OS, Hit the Command + R keys. You will be taken to Mac Recovery Mode.
Step 2: When you are in the Recovery Mode, Click on the Restore from Time Machine Backup option and click on the OK button.
Step 3: A list of all available backups taken using Time Machine will get displayed on your screen. Select the appropriate one and continue.
The backup restoration process will get started, wait till the completion of the entire process.
That’s how you back up the entire system info and restore the same.
Hopefully by now you have successfull upgraded to Mac Ventura OS without losing data.
If you have lost data during the OS upgradation process. Do not worry, follow the next section to find out about a proven solution for retrieving data and lost files from any Mac system.
How To Recover Missing Data or Lost Files During The Mac Ventura Update?
Data Recovery from a Mac system becomes a cakewalk when you have tools like Remo Recover for Mac. A robust yet easy-to-use tool to recover data from any data loss scenario.
The tool is completely result-oriented rather than problem-oriented, meaning the tool is thoughtfully designed to recover data, files, or folders. That was lost due to any reason.
The powerful algorithms can dive deeper into the drive to perform a thorough scan to identify and retrieve more than 500 types of files.
Download the tool now and recover files with just a few simple clicks.
How To Use Remo Recover For Mac to recover lost Files?
Step 1: Download and install Remo Recover For Mac on your Mac System.
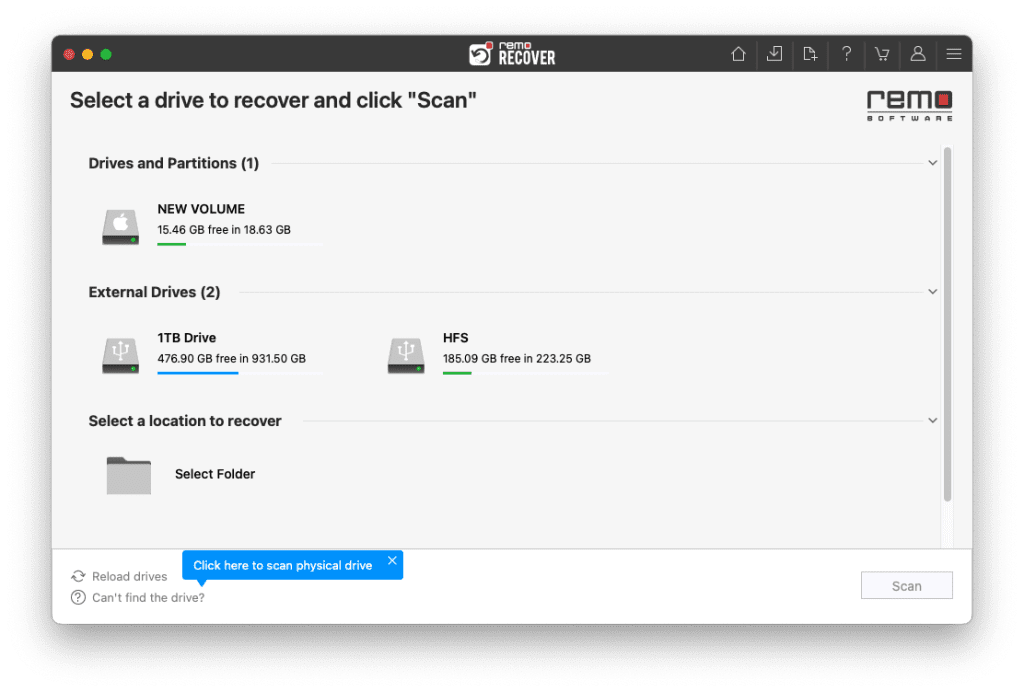
Step 2: Launch the tool, select the volume or drive from which you want to recover data, and click on Scan.
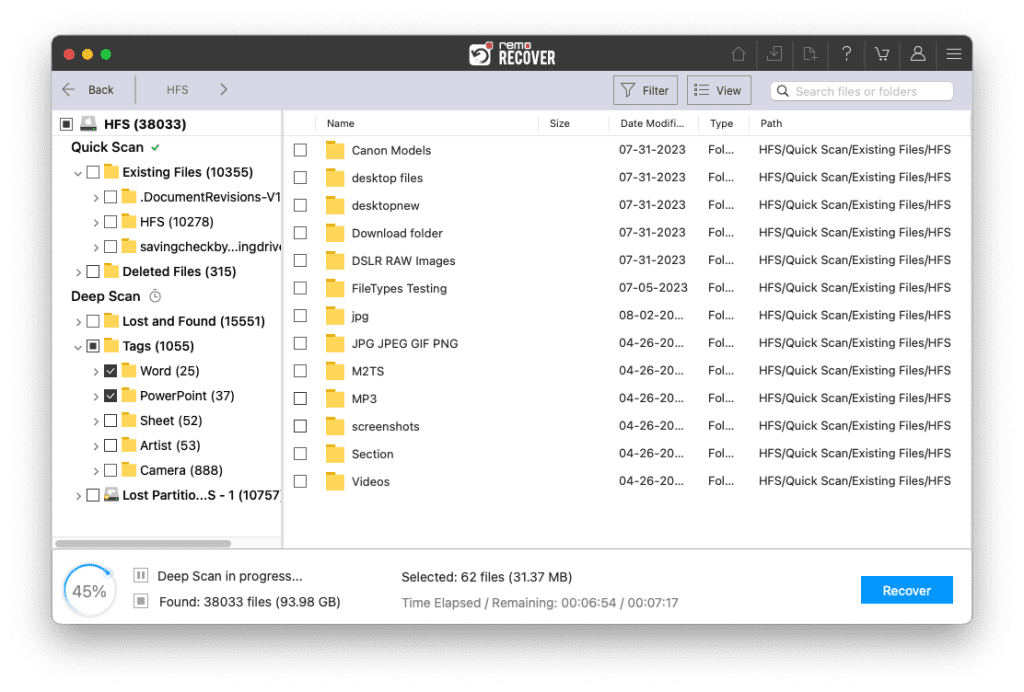
Step 3: Click on Dynamic Recovery View to see the files as they are being recovered and locate the files that want to recover which can save you a lot of time.
Step 4: Double-click on the file to preview it.

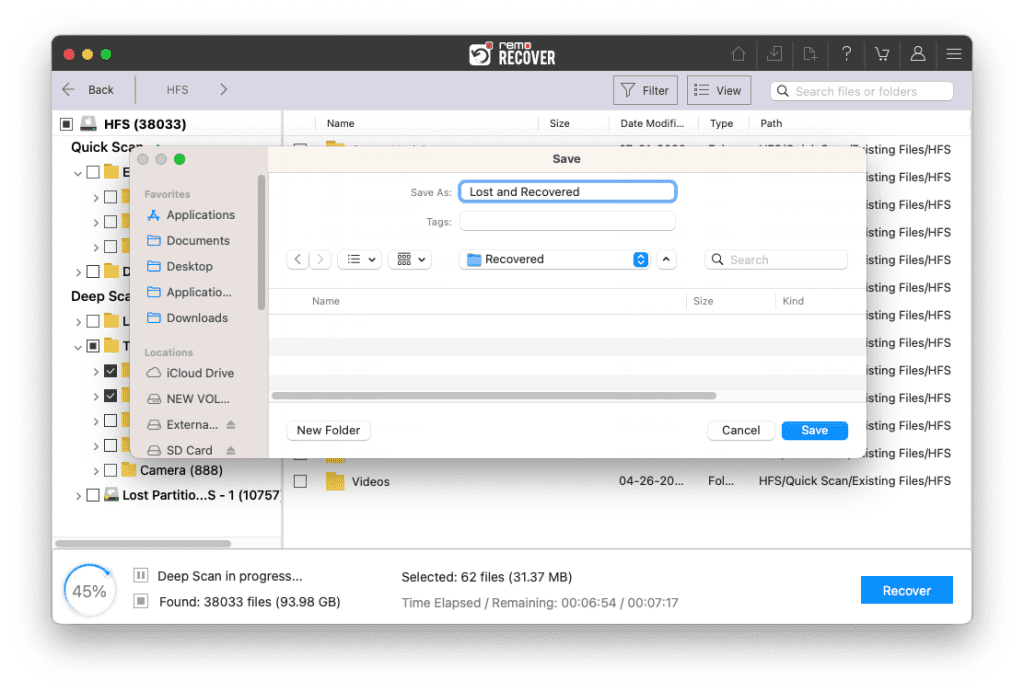
Step 5: If you are satisfied with the recovered files, just click on Recover to save the files in your preferred location.
Hopefully, by now you have safely recovered your lost files from your Mac system.
Frequently Asked Questions
You can make use of third-party backup tools some of them are free and you have to pay for some of those tools.
If you have decided to not use Ventura for whatever reason, you can easily go back to Monterey.
The possible reasons include incompatible applications, the performance of your Macbook has been drastically decreased, apps getting crashed regularly, etc.
Time Machine, macOS Recovery, and Bootable installer are three of the most common ways to downgrade your macOS.
You can easily make use of Remo Recover Mac to safely get back lost or missing files and folders as well as recover deleted files from Mac Ventura with absolute ease.
As explained earlier in the article. The macOS 13 is compatible with all the Apple devices that were released after 2017.