Add Inline Pictures to Your Outlook Emails
Sending Emails from Outlook is a great experience for every user. Over the years, Outlook has become one of the most used applications in computers. Why not! It has all the features to make your messaging enormously easy and convenient. At the same time, it has added features to make your emails look great. Most of the time we attach images within the email to send it to someone. However, Outlook also gives you a feature to insert pictures in Outlook email itself.
Many times, we want to send images, relevant to our text within our emails. These pictures need download separately and you can view them in a different window. This decreases the interest in your email or eliminates the relevance of your text and picture. Adding an inline picture to your emails can give them an all-new experience. This can be vital for many commercial, personal, and general emails.
How to Insert Inline Images in Outlook
You can add inline images to the mail body inline with your text in Outlook. Here are a few simple steps to do it:
Note: Make sure to use HTML formatting while you compose your mail.
Step 1: Use the mouse to point the cursor in the position where you wish to insert an image.
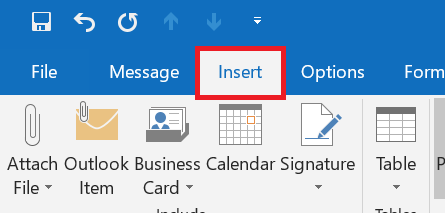
Step 2: Go to the Ribbon and access the Insert Tab.
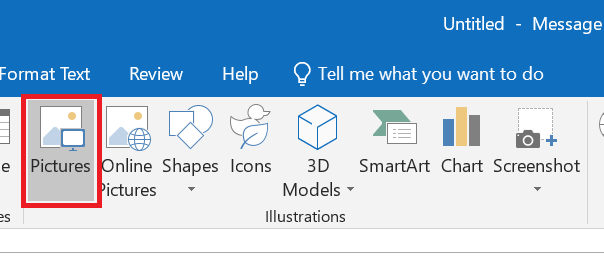
Step 3: Go to Illustrations
Step 4: Click on Picture (You can opt to use the image from an online source or One Drive).
Step 5: Find and select the image you wish to insert – You can also use more than one image, just hold CTRL while you select images.
Step 6: Click Insert.
This will insert the image or images to your email in line with the text. One can reposition the picture and use other functions related to it. Right-click on the picture for more options like adding a link or text.
The above steps hold true for updated versions of Outlook like Outlook 2013. If you are using Outlook 2007, it has some other options to do the same task. Here are the steps that you will require to insert pictures in line with the text in Outlook.
Outlook 2007: Insert Pictures Inline in Outlook Email
Outlook 2007 has some different menu options, unlike the higher versions. So in order to perform the same task in Outlook 2007, you have to go through different steps. Here are the steps to insert Images in line with the text in your email.
Note: Make sure to use HTML formatting while you compose your mail.
Step 1: Place the pointer and position the cursor in the designated spot of your image.
Step 2: Click on the Insert Tab.
Step 3: Go to Pictures.
Step 4: Browse your images and select the picture.
Step 5: Click Insert.
Step 6: If you wish to add an image online, go to the web page and drag and drop the image into your message.
Step 7: Click Allow to allow adding of an image from an online source.
This will add an image to your message text and make the email look more attractive. You can add an image to your emails using Outlook 2007, 2003, 2002, etc. While using Outlook 2002 and 2003, you can get an option button with a different appearance.
A number of users have suffered from the loss of profile information. Sometimes due to overloading or accumulation of a huge data in Outlook. Alternatively, corruption of PST files may affect the profile information. In such times, a user always wonders, how to repair my Outlook profile 2007, 2003, etc. It is better to avoid such situations by keeping backups of your PST files and keeping Outlook functional and bug-free.
Adding an image to your signature or email is an added advantage for you. In most of the messages sent by users, an image is required. It not only makes the message look attractive but also adds more weight to your emails. With these simple and easy steps, you can make add pictures to your email before sending it to anyone. This also helps, avoid attachments within the mail, which is great as many of the attachments remain unseen. You can also add a background image to enhance that personal touch.