We often come across files that are of utmost importance, but we do not need to access them regularly. For most of us, this can be a slight inconvenience because we realize that these files end up taking up a lot of space on our system or hard drive. However, we cannot afford to delete these files. So, what can we do when we need the space but cannot manage it by keeping all these files? Are you curious about the simple solution to keeping these files and creating more space? Then, continue reading...
The easy and simple solution is to compress these files. It is an easy way to back up these important files and a simple solution to create more space. NTFS, which stands for New Technology File System, is one of the ways to compress your files. To learn more about NTFS compression, continue reading.
What is NTFS Compression?
NTFS, which stands for New Technology File System, is the default file system used by Windows operating systems. NTFS compression is a feature that allows you to compress files and folders, reducing their size on the disk. This compression technique is lossless, meaning it doesn't affect the quality of your data.
When do you create and Use NTFS Compression?
The answer is as easy as it can get. Whenever you have an important document like an account sheet from a few years ago or a medical record that you need but do not refer to often. These are a few examples of important documents that are required, but you do not have to open these files regularly. It is then that you create and use NTFS compression. At the same time, you can also use this as a backup for your files. You can also use this to save space as most of these files can take up a lot of space, and if you need space for every important current file, you can always use NTFS compression.
Every time you open that file that has been compressed, you end up decompressing it. And every time you close the file after reading it automatically compresses it. Remember, this is for an already compressed NTFS. So, now the main question arises.....
How do you use NTFS Compression?
Using NTFS Compression is simple and easy. Just follow the instructions below. Remember, this is for backup purposes and not for frequent access. Here are the steps to compress files using NTFS Compression:
- Create a folder called 'Accounts,' and within that folder, create another new folder named 'Accounts 2010.'
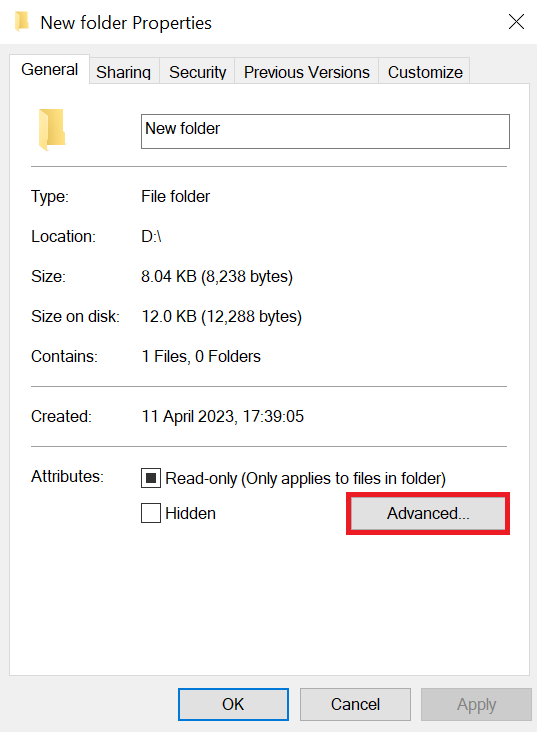
- Now, go back to the 'Accounts' folder, right-click on it, and select "Properties" from the dropdown menu.
- In the 'Accounts Properties' window, click on the 'Advanced' button.
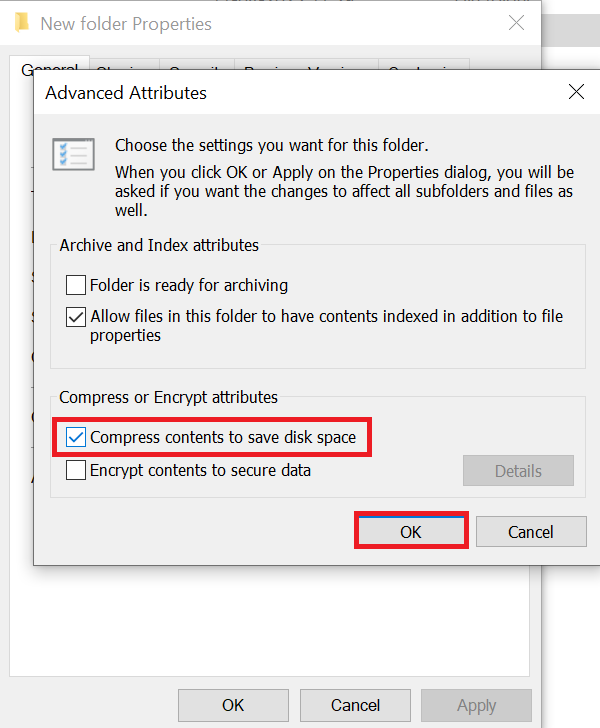
- In the new 'Advanced Attributes' window, check the box that says 'Compress contents to save disk space,' and then click 'OK.'
- Once you click 'OK,' a new window will appear, giving you the option to choose whether to apply changes to 'This folder only' or 'This folder, subfolders, and files.' Select the option that suits your requirement and click 'OK.'
- Once this is done, your 'Accounts' folder name will be displayed in blue, indicating that it is compressed.
One of the key advantages of this method is that you can have both compressed and uncompressed files in the same folder. If you want to keep a file uncompressed, simply open the file you wish to keep that way and follow step 4 again, but this time uncheck the box for 'Compress contents to save disk space' and click 'OK.' This will leave you with both uncompressed and compressed files within the same folder.
Also Read: NTFS Vs FAT32: What is Right for you?
When To Use and When Not to Use NTFS Compression
Now, you might be wondering when I use this NTFS compression. It is recommended as a backup for files you do not open often. The more often you compress and decompress the folder you end up wearing it out then you are more likely to have the files stored and scattered in different spaces. So, it is suggested that you use NTFS compression on documents you don’t use, mostly accounts or folders of the past that are important but not used often.
Also Read: How to Recover Data From NTFS Partition.
Use Cases for NTFS Compression
NTFS compression is particularly useful in scenarios such as:
- Archiving infrequently used files.
- Reducing the disk space used by system files.
- Managing documents and files with limited access.
When Not to Use NTFS Compression
Avoid using NTFS compression in the following situations:
- Files that are frequently accessed and modified.
- Already compressed files (e.g., ZIP archives).
- Applications or files that specifically request not to be compressed.
Note: While doing all of this, sometimes it can get a bit tricky, or if you are in a hurry and you end up formatting an NTFS partition, then don’t panic. These things happen, and luckily, there is a solution. Simply go ahead and read and learn how to unformat a formatted NTFS partition.
Benefits of NTFS Compression
NTFS compression offers several advantages, including:
- Reduced Disk Space: Compressed files occupy less space, allowing you to store more data on your drive.
- Improved Read/Write Speed: Smaller files are quicker to read and write, enhancing overall system performance.
- Backup Efficiency: Compressed files require less backup storage space.
- Increased Lifespan of SSDs: NTFS compression can extend the life of solid-state drives (SSDs) by reducing write amplification.
Drawbacks and Considerations
While NTFS compression is beneficial, it's essential to be aware of its drawbacks:
- CPU Overhead: Compressing and decompressing files consumes CPU resources.
- Not Suitable for All Files: As mentioned earlier, some file types should not be compressed.
- Limited Compression Ratio: NTFS compression may not significantly reduce the size of already compressed files.
Conclusion
NTFS compression is a valuable tool for optimizing disk space usage and improving system performance. You can make the most of this feature by understanding when and how to use it without compromising your data. Remember to monitor your storage and consider the nature of the files you compress.