Windows

How to Fix Blue Screen Memory Dump Error on Windows PC?

6 minutes read

Are you facing a blue screen memory dump error on your Windows? Wondering how to fix it? Then this article is for you. In this article, we will discuss some of the quick and easy ways to fix the error.

blue screen memory error

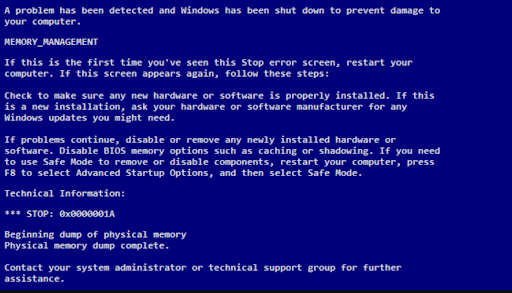
Image: Memory Dump Error

The Blue Screen of Death is commonly called as the “message box in full screen mode” by the technical people. Whenever you come face to face with such a screen, say by yourself, you are going to have a major or minor data loss immediately.

The blue screen with system memory dump error screen will pop just before the system gets rebooted or sometimes during any operation. This is because the Operating System will no longer function properly at that instance of time. The content of RAM will be dumped onto a single data file. So that the .dll files of the Operating System gets stalled and results in blue screen of death (BSOD). Finding and repairing this issue gets tricky. At times it is difficult to find out the type of error from the available information on the blue screen. Worry not. In this article, we will discuss how to fix blue dump errors on your Computer. 

Reasons Behind Blue Dump Error on your PC

  • Some virus files like rundll32.dll have the potential to stall the information flow from the hard drive to the Operating System or change the registry settings that contains the index of the needed .dll or .exe files which ultimately results in blue screen dump error problems.
  • Forcing the Operating System to access incompatible hardware components will lead to blue screen with a system memory dump error
  • If the blue screen displays messages related to UNEXPECTED_KERNEL_MODE_TRAP then check for irregular or incompatible RAM memory in your PC and investigate the CMOS for issues. If the both were well and good, finalize that your processor is the root cause.

Note: In case of other common problems, refer to common computer error messages.

How to Fix Blue Screen Memory Dump Error on your Windows?

Method 1: Run Windows Diagnostic Tool

To run Windows diagnostic you need to navigate to the Windows Update and Security.

  • Go to the Search Bar type Update and Security.
  • Now select the Troubleshoot option, select the troubleshooter for your issues like Bluetooth, Keyboard, Windows Update, etc.
  • If your troubleshooter is able to detect the issue then it will suggest you to resolve it by automatically repairing Windows.

Alternative Method: Run Windows Memory Diagnostic Tool

  • In the Search Bar type Windows Memory Diagnostic tool and select Restart now and check your problem option.
  • Now your Windows PC will restart, the Windows Memory Diagnostic tool will verify any issues on your Windows computer.
  • Once your computer reboots normally, open the Event Viewer application from your Search Bar and verify if your issue is fixed or not.

Method 2: Run System File Checker

  • Go to the Search Bar and type Cmd and select Command Prompt as Administrator.
  • Now type the command Chkdsk /r and hit Enter.
  • Now type Exit to exit the Command Prompt and restart your Windows computer.

Method 3: Run Startup Automatic Repair

  • To run the startup automatic repair, insert your Bootable CD and restart your PC.
  • You will be promoted to a window stating Press any key to boot from CD or DVD, select key based on preferences.
  • Select Repair your computer option. Now navigate to the Choose an option Windows and select Troubleshoot option.
  • On the Troubleshoot screen select Advanced options.
  • And in the Advanced Options Window select Automatic Repair.

Wait till the repair process gets complete. Now restart your Windows computer. 

How to Recover Data Lost Due to Blue Screen Dump Error?

To recover data lost due to blue screen dump error we recommend you make use of Remo Recover.

The Remo Recover tool is built with a deep scan algorithm that scans every sector of the drive to get back the data. The tool is compatible with all the Windows versions including the latest Windows 11. Download the tool now and start recovering the lost data.

Step 1: Launch Remo Recover tool on your Windows and select the drive from where you want to recover your data.

Step 2: Click on the Scan option. Once the Quick Scan completes the tool will automatically initiate Deep Scan

Step 3: Once the scan is completed the tool displays the recovered files in the Tree Structure

Step 4: You can Double click on the files to Preview them.

Step 5: Finally, select the files which you want to restore and click on the Recover option.

Also Read: How to Bypass “Publisher Could Not Be Verified” Warning in Windows 10?

Conclusion: 

In this article, we have discussed the reasons behind the error “Blue screen memory dump” and some of the methods to fix this error. These types of catastrophic situations might occur any time. Hence it is suggested to take a backup of your important files. In case you have not taken the backup then you can make use of the Remo Recover tool. 

If you have any further queries related to this topic, you can post your queries in the comment section.

Molly OwenMolly is the Lead Technical Specialist with distinguished knowledge and understanding of Mac computers and operating systems. Being a veteran photographer and video recovery specialist, Molly’s expertise in video formats and file repair has helped restore a lot of videos and cherished memories of users. As a technical specialist, she also believes in learning and…