Is your computer stuck in a loop showing an error message Preparing Automatic Repair or Automatic Repair couldn’t repair your PC? Follow this guide and you can boot in your Windows again safely.
Methods to Resolve Windows Preparing Automatic Repair
We have compiled the easiest, most effective, and safest methods that you can use to resolve computers stuck showing the Windows Preparing Automatic Repair message.
Table Of Contents
Method 1: Hard Reboot your Computer
Hard Reboot can resolve many issues and is the easiest and safest to perform. It is the least risky method so try it first. To perform a hard reboot.
- Press and hold the Power button to forcibly shut down the PC.
- Remove all connected devices and power connections. Remove the battery in case it is detachable.
- Wait for 15-20 seconds for the residual charge in the components to subside.
- Again press the Power button to turn on the computer.
If the issue is not resolved move on to the next method.
Method 2: Try another Boot Device
Try using another boot device like Live Linux USB or another hard drive with a working Windows installation. This is to check whether the device can boot using another OS. If the device can boot up then the problem is specific to your Windows Installation, but if it is still unable to boot it is highly likely that there are issues with the hardware.
Method 3: Check for Hardware Health
In case, you suspect hardware issues, here is how you can confirm it.
- Remove all external devices and boot the computer in safe mode as explained in the next method.
- Check your Hard Drive and RAM for any issues.
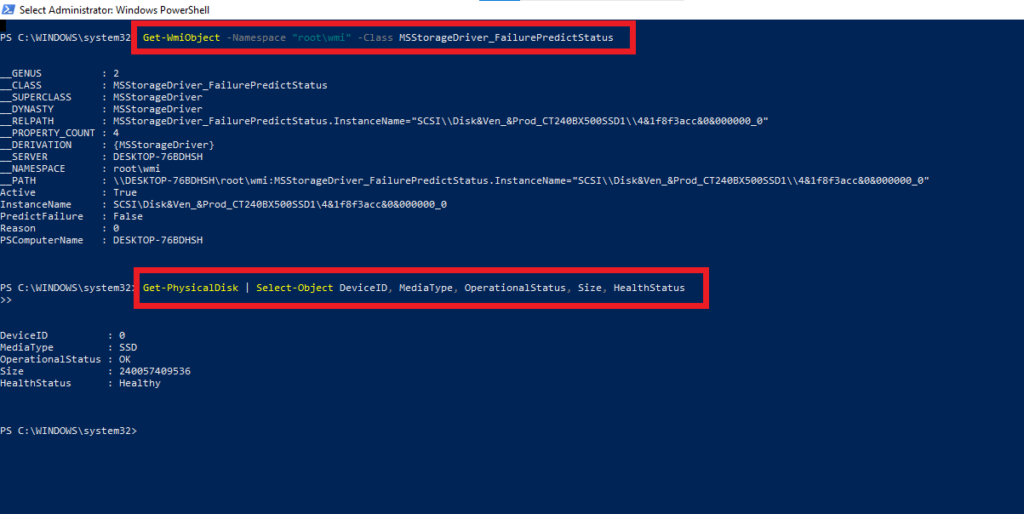
- To check your hard drive go to the Windows menu and run Powershell as administrator. Enter the commands Get-PhysicalDisk | Select-Object DeviceID, MediaType, OperationalStatus, Size, HealthStatus and Get-WmiObject -Namespace "root\wmi" -Class MSStorageDriver_FailurePredictStatus. You can also use third-party software to monitor your hard disk health.
- To check your hard drive go to the Windows menu and run Windows Memory Diagnostics. Choose the memory test and restart the computer. After the computer restarts you can check the results in the Event Viewer under Windows log labelled as MemoryDiagnostics-Results.
- If issues are found you may need to replace the faulty hard drive or RAM module. Consult a technician for further diagnosis of the hardware components.
Note; You should recover data from the hard drive before replacing it. Use Hard Drive Data Recovery software a safe, fast, and effective data recovery tool.
- Check if the cooling fans are running properly and the device is not getting overheated. This can also cause issues.
If there are no hardware issues but the Windows installation is faulty follow the following methods to resolve the problem.
Method 4: Boot into Safe Mode
Booting into safe mode does not resolve the problem but helps identify the cause of the problem and helps perform other methods with ease. To boot into safe mode.
- Wait till the Automatic Repair completes. You will get a message stating Automatic Repair couldn’t repair your PC and the Advanced options will be present next to the message. Select this option.
- In the Advanced options menu, select Troubleshoot.
- Then, choose Advanced options again.
- Select the Startup Settings option.
- Click on the Restart button.
- From the list of startup options, press the appropriate key (usually F4 or F5) to boot into Safe Mode or Safe Mode with Networking.
After entering Safe mode you can perform troubleshooting methods as follows.
Method 5: Repair System Files
A corrupt, damaged, or missing system file can also cause your PC to stuck showing the Preparing Automatic Repair issue. To resolve this it is important to keep the system healthy.
You can do so by the following steps
Run SFC Scan
SFC or System File checker checks the system file integrity and repairs in case problems are found. The steps to run an SFC scan are as follows.
- Press Windows + R. Type cmd and press Shift + Ctrl + Enter to run the Command Prompt as administrator.
- Type sfc /scannow and press enter.
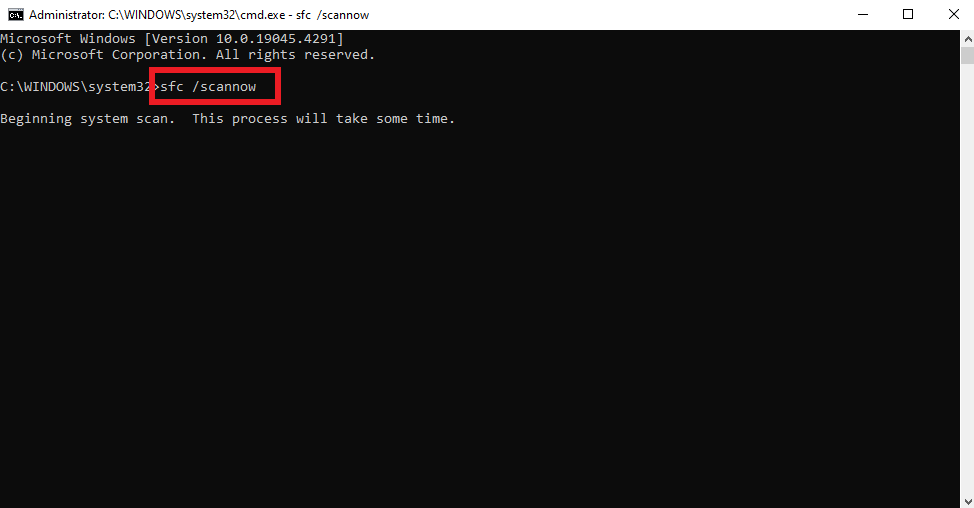
- Follow the on-screen instructions in case any issues are found.
If the problem isn’t resolved or no problem was found move on to the next step.
Run DISM
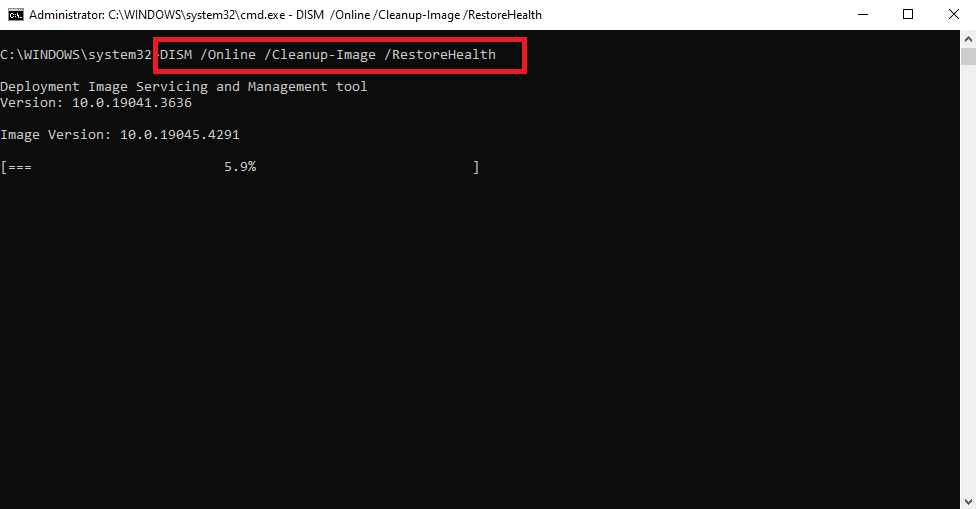
DISM (Deployment Image Servicing and Management) is a command line utility in Windows OS that services and manages Windows images (WIM files). It can repair Windows images, restore system health, and can also perform other maintenance tasks. This is particularly useful for customizing Windows installations or repairing corrupted system files. To use DISM to restore system health follow the steps.
- Run Command Prompt as administrator as explained above.
- Type DISM /Online /Cleanup-Image /RestoreHealth and press enter.
Once the process is completed restart your system to check if the problem is resolved.
Note: In case, the DISM is not able to retrieve the necessary files, you may need to provide the necessary source for the repair files. This can be a Windows Installation DVD or USB drive containing Windows Installation files etc.
Method 6: Extend the System Reserved Partition
When the size of the system reserved partition is inadequate and the partition becomes almost full it can cause problems with the system file execution and in such cases, it is best to extend the size of this partition. You can do this, just follow the steps as shown below.
- Open Command Prompt as administrator.
- Type diskpart and press Enter to open the Diskpart command-line utility.
- Type list disk and press Enter to display a list of disks on your system.
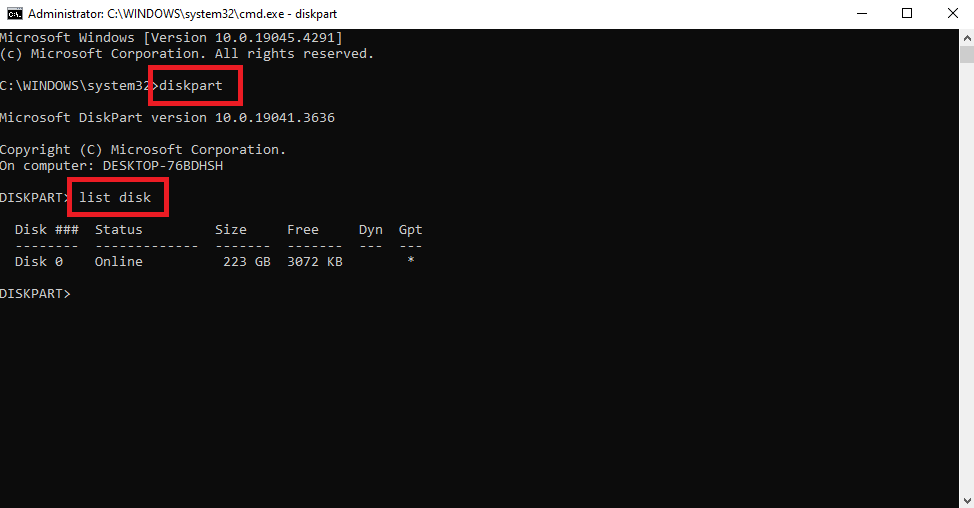
- Identify the disk containing the System Reserved partition (usually Disk 0).
- Type select disk 0 (replace 0 with the disk number) and press Enter.

- Type list partition and press Enter to display a list of partitions on the selected disk.

- Identify the System Reserved partition in the list.
- Type select partition 1 (replace 1 with the partition number of the System Reserved partition) and press Enter.

- Type extend size=123 (replace 123 with the size you want to extend the partition by, in MB) and press Enter. If you want to use all available space on the disk, you can simply type extend.
- Type exit and press Enter to exit the Diskpart utility.
- Restart your computer to apply the changes.
Method 7: Reset your Windows
If nothing else works the last option you can try is by resetting your PC. Although, in modern computers, you can reset your PC without removing any data it is still better to be safe and make a backup of the data before proceeding. To reset your computer follow the steps.
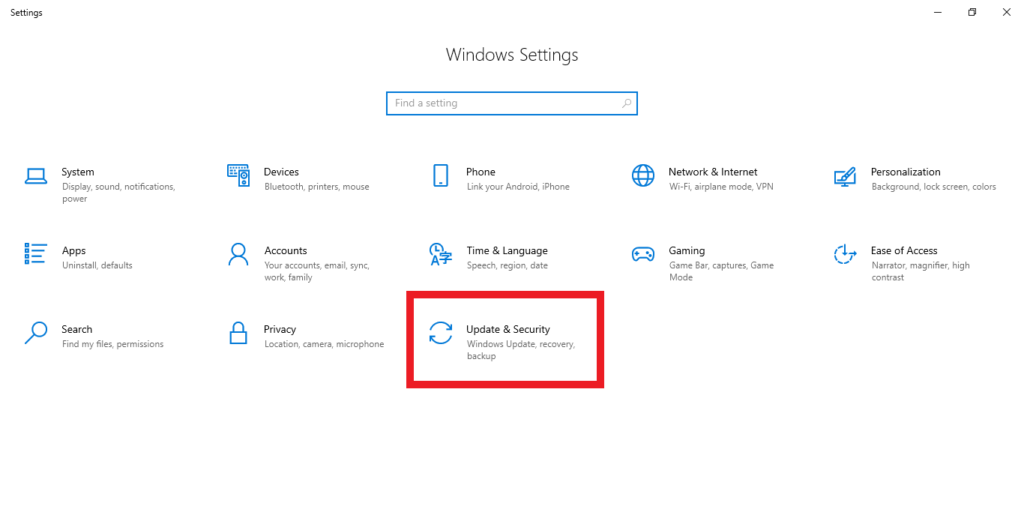
- Press Windows + I to open the Windows Settings.
- Select the option Updates & Security.
- Go to the Recovery tab and select the option Reset this PC.
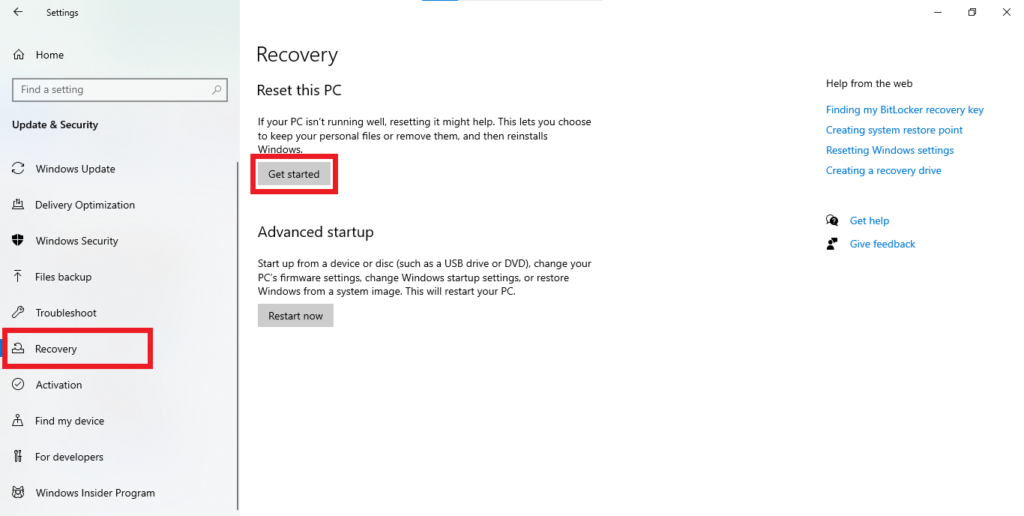
Follow the on-screen process to finish the process.
Conclusion
By following the simple 7 methods you should be able to resolve the issue of Windows Preparing Automatic Repair loop during boot. If you are still unable to resolve the issue, it is best to contact your PC Service Center.
If you found this article helpful, please share.