At times, Windows users encounter situations where their computer starts behaving in a problematic way. These problems include booting issues, an unbootable PC, repeated system restarts, a Blue Screen of Death, a system running slow or having other performance issues, frequent system crashes, various types of Error messages, a system not running smoothly, Windows update issues, or issues with the operating system or the system files. All of these prevent you from accessing your system and your files. Thereby disrupting your workflow and hampering your productivity. Leaving you wondering what might have gone wrong and what can be done to fix the issue.
This article is here to help you repair your Windows without losing data. We have discussed solutions like restarting your system, running an SFC scan, Startup Repair, and Restoring your system; if all of these solutions fail to repair your system. You can reinstall Windows OS to help you troubleshoot various issues, errors, and problems that are stopping your system from working properly.
Before we proceed any further, it's crucial to emphasize the importance of backing up your data before attempting any system repairs. This step is highly recommended as it can help prevent potential data loss, a common issue that many Windows users face during system repairs.
If you are unable to access your data. You can try specialized data recovery tools like Remo File Recovery Software to help you recover inaccessible data from any Windows system running on any Windows OS.
If you have taken a backup of your important data or file, you can directly start the repair process.
How To Repair Windows 11, 10, and Other Older Versions?
This section provides some of the most common solutions to help you repair Windows and troubleshoot various issues.
Starting the list off with the simplest solution first.
Solution 1: Restart Your Computer System
At times, a simple restart can do wonders. However, various issues might arise due to temporary glitches or conflicts, unresponsive hardware or devices, system files loading incorrectly, minor software glitches, etc.
Simply restarting your system can help you clear things up. Restarting your system in the correct manner could potentially fix your Windows system and allow you to regain control.
Restarting your system won’t help if the issue is severe or requires serious help.
If you are unable to boot your Windows system normally. You can try booting it in Windows Recovery Environment or Safe Mode.
Solution 2: Run SFC Scan
The SFC, or System File Checker tool, scans and repairs corrupt system files. These files are necessary for the smooth functioning of the Windows system. If they become corrupt, users might experience various issues like system crashes, face error messages, or encounter unexpected behavior.
Therefore, repairing system files by running an SFC scan should be the first step to diagnosing and fixing the problem.
However, an SFC scan also has certain limitations. For example, it only focuses on protected system files and might not resolve issues triggered by software conflicts, virus or malware attacks, hardware failure, etc. Additionally, it might not be able to repair severely corrupted system files, which can be due to permission issues that may stop the tool from replacing the files.
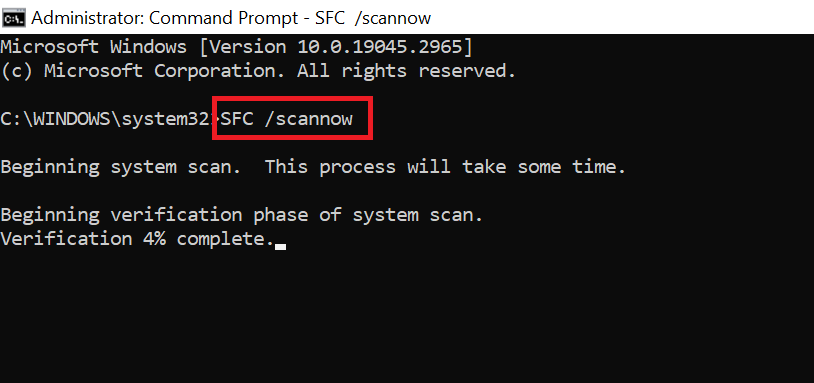
Steps To Run SFC Scan
- Run the command prompt as an Administrator.
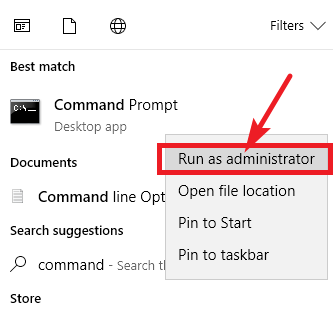
- In the Command Prompt window, type in “sfc /scannow” command and hit the Enter button.
- Wait for the scan to complete.
- Upon the scan is complete. You might receive either of these messages.
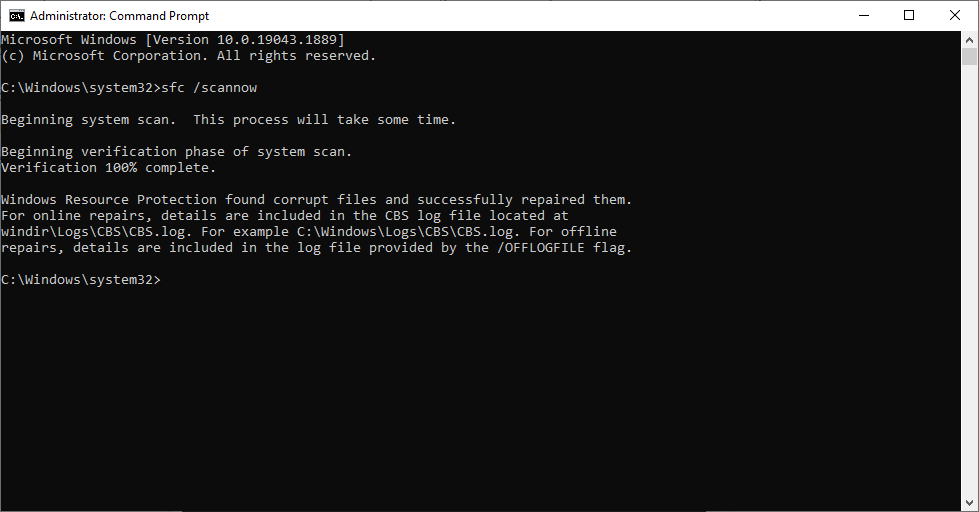
- Windows Resource Protection did not find any integrity violations: This means the tool did not find any corrupted files.
- Windows Resource Protection found corrupt files and successfully repaired them: This means that the System File Checker tool did find problematic system files and repair them.
- Windows Resource Protection found corrupt files but was unable to fix some of them. This message indicates that your files are severely corrupt and need additional troubleshooting steps. (In case you receive this message, you should run the DISM command and follow the steps mentioned in the next solution.)
If you have received the first message, This means the issue is not with your system files, but was due to some other reason. In that case, you can try the next solutions.
If you have received the second message, I suggest you restart the system and see if the SFC scan was able to repair Windows and resolve the issues.
If you have received the third message, then you need to try the DISM tool; more on that in the next section.
Solution 3: Running the DISM Command to Repair Windows
DISM, or Deployment Image Servicing and Management, is a command line built-in repair tool that can fix more severe and serious system image corruption issues.
DISM is primarily used to repair Windows system images, Widows component store, which is a repository for various system features and components, as well as used to create or fix the recovery drive that contains the Windows image and other troubleshooting tools.
Before you proceed, keep in mind that this is a command-line tool that requires users to be familiar with certain command prompts. Additionally, this solution is a bit more complex than the one mentioned in this article, and incorrect usage of the commands can cause more problems than this tool can potentially solve.
Steps To Run DISM Tool
1: Run the Command Prompt as an Administrator.
2: Type in the command “DISM /Online /Cleanup-Image /RestoreHealth” and hit the Enter button.
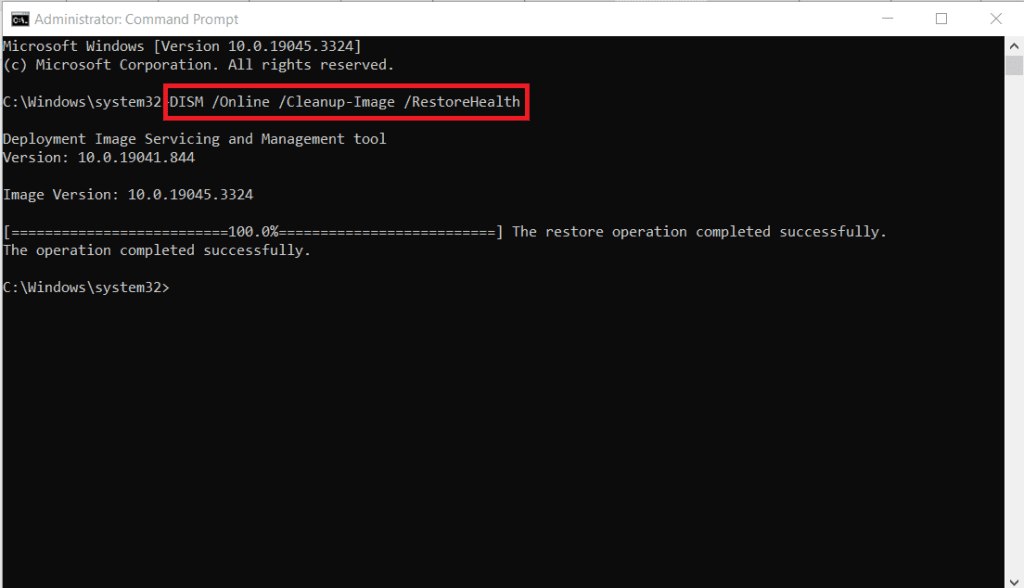
3: Wait till the process is complete.
4: Upon completion of the process, I suggest you run the SFC scan again. This will help you fix the previously unrepairable system files.
Using the SFC scan and DISM command should be your first step to repair general system files within a running OS. The next solution in this list is specifically helpful in case your system is having trouble with booting up.
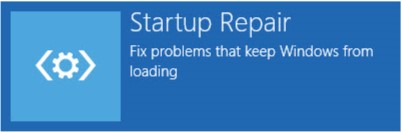
Solution 4: Startup Repair
The Startup Repair option can help users diagnose booting issues that are preventing Windows from starting or booting up normally and attempt to fix them. It can also help users resolve any boot-related issues that in-built tools like SFC and DISM cannot fix.
This solution can be extremely helpful in case you encounter issues like automatic system restarts, frozen boot screens, blue screen errors during booting up, system file issues, problems with boot configurations, or any other issue that is stopping a normal startup.
Steps to Boot into Windows When Windows Doesn’t Boot Normally
1: Boot into the Windows Recovery Environment using a recovery drive.
2: Once you are in the Windows Recovery Environment, click on the Continue option.
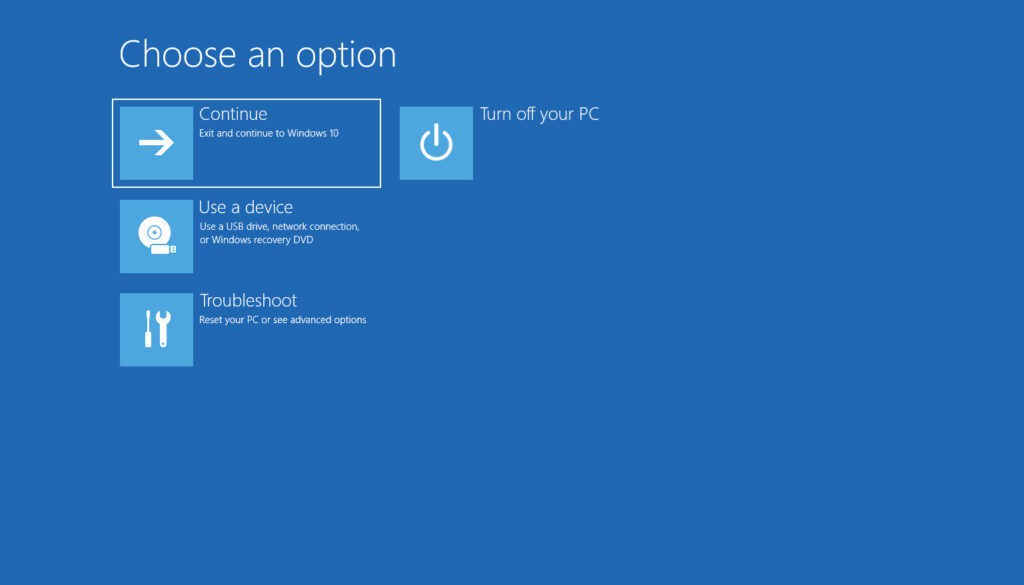
3: Select the Advanced options in the Troubleshoot windows and click on the Startup Repair option.
4: If prompted, select the Account type, enter the credentials, and follow the on-screen instructions.
5: Startup Repair will automatically start scanning your system. If any problems are found, it will try to fix them.
6: Upon completion of the repair process, your computer will be restarted.
If your Windows system boots up normally, then the repair was successful. In case the repair process was unsuccessful. Then, you might need to try more advanced solutions like system restore or reinstalling Windows.
Solution 5: System Restore To Repair Windows 11, 10, and Other Versions
System Restore is an option that lets you revert your system back to a previous point in time when Windows was working correctly.
This solution can be extremely helpful. Especially if the issue was caused by or after recently updating Windows OS or installing newer software.
Please note that the system restore solution only works if you have previously created and saved a recovery point. If you do not have any restore points. You can try the next solution, which involves reinstalling Windows systems to resolve issues and problems.
1: Click on the Start menu and click on the Settings option.
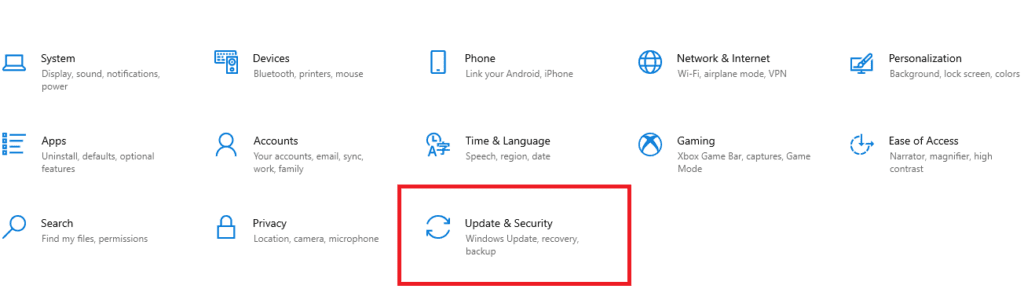
2: Find and click on the Update and Security option and then search for and click on the Recovery option.
3: Under the Advanced Startup tab, click on the Restart Now option. Your system will begin to restart and boot into the recovery environment.
4: Once you are in the Windows Recovery Environment, click on the Troubleshoot option, followed by clicking on the Advanced options.
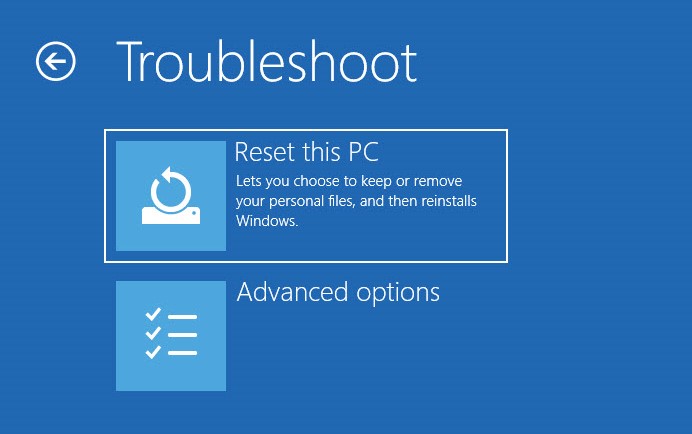
5: Now select the System Restore option and follow the on-screen instructions.
6: Select the most appropriate restore point from the list of all available restore points. (I recommend you choose the one created before you face any issues.)
7: Check the “Scan for affected programs” box. Although this is optional, it will help you see which programs might be affected or uninstalled after you have restored your system.
8: Now click on the Next button and click on the Finish button to start the system restore process. Upon completion of the system restore process, your computer will restart.
After following this solution. I am sure that you were able to fix various Windows issues and problems after performing System Restore. If none of the above repair options have helped you repair Windows 11, Windows 10, or other older versions. I recommend you try reinstalling Windows.
Solution 6: Repair Windows by Reinstalling Windows OS
This is probably the most comprehensive and versatile solution available. Reinstalling Windows is guaranteed to work in most situations, including severe system corruption, stubborn virus or malware attacks, issues with conflicting software, etc.
Reinstalling Windows won’t work if the issue is with Hardware, such as a failed hard drive, faulty RAM, or issues with the drivers.
If your system is booting into Windows normally, you can try the following steps:
1. Click on the start menu and click on the Settings option.
2. Scroll down, click on the Recovery option, click on the Reinstall Now button, and click on the OK button.
3. A window might appear on your screen giving you two options: “Keep my files” (keeps personal data) and “Remove everything” (wipes your entire drive clean).
4. Depending upon the option you have chosen, you might see additional options like “Cloud download” (this option downloads and reinstalls Windows) or “Local reinstall” “which uses the pre-installed installation files.”
5. Review the summary and click the Reset button to start the process. Your Windows system will restart and initiate the Windows reinstallation process.
6. Upon completion of the Windows reinstallation process, your system will boot up with a fresh copy of Windows. You need to go through the initial setting up process, and might also need to reinstall your applications and personalize settings.
If your system is unbootable, you must first boot it from a bootable device, such as a USB or external hard drive. Refer to this article to learn how to reinstall Windows OS without losing data.
Important Read: If you are using Windows 10 or other older versions of Windows, refer to this article to learn how to upgrade to Windows 11 without losing data.
If you have lost your files after repairing Windows, you can try recovering them using Professional data recovery tools like Remo File Recovery Software.
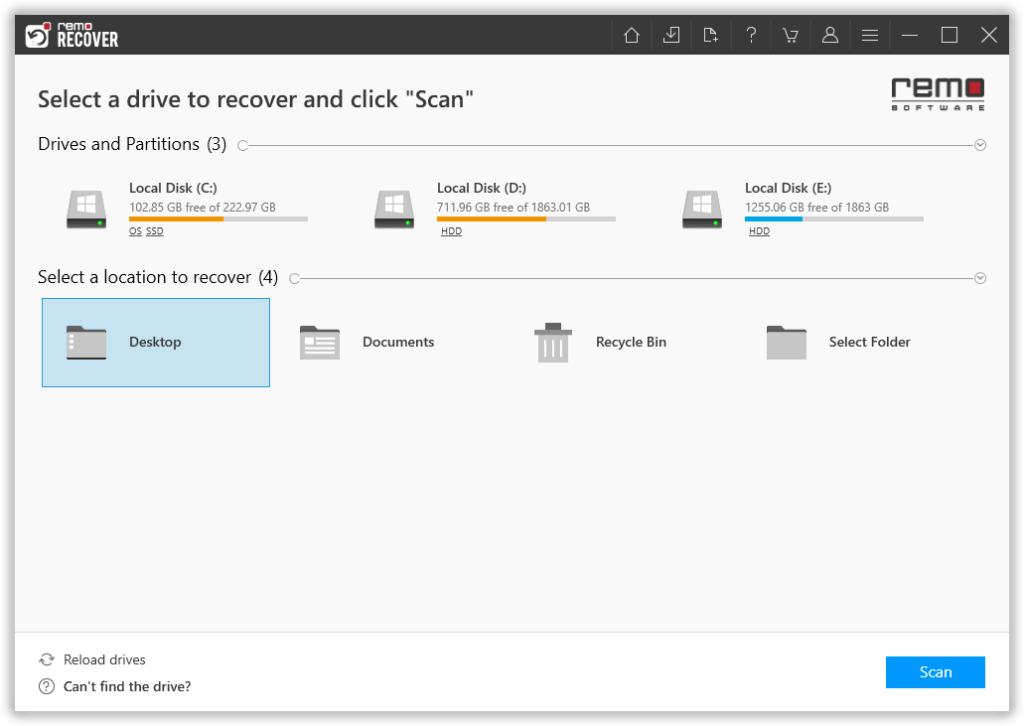
Step 1: Launch the tool. Select the drive from where you want to recover your lost files or data, and click on the Scan button.
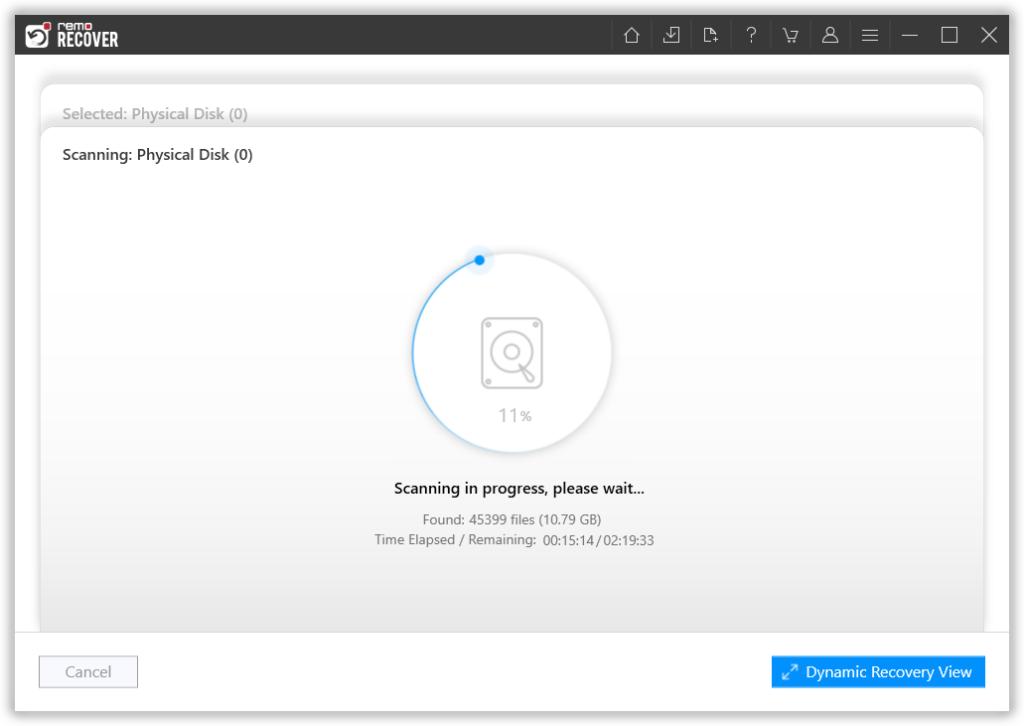
Step 2: Remo will start scanning the selected drive or volume while the scan is in progress. You can click on the Dynamic Recovery View option. To view the recovered files, folders, and data without having to wait until the entire scanning process is completed.
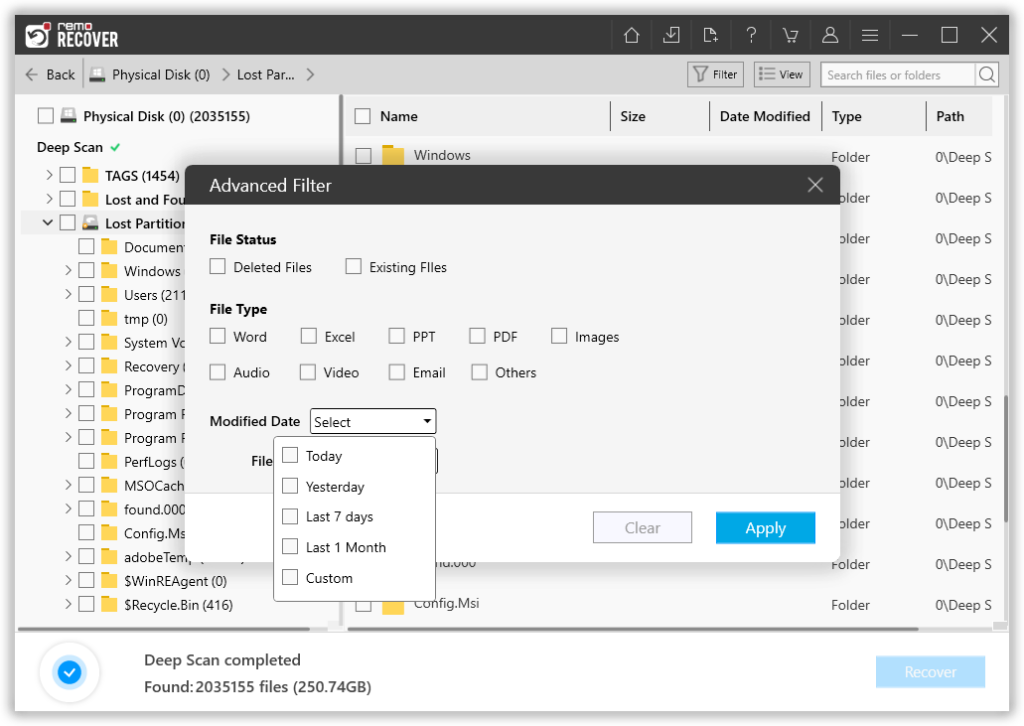
Step 3: The tool will display a list of all the recovered data from the selected drive. You can use the Advanced Filter option to sort files based on various criteria such as file type, file size, date modified, etc.
Step 4: Select the files and the folders that you want to restore and click on the Recover button. The tool will prompt you to provide a location where you want to save the recovered files.
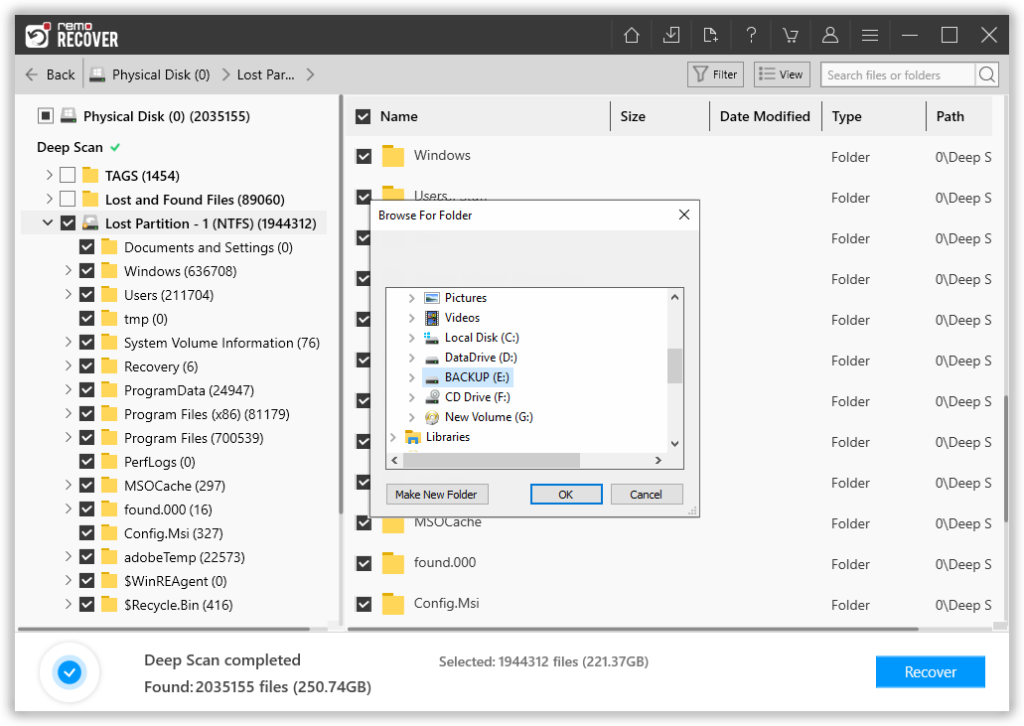
Remo will start saving the selected files in the provided location.
Conclusion
Repairing Windows is vital to maintaining a super stable and efficient operating system. This might include resolving software glitches, addressing system errors, restoring corrupted files, restoring the system to an earlier point, or reinstalling Windows, among other things.
Timely repairs can remarkably boost the system’s performance and significantly increase its longevity. By regularly using in-built tools like SFC scan or choosing more extensive solutions like Windows reinstallations. Users can easily troubleshoot various issues, errors, and problems and also ensure their system remains functional.