The universal fact that an SSD is faster than a standard hard disk drive is undisputed. Although HDDs are cheaper, spending a few extra bucks on an SSD when looking for speed is wise. But do you know that there can be degradation in the performance of an SSD if a proper Background garbage collection method is not enabled in your SSD?
This is where TRIM comes into play.
In this write-up, we have extensively talked about TRIM In SSD. Right from what is TRIM to why is TRIM so important, how to check if it is enabled on my computer, how to enable and disable TRIM on Windows 11, 10, 8, 7, etc.
Let’s dive straight into it.
As mentioned above, TRIM is a command that enables your operating system to tell the solid-state drive that particular data on your solid-state drives are no longer needed and can be erased internally. If the TRIM feature is not enabled on the drive, the SSD considers the data valid until the operating system notifies the SSD to overwrite the data. Hence, the usable storage space available on the drive decreases.
Before understanding how the TRIM feature works, it is essential to know about garbage collection. Compared to HDD, the SSD cannot overwrite the old data unless the data is erased.
Garbage collection is a process in which the invalid data is separated from the valid data on the block. During this process, the valid data is copied onto a new block, and the entire block containing the old information is erased. This way, the SSD is freed for more space to accommodate new data on the drive.
Today most SSDs come with the TRIM features enabled by default. However, we provide the following step-by-step procedure to check if TRIM is enabled on your SSD:
Step 1: Type cmd in the start menu.
Step 2: Right-click on the cmd suggestion and select Run as Administrator.
Step 3: In the command screen displayed type the command: “fsutil behavior query disabledeleteNotify” and hit enter.
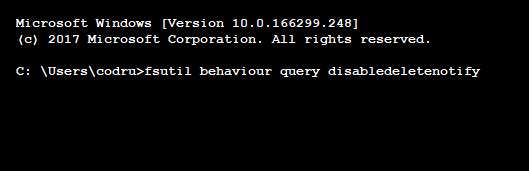
Step 4: if “DisableDeleteNotify=0” is displayed TRIM is enabled on the computer else if the value “DisableDeleteNotify=1” is displayed TRIM is disabled.
Step 1: Type cmd in the start menu.
Step 2: Right-click on the cmd suggestion and select Run as Administrator.
Step 3: once the Administrator command prompt is open type the command: “fsutil behavior set DisableDeleteNotify=0” and hit enter
Step 4: “DisableDeleteNotify=0” is displayed when the trim is enabled.
Step 1: Type cmd in the start menu.
Step 2: Right-click on the cmd suggestion and select Run as Administrator.
Step 3: once the Administrator command prompt is open type the command: “fsutil behavior set DisableDeleteNotify=1” and hit enter.
As discussed earlier, TRIM boosts the performance of your Solid-State Drive. however, when you delete data, SSD also erases data blocks/Pages where your data was stored earlier. So next time when Operating system wants to store data, the data block on your SSD is already empty. Having said that, the major drawback of enabling TRIM Command is it makes data recovery an extremely difficult process.
Previously users were left with no other option, but as we mentioned earlier, disabling TRIM increases the chances of recovering data irrespective of the SSD brand.
Note: In case you have lost or deleted data from your SSD, or you have formatted SSD, we highly recommend you stop using that SSD right away since incessant usage may lead to the SSD getting overwritten. Which makes retrieving data completely out of the question.
First off disable the TRIM command using the above-mentioned method and then stop using SSD to recover data from it.
Step 1: Download and install Remo Recover Windows software to recover the data that is lost due to the enabled TRIM option.
Step 2: Launch the application, in the main screen, select the drive from where you want to recover your data.
Step 3: Click on the Scan button to start the data recovery process.
Step 4: During the scanning process, you can click on the Dynamic Recovery View option and preview the recovered file. This tool also gives you the option to sort your files using Advanced Filter.
Step 5: Now, when the scanning is complete you can double-click on any file to preview the recovered files such as documents, PPT, excel sheets, photos, videos, and many more for free. Select the files you want to restore and click on the Recover button.
Step 6: If you are well pleased with the Outcome, activate the software and save the recovered data to your desired location.
TRIM is a command using which the users can boost the efficiency of the Solid-State Drive. It basically tells the SSD which data blocks are unwanted and is marked as free space for data writing. We have discussed in brief TRIM and how to enable and disable the TRIM commands. In addition, we have also provided a sure-shot way to recover lost or deleted data when TRIM is enabled using one of the best SSD recovery software Remo Recover.
We believe we have answered all your TRIM-related queries. Feel free to drop any additional questions down below.


