Everyone wants a normal functioning computer. Any error while working on your system seems like the end of the world! It is seldom the case that any system is error-free. One such error that has caused some worry in users has been the SMART Hard disk error 301.
What is Smart Disk Error 301?
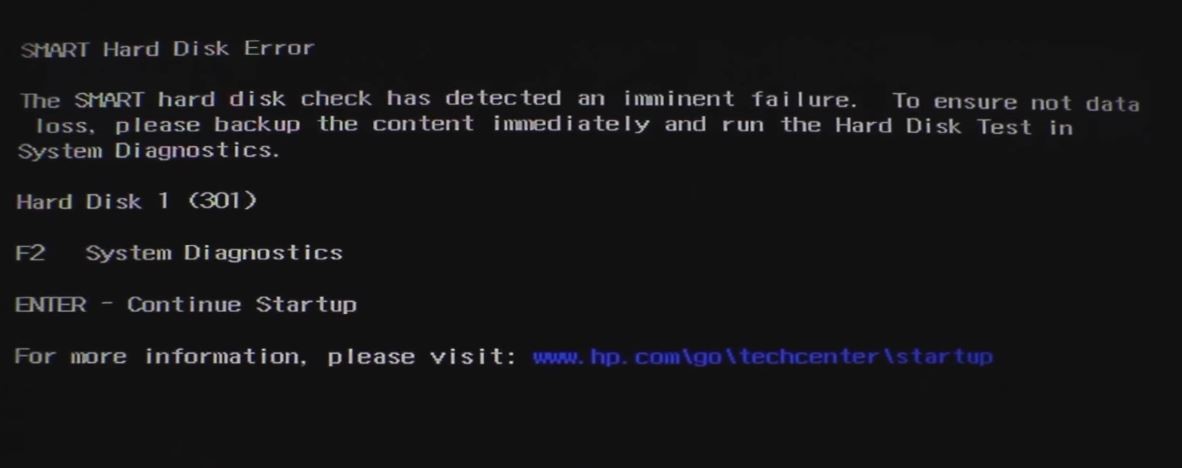
When you start your system, you will be greeted with the following error on the screen:
The above error indicates that your hard drive is failing and you have to take preventive steps like backing up data as soon as possible and replacing the hard drive.
If you do not back up data, you end up losing all your hard disk data. It could also be caused by a broken IDE/SATA controller chip on your motherboard.
My HP laptop showing smart hard disk error when turning on. How can I fix this error?
"Smart Hard Disk Error Hard Disk 1 (301) The smart hard disk check has detected an imminent failure. To ensure not data loss, please backup the content immediately.
Specifications HP 15da0008ca Windows 10 RAM 12 GB"
Source: Reddit
How to Fix SMART Hard Disk Error 301?
There are several ways to fix a Smart Hard disk error in Windows, You can try the following solutions to get rid of a Smart Hard disk error.
1. Restart the Computer
If you are experiencing smart hard disk error 301 on your computer then the first thing you’ll have to do is restart the computer, mostly The error might be a false popup.
In case a regular restart doesn’t work then you’ll have to do a Hard restart
- Turn off your computer.
- Pull the battery plug from the desktop or remove the battery from the laptop.
- Press and Hold the Power button for 30 seconds.
- Now you can connect the battery again and check if the smart hard disk error is fixed.
2. Using Boot Device Options
- When you see the error screen above, Long press the Power button and switch off your computer. After a few seconds, start up again.
- Once the computer is booting, keep holding the Escape key until you see the Startup menu.
- Now press F9 for Boot Device Options.
- Select Notebook Hard Drive and hit Enter. You should boot into Windows.
Now Windows will start booting and it will take a long time. This is to be expected as the hard drive is failing. Just remain calm. Once the booting process is complete, you can start backing up your files.
You might get another error “Windows detected a hard disk problem”. Back up all your files and then you can replace the hard disk.
3. Using BIOS Menu
- Remove your hard drive from the system.
- Reconnect it.
- Start your computer. Once the system starts booting, keep pressing F10 to enter the BIOS menu.
- Run a test on your hard drive under Advanced or Diagnostic settings. Wait for the test to complete.
4. Change Boot Order
Check if your Hard disk is in the priority order that will be used to boot into Windows. If not then you’ll have to manually change to fix Smart Hard Disk Error 301.
- Enter the BIOS menu.
- Choose the Boot tab using the arrow keys, Now you’ll have to change the smart Smart Hard Disk's position to first.
- Click on Commit the changes and Exit.
5. Using chkdsk
All bad sectors and directory errors on the drive can be overcome by running chkdsk.
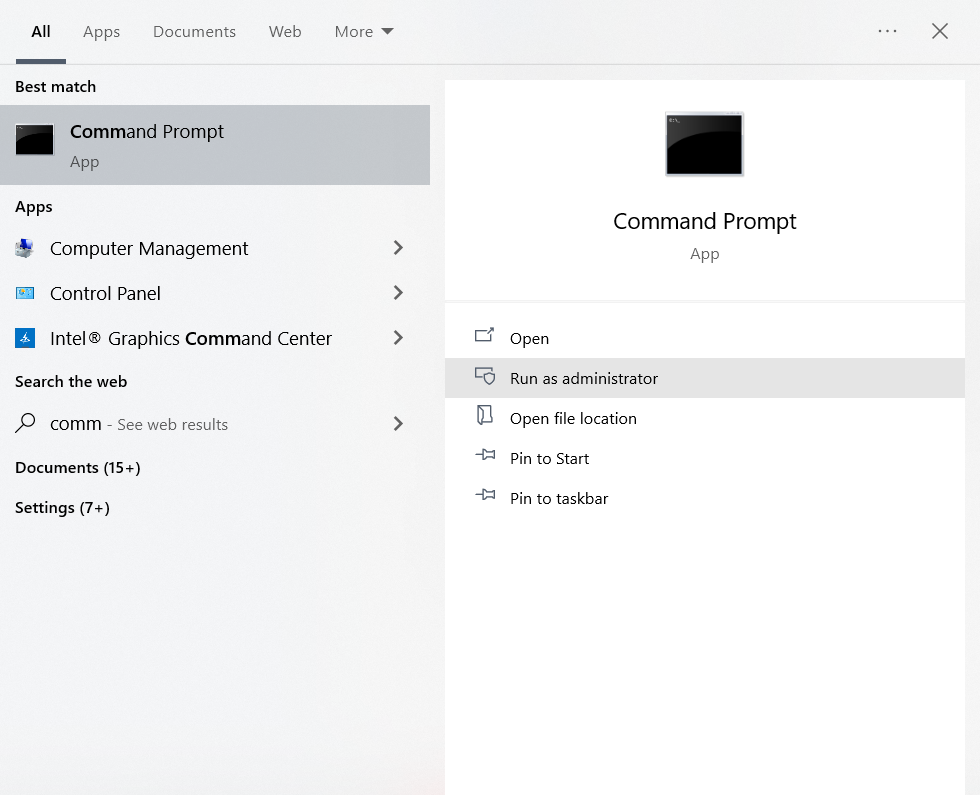
- Go to Search Box.
- Run Command Prompt and Run as Administrator.
- Now type chkdsk /f /r X and hit Enter, where X is your drive letter.
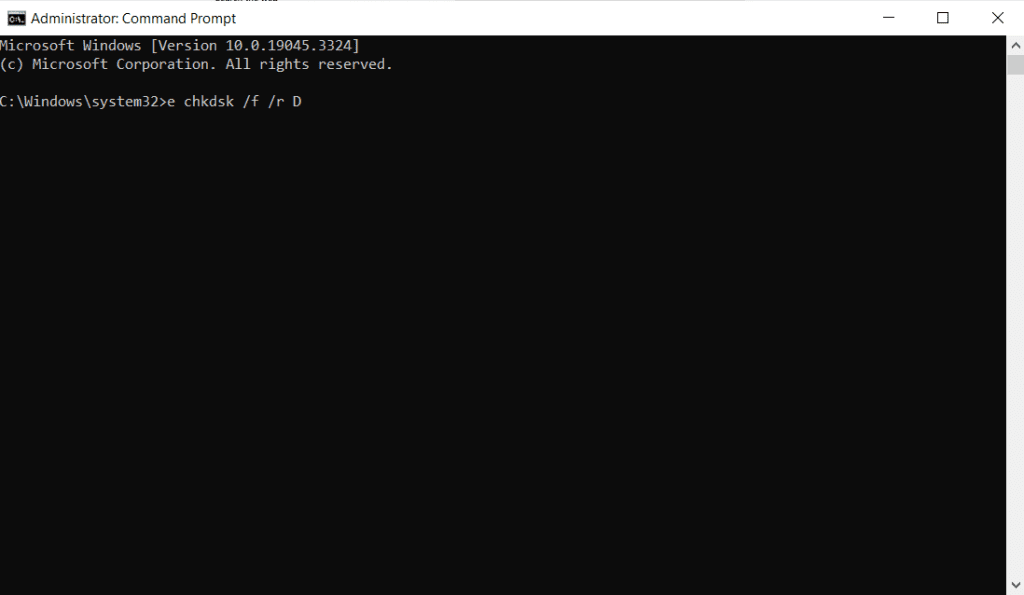
Note: Replace X with the drive you want to Repair example: D, C, or E, and hit Enter.
- The system restarts and asks you to verify the disk. Press Y.
- Now close all your Applications and Restart the system.
Running chkdsk comes with the possibility of losing data. Back up your files before running them.
6. Check Your Hard Drive for Errors
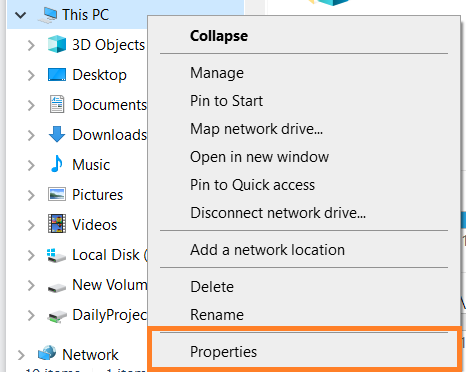
- Go to This PC.
- Now select the hard drive and right-click on it.
- Go to Properties.
- Click on the Tools tab.
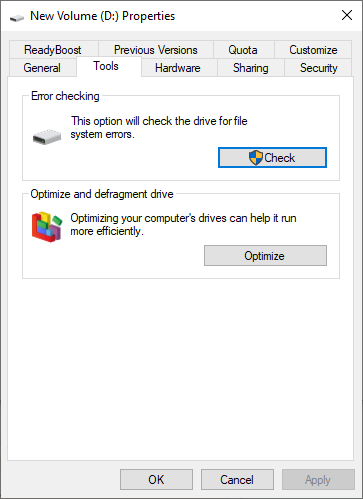
- Under the Error checking click on Check.
- A new prompt window opens in which you can simply click on Scan drive to scan the hard disk and fix errors in it.

The first thing you should do when a hard drive fails is to back up all the data after you have completed all the troubleshooting methods given above to find a reliable data recovery tool.
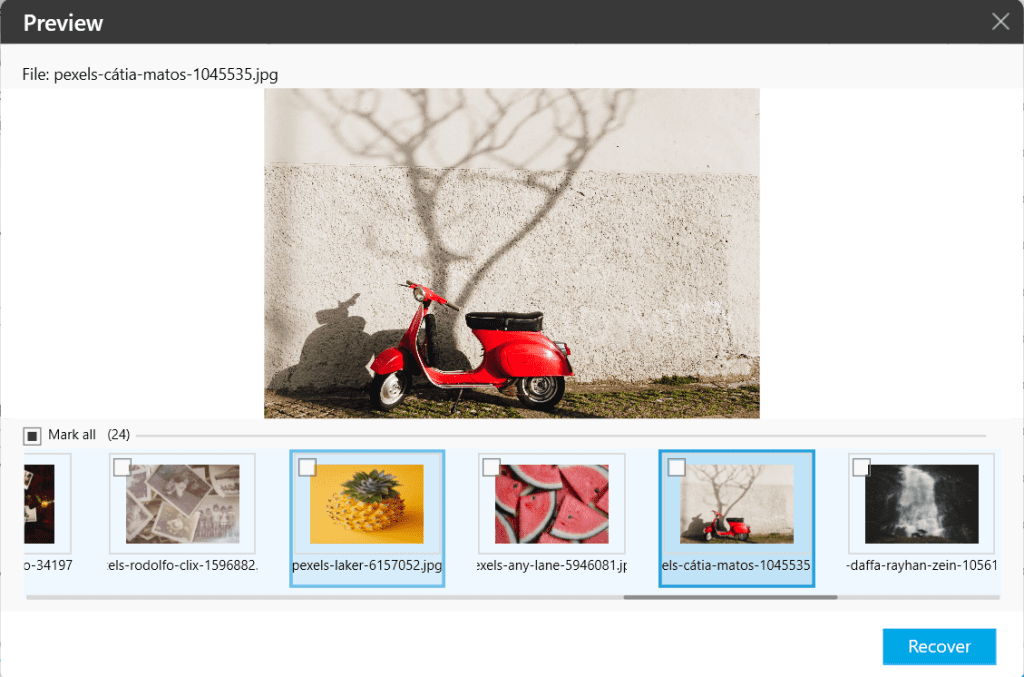
Recover Data after Fixing Smart Hard Disk Error 301 using Remo Recover
Remo Hard Drive Recovery Tool is an excellent data recovery tool to recover all your lost or deleted data with just a few clicks.
The software supports over 500 distinct file kinds and is compatible with both Windows and Mac operating systems. You can be confident that all of your data will be safely retrieved. The software also allows you to add a file type that was not already listed.
You can recover data from lost, deleted, formatted, and re-formatted partitions or drives as well. Remo Recover software works even after you re-installed your Operating system. You can view a list of recovered files through the preview feature. Just download the software and start your data recovery! It is that simple!
Also Read: Fix Hard Drive Error Code 2000 0142
Conclusion:
Follow the above-mentioned methods to fix Smart hard disk error 301, If you run into data loss during the process we suggest using Remo Recover to recover data quickly.
Please free to drop queries in the comment section below.