Accidents happen. Sometimes, a photo or video gets deleted that you didn’t mean to.
Luckily, Photos has a safety net to help you restore recently deleted photos from your Mac. However, sometimes that isn’t enough, and you need something more powerful to help you recover lost photos on your Mac.
So, let’s jump right into it without wasting any more time.
Table of Contents:
Reasons Why You Can’t Find Recently Deleted Photos on Mac
It’s happened to everyone. You accidentally hit a key, and a picture goes missing from your library, a storage drive crashes, or an issue syncing with the cloud. Luckily, not all is lost.
The next section talks about recovering photos that you can't find in the Recently Deleted folder.
How to Recover Recently Deleted Photos on Mac?
You can recover a lost photo on your Mac in several ways. Some of these require that you have things set up, like a backup of your drive, but if you do, you can save the day!
Here are some simple ways how to recover recently deleted photos on your Mac; there are a few simple ways to retrieve recently deleted photos.
Get Back Photos from Recently Deleted Album
If you use iCloud Photo and the Photos app on your Mac, check your Recently Deleted Photo Album first. If you delete a photo from your library, your Mac will move the photo to this album. It will remain there for 30 days before it is deleted.

If you find your missing photo in the Recently Deleted album and want to recover it, click on the photo you want to restore and then click the Recover button. This will move the photo back into your library.
Using the Recently Deleted album is the easiest way to recover a lost photo, but you have a time limit. After 30 days, the photo will be lost from the library for good.
Get Back Recently Deleted Photos Using Time Machine Backup
If your photo disappeared from the Recently Deleted photo album or you can’t find the picture you’re missing, your next option would be to check your Time Machine backup.
Unfortunately, you must know when you had the picture in your library and had Time Machine backing up your computer. You’ll also need to know where your photo library is currently located. If you don’t know, open the Photos app, select File, and then Settings. Photos should list where your library is currently located.
To recover a photo using a Time Machine,
1. Open the Time Machine app. You can find the Time Machine app in your applications folder.
2. Find the location of your Photos library.
3. Find a previous date you know you had the missing photo in your library.
4. Control-click on the Photo Library file and click Restore Photo Library.
5. Save the file to a new location.
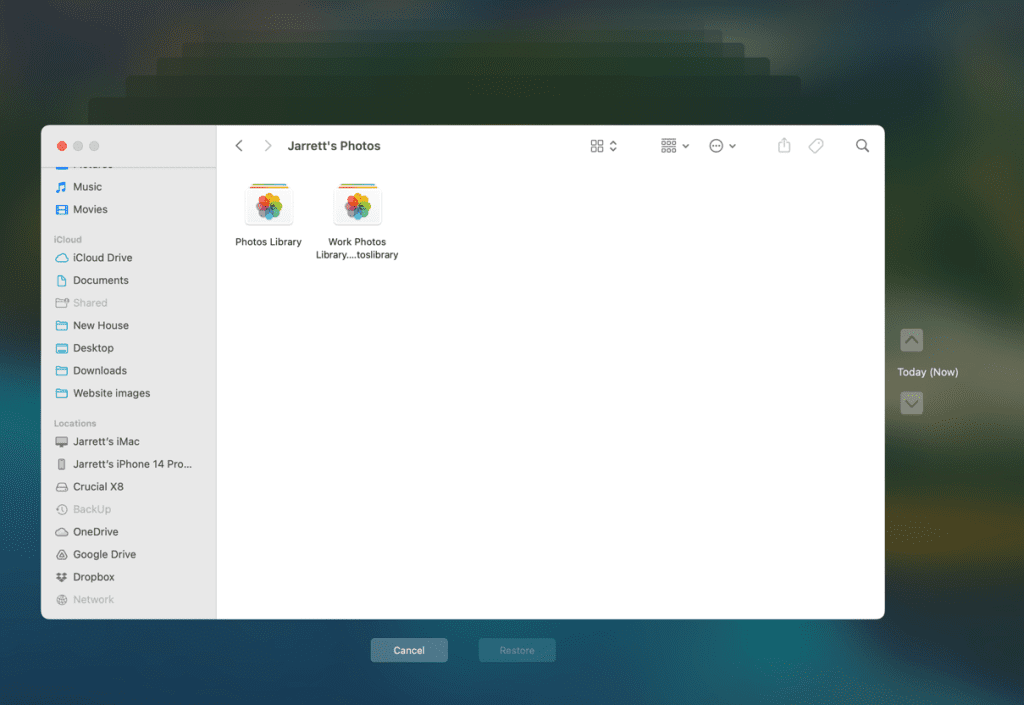
Once you exit Time Machine, you can open up the restored library in photos. Hold down the Option button while you launch a Photos. From this screen, click Other Library and select the restored file.
Now, you’ll need to find the photo and drag it out of Photos. Close photos, reopen holding the Option key, and reopen your original photo library. Drag the photo in, and it should be imported.
Now, you can delete the restored library.
Recovering your photos this way requires you to have a Time Machine backup and know when you had the image in your library. It can also take a long time to restore more extensive photo libraries.
iCloud Photo Library
If neither of these options produces the image you’re looking for, you might luck out with iCloud Photo Library. If you have your photo library synced between your Apple devices.
You could disconnect one of your devices from the internet to stop the library from syncing. Once disconnected, search for your missing photo. If you find it, save it somewhere outside of your library. Then, you can connect the device to the internet and add the image back in.
This method is all about luck. Most devices update quickly and often if they are attached to the internet.
The Better Solution: Remo Recover Mac
If none of those options worked, or you don’t want to jump through so many hoops to recover your recently deleted photos on your Mac, there’s Remo Recover for Mac.
The Remo Recover app is a full-featured app that offers deep scanning of your drives to find those files and photos you thought were lost. It can scan your main drive or attached storage. It works with a simple push of the button.
How Remo Recover Mac Works:
Remo Recover does a deep scan, searching for all the lost data bits in your storage. All with the push of one simple button. Remo Recover can help you find a file you thought deleted and restore it to normal.
Step-by-Step Guide to Using Remo Recover Mac:
To recover a file, you’ll need to start a scan. Open the app and choose the drive where the file previously lived. Press the Scan button in the bottom right of the window.
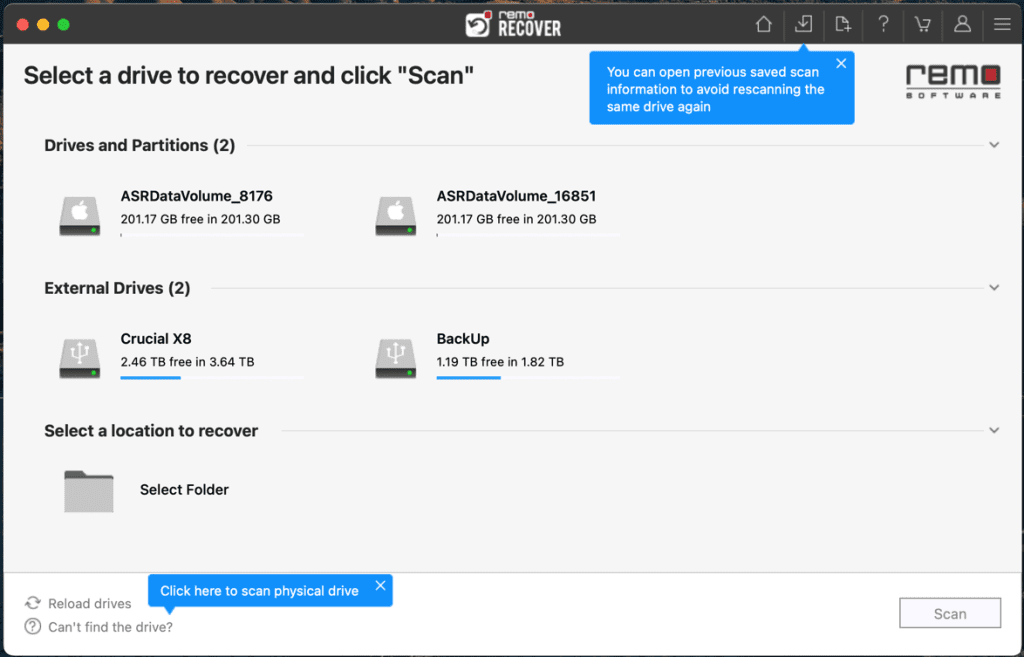
Your Mac will begin the deep scan of the drive and take you to a window with a percentage tracker. You’ll only need to run the scan once since Remo Recover allows you to save it for future use.
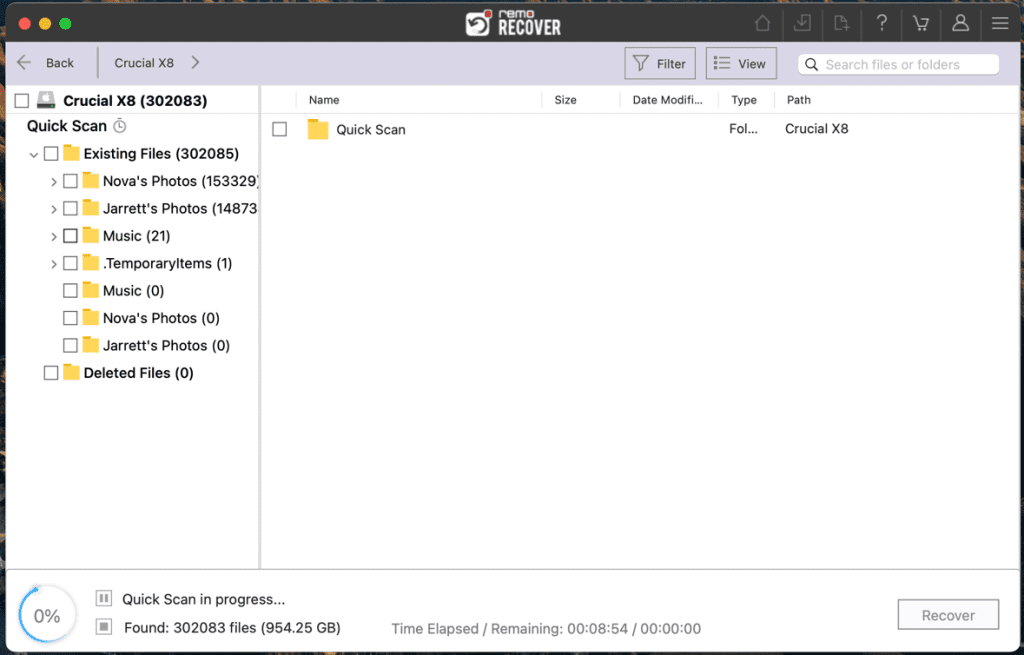
Once the scan is done, you will see a window similar to the Finder. All of your folders will display in the left-hand column. All the lost or deleted files the scan produced will appear under the Deep Scan section.
Scan or search for the file or photo you’re looking for. Once you think you’ve found the file, you can preview it to confirm. If correct, click Recover, and Remo Recover will recover and save the file.
Why Choose Remo Recover Mac:
Remo Recover allows you to restore lost photos and files quickly. You also aren’t dependent on having extra steps or having a device that hasn’t synced with the cloud yet.
Remo Recover for Mac has a higher success rate for recovery than being lucky with some of the other options. After the first deep scan, it can recover a file faster than any other option. Plus, unlike the other options, Remo Recover has a 24/7 comprehensive support system to help you with any issue you might come across.
Conclusion
With the amount of data coming in and out of our storage drives, you need an excellent way to find a missing file. While great options for recovering a photo are built into macOS, things might still fall through the cracks.
That’s why you need an option like Remo Recover, the quick and easy option to restore deleted files or lost photos from any Mac Machine running on any macOS. Give yourself some peace of mind and give Remo Recover Mac a free trial to see if you can recover those lost photos on your Mac.