When a USB drive is corrupted, it can act strangely. It may not show up on your computer, give you error messages, or make your files disappear or unreadable. It can also slow down a lot and even disconnect unexpectedly. But don't be too upset! This article talks about various solutions on how to repair a corrupted USB on Mac. However, most of these solutions might also delete the saved data. That's the reason many Tech experts and thousands of Mac users across the world recommend you first recover data from the corrupted USB drive using a specialized File Recovery Software. Once you are sure, that you data is safe. You can proceed to fix the problematic or the corrupt USB flash drive without worrying about data loss.
Recover a Corrupted USB Drive on Mac Using Remo Recover Mac
Remo Recover Mac is a program that helps you get back lost or deleted files on your Mac computer. It works with different storage devices like USB drives and memory cards. If you lose important files, this tool can help you get them back easily.
Steps To Recover Data From a Corrupted USB Drive on Mac
1: Connect your corrupted USB drive to a working computer that has Remo Recover for Mac. If your internal hard drive or SSD is damaged, connect it to another computer like it's an external drive.
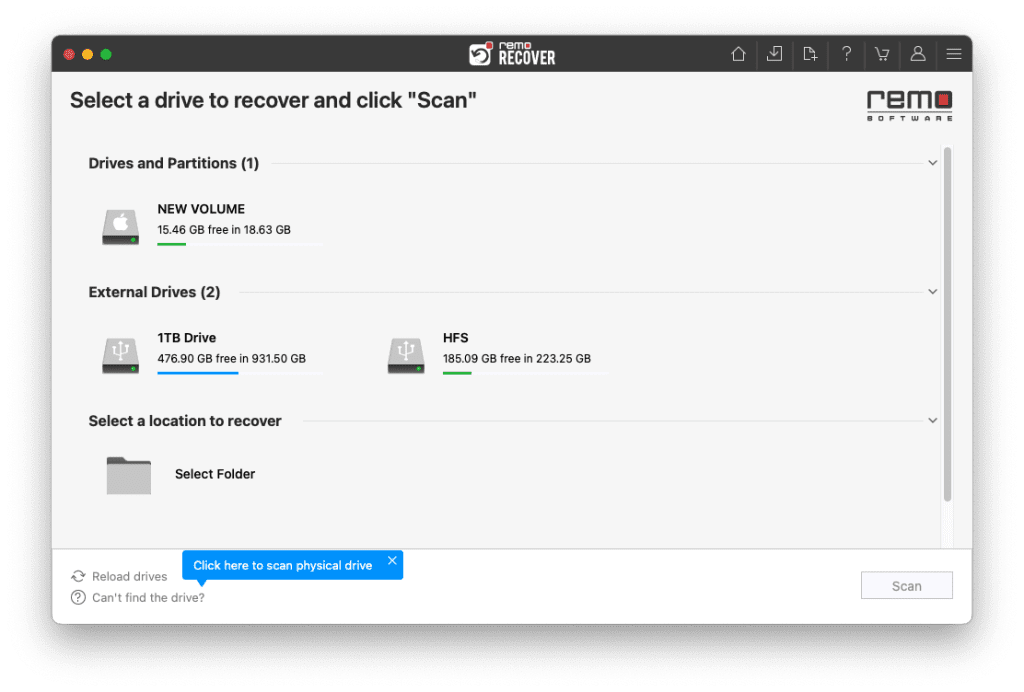
2: Now launch Remo Recover for Mac and choose the drive you want to recover data from. If your drive isn't visible, click "Can’t Find Drive" to locate it, and then click "Scan."
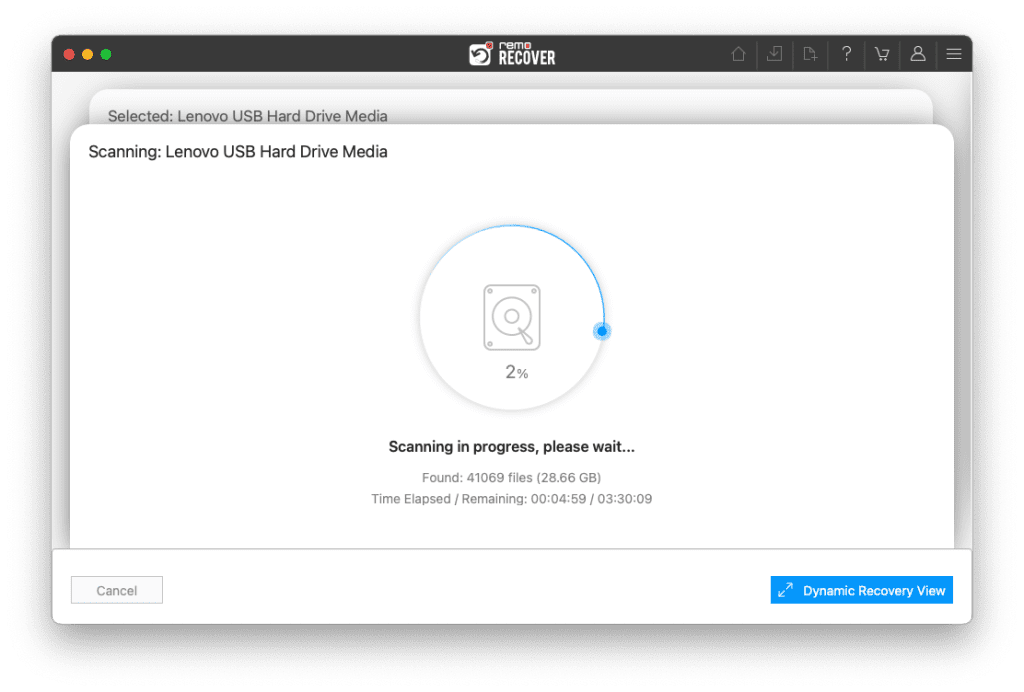
3: Once the scan starts, check "Dynamic Recovery View" to see the progress.
4: After the scan finishes, you'll find the recovered data in the "lost partition" folder on your Mac's corrupted hard drive.

5: Use the Preview feature to check the recovered files and folders.

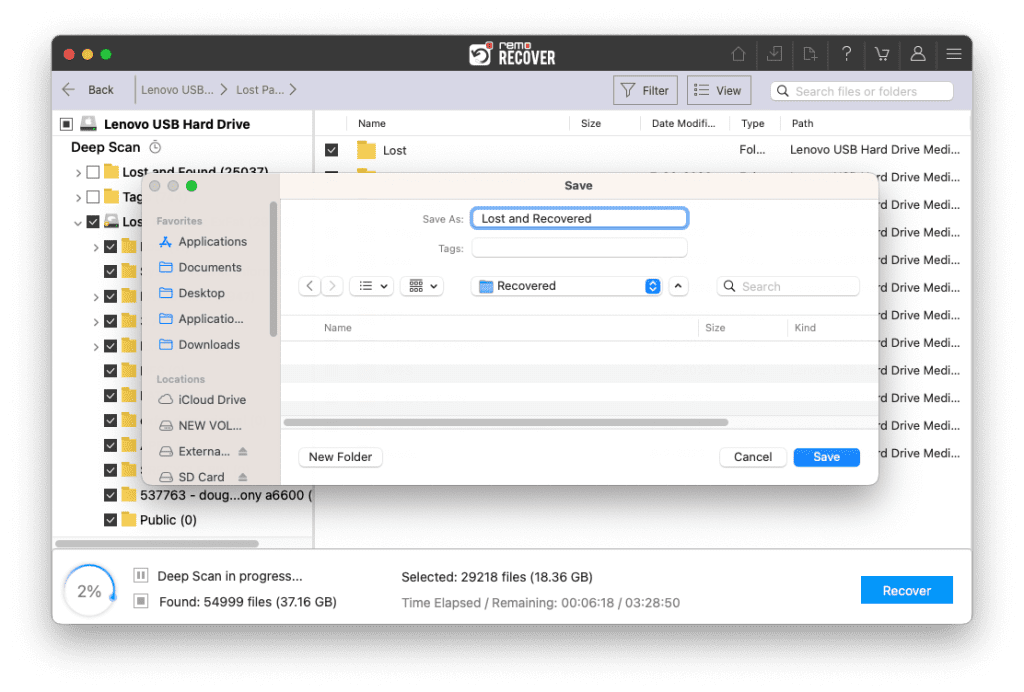
6: If you're satisfied with the recovery, select the files you want to save and click "Recover" to store them in your chosen location.
Now that you have recovered your corrupt USB drive data safely. The next section talks about four ways to repair corrupted USB drives on Mac with ease.
How to Fix a Corrupted USB Drive on Mac?
Here are some ways that have been tested and proven to help you fix a corrupted USB on a Mac and get your data back. Before you try these fixes, first see if your USB stick is locked with a password. If it is, you'll need to type in a password to see your files.
If your USB isn't password-protected, check if it can work with your Mac's way of organizing files. Follow these steps to see if your USB can work with your Mac:
- Open Finder to look at your USB drive.
- Click on the USB drive while holding down the Control key.
- A menu will pop up. Choose "Get Info" to see more about your USB.
Let's explore the below-mentioned methods to find out if any of them can help you in recovering data from a corrupted USB drive.
Method 1: Fix the Corrupted USB Drive on Mac Using Disk Utility
Disk Utility is a program that comes with macOS. You can usually find it in the 'Other' folder in Launchpad. Here's how to use Disk Utility to try fixing a messed-up USB drive on your Mac:
1: Open Disk Utility and go to View > Show All Devices.
2: Select your USB drive in the sidebar and click on the 'First Aid' button.

3: Click 'Run' in the First Aid box and follow the instructions on the screen.

4: Click Done when the First Aid process finishes.
If Disk Utility works well, your Mac should recognize the USB drive, and you can get your files back. Let's move on to the next method.
Method 2: Use Mac Terminal To Fix Corrupted USB Drive
You can use Terminal to fix a corrupted USB drive, but it's a bit more advanced. If you're not comfortable with Terminal, try the previous method.
Note: Before you begin fixing your USB drive using this method, remember that it will delete all the data from your device.
1: Plug in your USB drive.
2: Open Terminal from Launchpad.
3: Type "diskutil list" and press Enter. You'll see a list of your connected disks.

4: Copy and paste "diskutil verifyDisk /dev/disk2" (change 2 to your disk number) and press Enter to check your USB drive.
5: If you see a GPT error, type "diskutil eraseDisk JHFS+ BackupMaster disk2" and press Enter to format it. Then repeat the previous command.

Step 6: Copy and paste "diskutil repairDisk /dev/disk2" and press Enter to start repairing.
Step 7: It'll warn you about erasing the USB. Type 'y' and press Enter to continue.

Step 8: When you see "Finished partition map repair on disk2," close the Terminal and eject your USB.
If Terminal couldn't solve the problem with your USB drive, it's time to try the next solution.
Method 3: Update the USB Driver to Repair the Corrupted USB on Mac
The USB device driver gets updated automatically when your Mac gets new software. Here's how to check if there are any updates for your Mac right now and install them yourself:
1: Go to the Apple menu and select "About This Mac."
2: Click on "Software Update" to see if there are any updates.

3: If there are updates, click "Update Now." You can also click "More info" to see what the update does.
If there are updates for the USB driver, your Mac will install them. After that, try your USB drive again to see if it's working better now.
Method 4: Repair a Corrupted USB on a Mac by Reformatting
Before you attempt to repair an unreadable disk on your Mac using this method, be aware that it could delete everything on it. You might be able to retrieve your files with special software, but it's a good idea to back up your data before completely erasing the USB drive.
1: Plug in the USB drive.
2: Open Disk Utility.
3: Pick your USB drive from the list on the left.
4: Select "Erase." Don't choose extra security options if you want to recover data later.

5: Give the drive a name and choose the format you want to use.
6: Click "Erase" in the bottom left.
7: A progress bar will show how it's going.
8: When Disk Utility is done, click "Done."

Normal formatting might let you recover data with recovery software. If you format it with multiple passes, you'll wipe out all the data, and it can't be recovered. So, think carefully before you do this because it's a way to permanently fix a corrupted USB drive.
Safety Tips for Fixing a Corrupted USB Drive on Mac
- Backup First: Make sure you have copies of your important stuff somewhere else before you try to fix the USB drive.
- Eject Safely: Always tell your computer you want to take out the USB drive before you actually take it out.
- Keep Things Updated: Make sure your computer and antivirus software are up to date to protect your USB drive.
Remember, it's always smart to back up your important stuff regularly so you don't lose it in the first place.
Conclusion:
In conclusion, we've learned how to repair a corrupted USB on Mac and discussed the importance of data backup. We also introduced Remo Recover Mac as a tool for recovering lost files on Mac computers. Remember to be careful when recovering data and consider backing up your important files regularly to avoid future data loss.
Frequently Asked Questions:
Common signs include being unable to access files, receiving error messages when trying to open the drive, or the drive not being recognized by your computer.
Corruption can happen due to various reasons, such as abrupt removal, power surges, malware, or hardware issues.
Data recovery success depends on the extent of damage. While some data can usually be recovered, there are no guarantees of 100% recovery.