A new storage access and transport protocol called NVMe (nonvolatile memory express) is designed for use with flash and next-generation solid-state drives (SSDs). It offers the fastest reaction times and maximum throughput available for corporate workloads. However, even with such advanced technology, users may encounter issues, and one common problem is an NVMe SSD not showing up or being detected.
Several factors could contribute to this problem, including driver issues, connection problems, BIOS/UEFI settings, faulty SSDs, etc. Nevertheless, this article presents 12 proven solutions divided into two parts to address and resolve the issue.
12 Solutions to Fix NVMe SSD Not Showing Up/Detected
Below, we have divided the solutions into two parts: one for users unable to detect the SSD in BIOS and the other for disk management. Each part includes six solutions:
NVMe SSD Not Showing Up in BIOS
Solution 1: Enable PCIE Support
By enabling PCIE support in the BIOS settings, the system can recognize and utilize the NVMe SSD effectively. This step ensures that the necessary protocols are activated for seamless communication between the motherboard and the SSD. Follow the below steps to enable the PCIE support:
- Ensure all applications are closed and perform a complete restart.
- Press the designated key (F2 or Delete) to enter the BIOS during the initial boot screen.
- Navigate to "Advanced > M.2_2 PCIE Storage RAID Support:"
- Use the arrow keys to navigate to the specified section.
- Ensure it's enabled and save changes.
Solution 2: Reinstall the NVMe SSD
Reinstalling the NVMe SSD involves a physical reconnection, ensuring secure and proper seating in the designated slot. This method addresses potential issues related to improper connections or dislodged components, providing a practical solution for SSDs not detected in BIOS issues.
- Safely shut down your computer and disconnect the power source.
- Locate and remove the side panel of your computer.
- Identify the slot where your NVMe SSD is connected.
- Carefully detach the mounting screw.
- Gently insert the NVMe M.2 SSD into the slot and secure it with the mounting screw.

- Power up your computer and follow any onscreen prompts related to the NVMe SSD installation.
Solution 3: Troubleshoot and Fix Hardware Faults
Many SSD-related issues stem from hardware failures, such as broken cables or incorrect connections. To address these problems, follow these steps:
- Power off your computer and inspect the NVMe data cables. Ensure they are securely connected to your SSD drive. Verify that the power cable is also properly attached.
- Insert the SSD drive into the port, ensuring a secure connection.
- Access the BIOS settings and check if the SSD has now been detected.
- If the issue persists, reset the BIOS settings to their default configuration.
Solution 4: Configure NVMe SSD Settings in BIOS
Configuring SSD settings in the BIOS ensures that the system is set up to recognize and work optimally with the SSD. To do so, follow these steps:
- Ensure a standard boot-up process.
- Access the BIOS settings by pressing the designated key during the initial boot screen.
- Configure the SSD settings:
- Navigate to the Boot menu.
- Locate the SSD-related settings; the exact option name may vary depending on your motherboard.
- Adjust settings as needed.
- Save your changes and exit BIOS.
Solution 5: Update BIOS
Verify whether your motherboard has a BIOS update available. Sometimes, compatibility problems can be fixed, and issues like NVMe SSD showing up in the BIOS can be solved by updating the BIOS.
Solution 6: Reset BIOS Settings to Default
Resetting BIOS settings to default is a troubleshooting step to address unintended changes or configurations that might hinder NVMe SSD detection. By reverting the BIOS settings to their default state, you can eliminate potential issues caused by unintentional modifications, allowing the system to recognize the NVMe SSD. Follow these steps to reset BIOS settings to default.
- Restart your computer.
- During a reboot, press the designated key, often "F9", to prompt a window that asks, "Load Setup Defaults?".
- Choose the "Yes" option and press "Enter".
- Save the changes you've made and exit the BIOS.
NVMe SSD Not Detected in Disk Management
Solution 1: Connect NVMe SSD to Another PC
When the NVMe SSD SSD is not showing in File Explorer and Disk Management, experiment with changing cables or connecting the NVMe SSD to another PC.
- Swap out the data and power cables connected to the NVMe SSD.
- Connect the NVMe SSD to another computer.
- Verify if the SSD is recognized on the alternate computer.
If the SSD is recognized on another PC, the issue may lie with the cables or connections.
Solution 2: Update SSD Driver
In some cases, the SSD may be detected but not displayed in "My Computer" due to incorrect installation of the disk driver. To resolve this issue, try updating or reinstalling the SSD driver.
- Connect the NVMe M.2 SSD to your computer.
- Right-click on "This PC" and select "Properties."
- Navigate to "Device Manager" and expand the category labeled "Disk drives."
- Locate the NVMe SSD that is not being detected in Disk Management. Right-click on it and choose the option "Update driver."

- Opt for the "Search automatically for updated driver software" feature.
- Allow the system to search for and install any available driver updates. Once the process is complete, restart your computer.
- Reconnect the SSD and verify if it appears in the system.
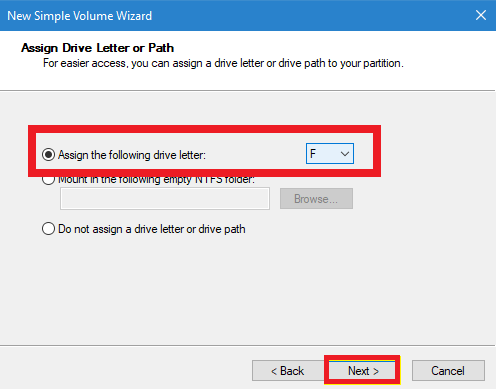
Solution 3: Assign a Drive Letter to your NVMe SSD
If your SSD is not showing up due to a missing drive letter or conflicts with another disk, you can resolve this problem by manually assigning a new drive letter in Windows Disk Management. Follow these steps:
- Right-click on "This PC" and select "Manage." Under the Storage section, click on "Disk Management."
- Right-click on the SSD partition and select "Change Drive Letter and Paths…".

- Click the "Change" button among Add, Change, and Remove. Then, choose a drive letter from the list and click "OK" to confirm.
Solution 4: Initializing the NVMe SSD
If a new SSD fails to appear in Windows Explorer or Disk Management or an existing SSD shows the "disk unknown not initialized" error, the solution involves initializing the SSD. The steps to address this issue are outlined below:
- Open Disk Management on your computer.
- Identify and right-click on the SSD that requires initialization, then select "Initialize Disk."
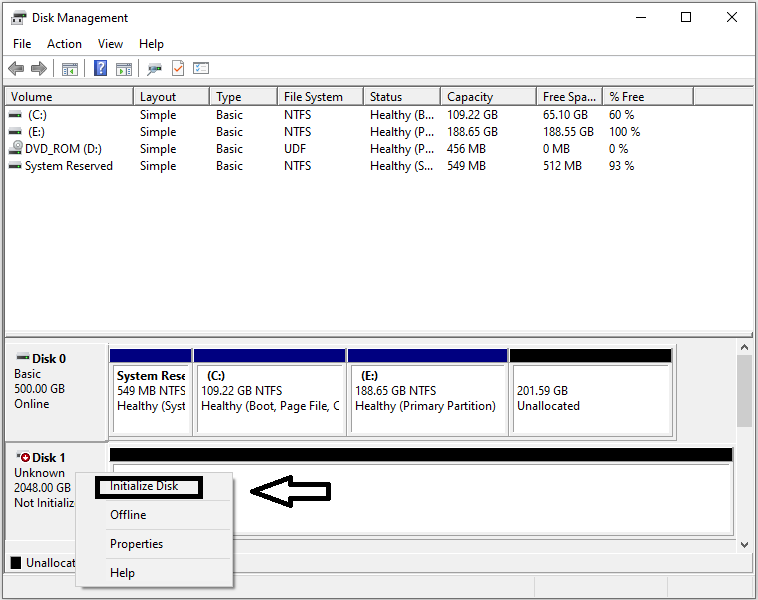
- In the Initialize Disk dialog box, choose the NVMe SSD to initialize and opt for either the master boot record (MBR) or GUID partition table (GPT) partition style.
Solution 5: Run Hardware and Device Troubleshooter
Run the Hardware and Device Troubleshooter, a built-in Windows diagnostic tool that automatically scans and addresses hardware-related issues, providing a streamlined approach to troubleshooting SSD recognition problems.
- Utilize the Windows search box to locate the "Hardware and Devices" troubleshooter.
- Click "Next" and patiently wait for the scanning process to complete.
- The troubleshooter will identify if there is any problem that can be the reason behind the NVMe SSD not showing up issue.
Solution 6: Format the NVMe SSD for Unsupported File System
If you have tried the previous fixes and are still having problems, it is possible that the file system has become corrupted or that Windows does not recognize the current file system. This issue may be indicated by alerts such as "RAW," "Free space," or "Unallocated SSD."
It could be necessary to reformat your SSD drive to fix file system problems. It's crucial to remember that formatting the SSD disk will remove all of the data that is saved on it. Thus, recovering data from the NVMe SSD before starting the formatting procedure is essential.
How To Recover Data From Undetected NVMe SSD?
To recover data from an undetected NVMe SSD, you can utilize the best SSD recovery software, such as Remo Recover.
Remo Recover is a user-friendly tool capable of detecting and recovering over 500 file formats from your NVMe M.2 SSD. Download the software for free and follow the steps below to initiate the recovery process.
- Launch the Remo Recover software on your computer.
- Select the SSD from the home screen. If it is not detected, click the "Can't find the drive?" option to locate it manually.

- After selecting the NVMe SSD, click the "Scan" button to initiate the scanning process.

- Once the scan process is completed, you can see the list of recovered files. Utilize the built-in features of the tool to Preview, Filter, and Search for the desired files.

- Select the files you want to recover and click on the "Save" button to save them to a location of your choice.
Conclusion
Resolving NVMe SSD recognition issues requires a systematic and thorough approach. Follow these step-by-step solutions and methods to ensure your NVMe SSD functions seamlessly. Whether adjusting BIOS settings, updating drivers, or troubleshooting hardware connections, this guide covers all aspects to provide a comprehensive solution to the NVMe SSD not showing up issue.