Recognized for its exceptional quality, ASUS, a leading laptop manufacturer, often ranks as the top choice for many consumers. However, it can be quite frustrating when an ASUS laptop fails to power on. If you're experiencing such an issue, worry not! We have carefully crafted a comprehensive guide to help you resolve the problem effectively.
Table Of Contents
-
Decoding the Potential Scenarios for ASUS Laptop Startup
Issues
- Scenario 1: ASUS Laptop Won’t Turn On And The Power Light Is Off
- Scenario 2: The Power Light Is On But There is No Display And ASUS Computer Won’t Turn On
- Scenario 3: Failed BIOS Update And Unable to Enter Windows Operating System
- Scenario 4: “S.M.A.R.T. Status Bad” Error Message Display at Startup
- Scenario 5: Screen Visible during Startup, Desktop Turns Black After Entry
- Conclusion
Decoding the Potential Scenarios for ASUS Laptop Startup Issues
There are 5 major scenarios, the problem of your ASUS laptop not turning on can show as. The root cause of the problem and the solutions to fix it may differ for each scenario. Let us investigate each scenario one by one.
Scenario 1: ASUS Laptop Won’t Turn On And The Power Light Is Off
If the power light is not turning on when you try to open your ASUS laptop, then the issue is with power. The potential problems may include.
- Loose or Faulty Connections- If any connections are loose or faulty in your device, it won’t receive a proper power supply and will not turn on. Check the connections properly.
- Dead Battery- If your battery is dead your laptop won’t turn on. Try to remove your battery and directly connect the computer to an AC supply. If the computer turns on your battery is dead and needs to be replaced.
- Faulty Adapter- There may be a case where your battery is fine but the charging adapter is faulty, so the laptop won’t charge and turn on. Try using an alternate adapter cable to confirm and replace the adapter if necessary.
- Hardware Conflicts- Sometimes hardware configurations may conflict with each other and prevent your ASUS computer from starting.
- Fault in Power IC- Integrated circuits are very important as they ensure that each component of the device receives an adequate power supply, and any fault in it can prevent your computer from turning on. In such a case contact ASUS’s authorized service center to get the IC replaced.
Note- Having third-party repairs done could void your warranty claim, depending on the nature of the repair and any damage it may cause. Hence it is always advisable to contact the ASUS service center in case any hardware components of the computer need to be replaced.
If you do not find any hardware issues you can try these fixes.
Fix 1; Perform EC Reset or Hard Reset
To perform a Hard Reset
- Remove all external devices including memory cards, CDs/DVDs, dongles, mice, keywords, etc.
- Disconnect Power Adapter
Note- For ASUS laptop models TP420IA and UX425IA, do not disconnect the power adapter. You need to keep the adapter connected for the EC reset.
- Press and hold the Power key for 20 to 40 seconds depending on your model. Release the key when the power indicator starts flashing rapidly.
- Reconnect the power adapter and try to restart the computer to check if the issue is resolved.
Fix 2: Perform CMOS Reset
Caution- This method requires you to open your laptop casing and tweaking with your motherboard. Do not attempt it if you are not confident. Improper execution can aggravate your problem.
You can reset CMOS for your ASUS laptops by two different methods. Follow the steps to perform a CMOS reset
Clear the CMOS by CLRTC Pin
- Turn off your Computer and Unplug the power cord.
- Short-circuit two jumper caps by connecting them with a metal conductor. Maintain this connection for approximately 5-10 seconds.
- Reconnect the power cord to the computer and switch it on.
Reset CMOS by Mercury Cell Short-Circuit Method
- Power down the computer and disconnect the power cable.
- Open the computer casing.
- Find the motherboard's battery.
- Remove the battery from the motherboard. Short-circuit the positive and negative terminals of the battery holder for approximately 1 minute, then reinstall the battery.
- Reconnect the power cable and switch the computer back on.
Note- For the TP420IA and UX425IA notebook models, do not remove the adapter during CMOS reset (CMOS clearing should be performed while it remains connected).
Scenario 2: The Power Light Is On But There is No Display And ASUS Computer Won’t Turn On
You will encounter this kind of scenario when there are
- Laptop Screen issues- There may be issues with your display screen, its components, or its configuration settings which can prevent your computer from displaying even after it turns on. Try using an external Display Screen to confirm.
- Graphics card or issues- In the case of your graphics card malfunctioning, inadequate connection to the motherboard, or a loose configuration, your laptop's functionality may be compromised.
- Boot Failure due to Memory Training- If you performed any of the below-mentioned tasks and encountered the issue of the computer power light being on but there is no display and your ASUS computer won’t turn on, as your computer needs to undergo Memory Training.
- Replaced the battery or disconnected the battery interface.
- Replaced RAM cards with different capacities or brands.
- Performed a CMOS reset to return your computer's hardware to its default configuration.
There are some common fixes that you can try in this scenario.
Fixes: Steps to Resolve Laptop screen issues.
- Memory Training- In case your computer needs memory training it won't start unless the memory training is complete.
- Memory Training performs automatically when the device is started.
- It takes approximately three minutes during which nothing is displayed.
- Turn on your device and leave it for some time. It will turn on if the issue is because of memory training requirements.
- Reset Display Settings- Press Windows + Shift + Ctrl + B key. This will resolve any display setting
- Test for Screen Issues by External Monitor- If you have an external monitor, try to use that. Connect the monitor to your ASUS laptop.
- Press the Windows + P key to toggle the display mode and ensure that the external can display correctly.
- In case the display is available try installing the graphics driver. If your computer is equipped with two graphic cards make sure that both are up to date.
- Perform EC Reset/Hard Reset- Perform Hard Reset as explained in the previous scenario.
- Perform CMOS Reset- Perform CMOS Reset as explained in the previous scenario.
Scenario 3: Failed BIOS Update And Unable to Enter Windows Operating System
If you encounter a situation where your ASUS computer is asking for an update and the process is failing, then this means that the BIOS update is failing and you cannot turn on your computer unless the BIOS is updated.
Caution- Although unlikely, you may lose some of your data from your laptop during a BIOS update. We would recommend you recover data from a dead laptop and create a backup before proceeding with this process.
Fix: Update BIOS
Note- Be sure to keep your device charged and keep the power connected when using this method as it can take some time and interruptions during this process can cause abnormal issues.
Follow the steps to update your BIOS
- Find a working laptop and download the appropriate BIOS for your specific model from ASUS's official website. If the latest BIOS version is not recommended for your computer model, download the most recent one instead.
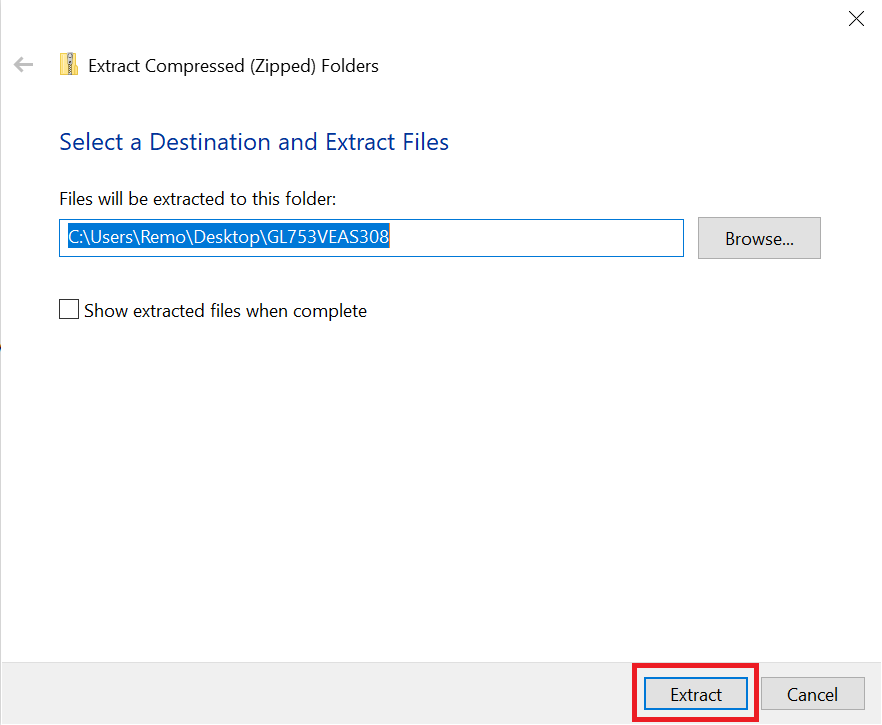
- On download completion, right-click on the file and select Extract All.
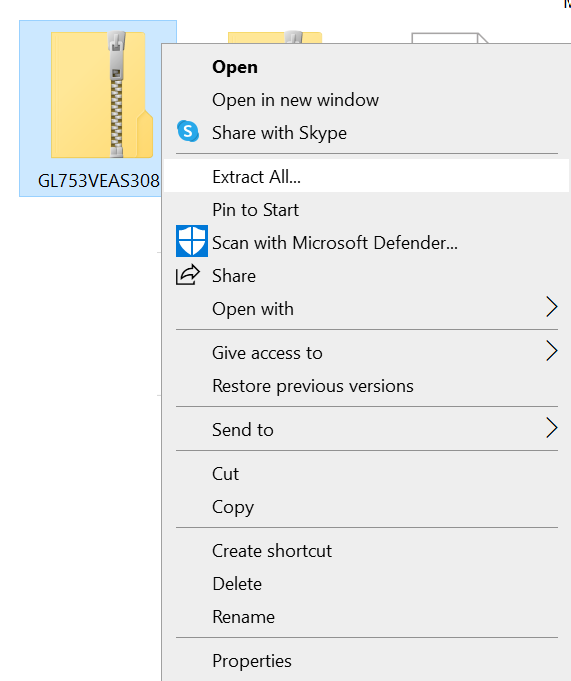
- Click on Extract.
- Rename the extracted file to change the file extension to .bin.
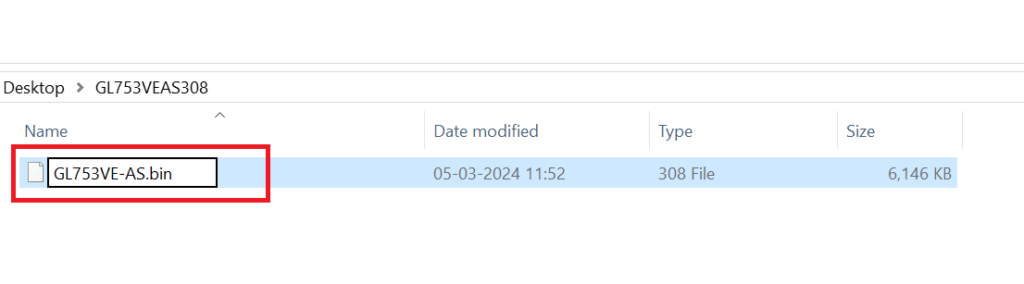
- Connect a USB drive and format it to FAT32. Save the renamed file to the root directory of the USB drive.
- Connect the USB to the problematic ASUS laptop.
- Restart the computer. It will automatically enter BIOS Safe mode.
- Select the .bin file of the USB and select Yes to update the BIOS.
On completion, the computer will restart automatically, and check if the problem is resolved.
Scenario 4: “S.M.A.R.T. Status Bad” Error Message Display at Startup
Modern-day hard drives have the Self Monitoring Analysis and Reporting Technology feature, which monitors and analyzes their functioning and reports the results. On startup or during cloud recovery the device executes a S.M.A.R.T hard drive test.
If there are potential issues with the hard drive, you may encounter an error message on the screen.
We recommend you recover any data from the hard drive in case you encounter the S.M.A.R.T. Status Bad error. You can safely and easily recover your data using Remo Recover. Depending on the type of error, we can resolve the hard drive issue.
You can replace your hard drive in case you are confident in opening the laptop casing. We will always recommend, that you contact ASUS’s authorized service centers for such tasks to prevent the problem from escalating.
Scenario 5: Screen Visible during Startup, Desktop Turns Black After Entry
If you can see the Windows welcome screen during boot, but the display turns black after entering the desktop, it likely indicates an issue with the graphics card driver. To address this, it's advisable to boot into Safe Mode and proceed with a reinstallation of the graphics card driver.
Here are the steps to do the same.
Boot into Safe Mode
- As your computer is failing to boot successfully, you'll need to enter Windows Recovery Environment (WinRE) directly upon powering on your computer.
If the system encounters issues loading the required configuration repeatedly, it will automatically direct the display to the Windows Recovery Environment after two failed attempts. - Power on your computer, then press and hold the power button for 15 seconds to force shutdown.
- Press the power button once more to turn on your computer.
- Again, press and hold the power button for 15 seconds to force another shutdown.
- Press the power button again to turn on your computer.
- Upon restarting, as Windows boots up, press and hold the power button for 15 seconds to force another shutdown.
- Press the power button once more to turn on your computer.
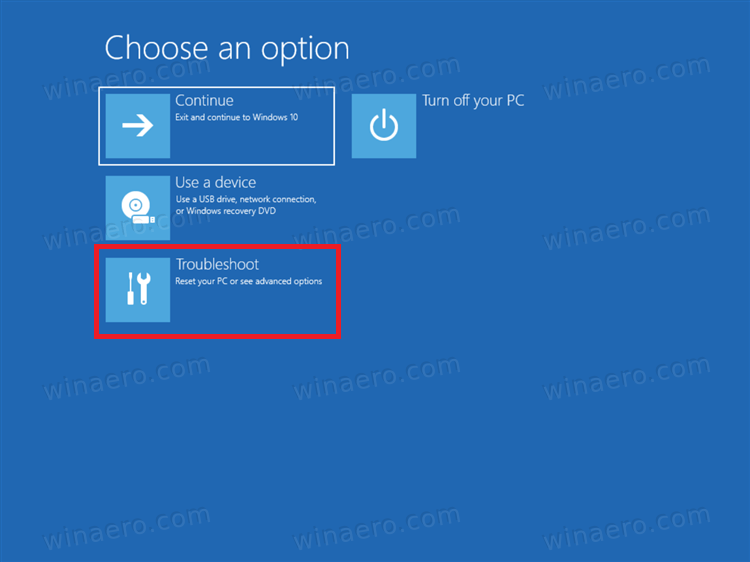
- This time allow your computer to fully restart, and it will automatically enter Windows Recovery Environment.
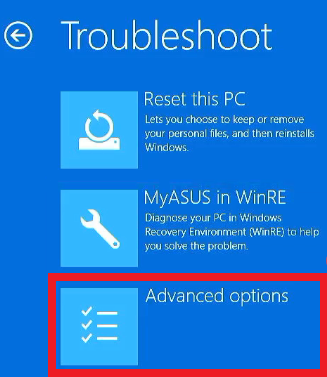
- Once in Windows Recovery Environment (WinRE), select the Troubleshoot option.
- Select Advanced options.
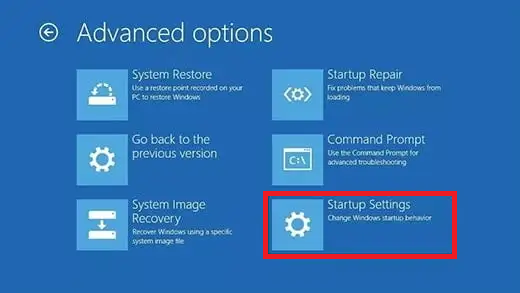
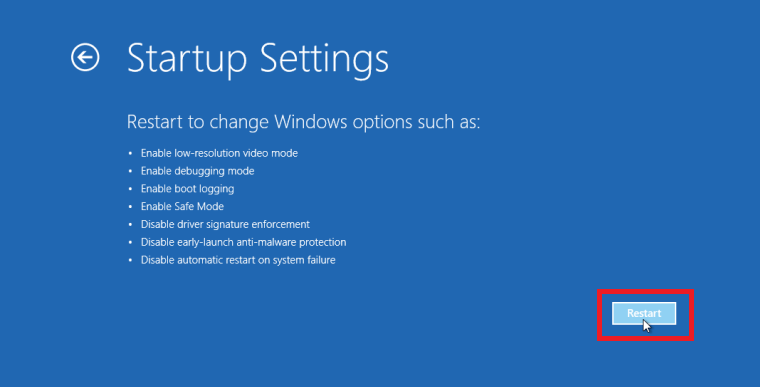
- Select Startup Settings and then click Restart.
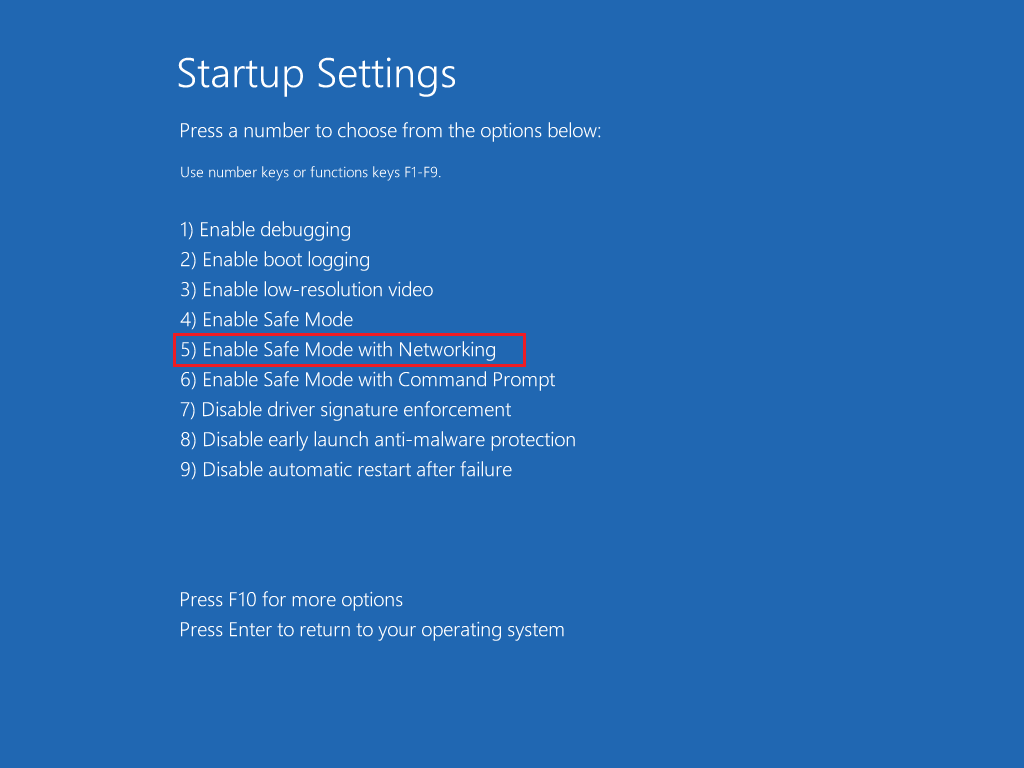
- Press 5 to Enable Safe mode with Networking.
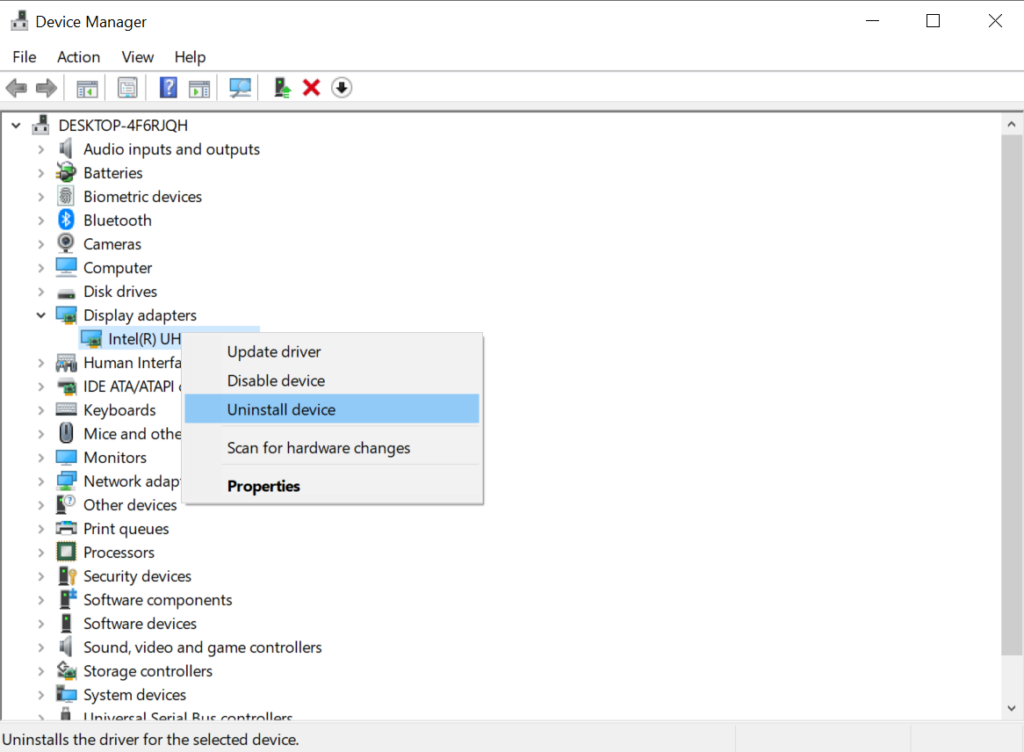
Access Device Manager
- Click on the Windows key. Search and select Device Manager.
Uninstall the Graphics Card Driver
- In the Device Manager expand Display Adapters. Right-click on the graphics card and select the option Uninstall.
Update Driver
- Visit the official website of your graphics card manufacturer (Intel, AMD, NVIDIA, etc) and download the latest driver for your specific graphics card model.
- Run the downloaded file to install the driver.
- After the installation is complete, restart your computer normally.
Note- The unavailability of the Troubleshoot option, when entering the Windows Recovery Environment, implies corruption of the OS file. In this case, contact the ASUS Service Center for further evaluation.
You should have installed your Graphics Card Driver and be able to boot into your system without the Desktop turning black.
Conclusion
In this article, we have discussed all the different scenarios where your ASUS laptop won’t turn on. We have also explained in detail what the potential causes and solutions can be for each scenario.
For any doubts do contact us. If you find this article helpful feel free to comment and share.