This page discusses configuring and setting up incoming mail server on various Outlook protocols, such as POP3, IMAP, and Exchange Server.
In today’s world, efficient email management is one of the foremost concerns of individuals and businesses alike. Therefore, Microsoft Outlook stands as one of the most reliable email clients. Known for its simple, user-friendly interface, robust functionality, and comprehensive suite of features and tools designed to streamline communications and boost productivity.
Thereby, making it a go-to tool for millions of users across the world who want to organize their emails effectively, stay connected, and be productive.
At the core of Outlook’s functionality is its ability to flawlessly integrate with email servers, thereby facilitating smooth communication between different users and email accounts. The core component of this is the “Incoming Mail Server,” which acts as a gateway through which emails are received and delivered to the Outlook user’s inbox.
Therefore, properly configuring and setting up an incoming email server in Outlook is one of the best ways to ensure uninterrupted email communication, as well as prevent errors and problems that might be triggered due to improperly configuring incoming mail server settings in Outlook.
Correct configuration of the incoming mail server in Outlook is not only a technical requirement but also a fundamental necessity for optimizing the email and overall Outlook experience. By ensuring seamless connectivity and strong security measures, users can harness Outlook's full potential to manage their emails effectively and efficiently.
Outlook Incoming Mail Server Setup Guide for POP3, IMAP, and Exchange Server Accounts
This section discusses setting up and configuring an incoming mail server using various Outlook protocols, including POP3, IMAP, and Exchange server.
Set up Incoming Mail Server on POP3 Account
Step 1: Open Outlook and navigate to Account Settings, and Add Account:
Launch the Outlook application on your computer. Click on the "File" tab at the top left corner of the Outlook window. In the Info category, click on the "Add Account" button.
Step 2: Choose Account Type and select services:
Select "Manual setup or additional server types" and click "Next." Then, choose "POP" and click "Next."
Step 3: Enter User Information and Configure Server Information and Logon Information:
- In the Account Settings window. Fill in your Name and full Email Address in the respective fields.
- Select "Account Type" as POP3.
- Enter the Incoming Mail Server (POP3) provided by your email provider.
- Enter the Outgoing Mail Server (SMTP) provided by your email provider.
- Enter your full Email Address and Password in the respective fields.

Step 4: Configure settings for Outgoing Server:
- Click on the "More Settings" button.
- In the "Outgoing Server" tab, check the box that says, "My outgoing server (SMTP) requires authentication."
- Optionally, select "Use same settings as my incoming mail server."
Step 5: Advanced Settings:
- Go to the "Advanced" tab.
- Set the Incoming server (POP3) port to 110 (default) or 995 for SSL encrypted connection.
- Set the Outgoing server (SMTP) port to 25 (default), 587 (common alternate), or 465 for SSL encrypted connection.
- Choose SSL/TLS encryption for both Incoming and Outgoing servers.
- Click "OK" to close the dialog box.
Step 6: Test Account Settings and complete the Setup process:
- Click on the "Test Account Settings" button to ensure everything is configured correctly.
- Outlook will attempt to send a test email and verify incoming server settings.
- If the test is successful, click "Next" and then "Finish" to complete the setup process.
Set up Incoming Mail Server on IMAP Account
Step 1: Open Outlook and access Outlook account setup section:
Launch the Outlook application on your device. Access the account setup section within Outlook. Look for the "File" menu at the top left corner of the Outlook window and select it.
Step 2: Select Account Type:
Choose the option to add a new email account. In the account setup wizard, opt for "Email Account" or "Manual setup" depending on your version of Outlook.
Step 3: Enter Account Information and configure Server Settings:
Input your personal details accurately. Provide your name, full email address, and password in the fields provided.
Additionally, you need to enter the incoming mail server details provided by your email provider. This typically includes the IMAP server address (e.g., imap.youremailid.com). Then, set the port number for IMAP. The default port for IMAP is usually 993 for SSL/TLS encrypted connections. Enable Secure Password Authentication (SPA) if required by your email provider or for enhanced security.
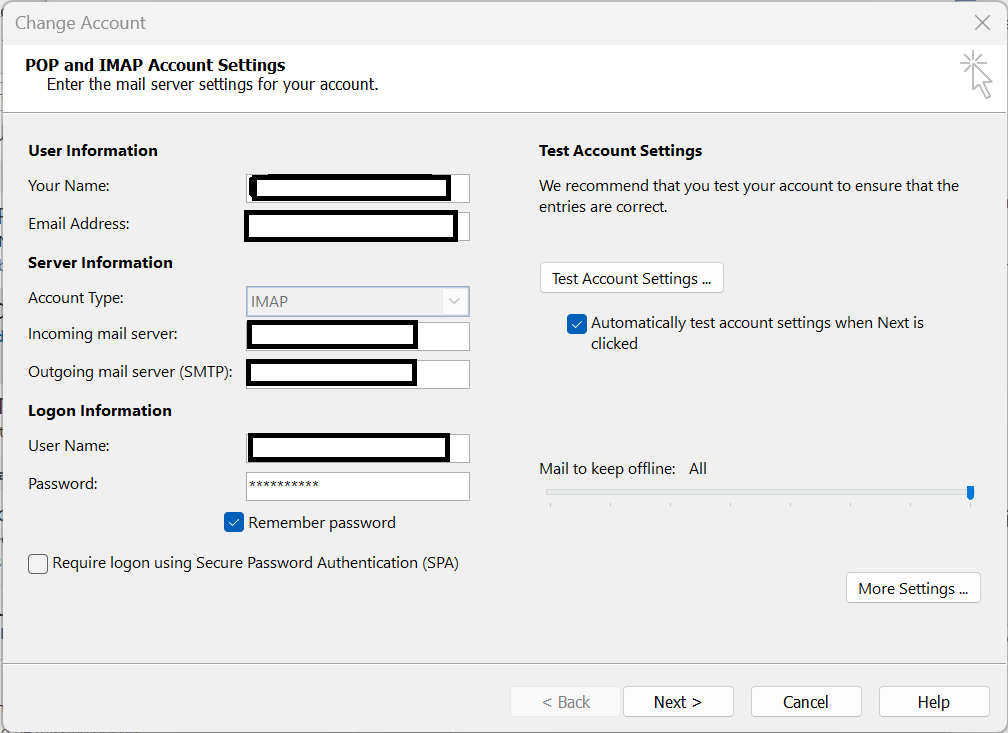
Step 4: Test Account Settings:
Initiate the testing of account settings within Outlook by clicking on the Test Account Settings option. This ensures that the provided information is accurate and Outlook can establish a successful connection to your email server.
Outlook will attempt to log in to your email account and retrieve server information. Any encountered errors will be displayed, allowing for immediate troubleshooting and correction.
Step 5: Complete Setup:
Upon successful verification of account settings, proceed to finalize the setup process within Outlook.
I recommend you consider sending a test email or checking for incoming emails to ensure seamless functionality.
I also recommend you explore additional features and customization options within Outlook to tailor the application to your preferences and ultimately optimize your email management experience.
Set up Incoming Mail Server on Exchange Server Account
Step 1: Open Outlook and Add Account:
Begin by launching the Outlook application on your device. Access the account setup section within Outlook. Look for the "File" menu at the top left corner of the Outlook window and select it.
Step 2: Select Account Type and Enter Account Information:
Choose the option to add a new email account. In the account setup wizard, opt for "Email Account" or "Manual Setup," depending on your version of Outlook.
Enter your personal details like your name, full email address, password, etc.
Step 3: Configure Server Settings:
Select "Exchange" as the account type to set up a connection with an Exchange Server.
Enter the Exchange Server details provided by your organization's IT administrator. This typically includes the Exchange Server address (e.g., mail.yourcompanymailid.com).
Ensure the "Use Cached Exchange Mode" option is checked if you want Outlook to store a copy of your mailbox data locally for offline access.
Step 4: Test Account Settings:
Initiate the testing of account settings within Outlook. This ensures that the provided information is accurate and Outlook can establish a successful connection to your Exchange Server.
Outlook will attempt to log in to your email account and retrieve server information. Any encountered errors will be displayed, allowing for immediate troubleshooting and correction.
Step 5: Complete Setup:
Upon successful verification of account settings, proceed to finalize the setup process within Outlook.
I suggest you try sending a test email and check for incoming emails to ensure seamless functionality.
I also recommend you explore additional features and customization options within Outlook to tailor the application to your preferences and ultimately optimizing your email management experience.
Note: If you have encountered Outlook Error 0x800CCC0F, "Your Server Has Unexpectedly Terminated the Connection; Outlook Error Number," refer to this article.
Conclusion
Setting up and configuring the incoming mail server in Outlook is undoubtedly one of the most essential processes when it comes to seamless communication and efficient email management.
Irrespective of what Outlook protocol was used to set up your Outlook. By following the solutions mentioned above, you can safely and correctly set up an Incoming Mail Server for your Outlook account.
Note: Follow this article if you want to learn how to move Outlook settings to a new computer.