If you are one of those Microsoft Word users regularly performing repeated activities, then Macros are for you. Creating Macros will make your work easier by assigning a shortcut key, but it also helps you a lot of time. Follow this article to learn how to create Macros and add a shortcut for Macros in a Word document.
What are Macros?
Macros in a Word application is a short code that runs in the background.Creating Macros in Word can help you improve your work experience with Microsoft Word by finding a shortcut for repeated sets of actions on it.
Say you want to run a formula or insert a template into your Word document regularly for multiple Word files; Macros can do this in just a simple assigned keystroke, saving you time and effort.
Creating Macros in Word doesn't require you to be a technical geek. You can create Macros by using the Macros Recorder to record a sequence of actions. To create Macros, you must assign the key combination to perform repeated actions on your Word documents.
NOTE: Macros in Microsoft Word can also pose a threat to be used as a potential malware vehicle to corrupt the Word document. To avoid corruption of Word files, it is recommended to maintain a backup copy of Word documents. If you face any issues with MS Word, read more to learn how to protect Word documents.
How to Create Macros and Assign Shortcut Keys on Word?
You can create and assign macros a shortcut key by following the steps below.
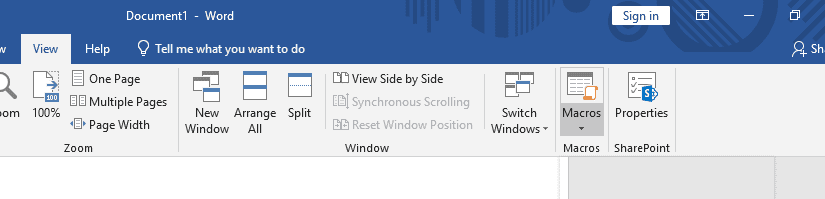
1: Click on the View tab > Macros > Record macros.
2: Provide a name under Macros name.
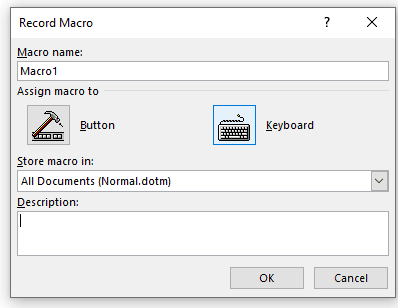
Note: To use Macros in any new documents, select the All Documents (Normal. dotm) option in the Store Macros.
3: Now, to assign a shortcut for Macros, click on the Keyboard icon and click on the Assign button to add a shortcut key for Macros. An example of a shortcut key is (shift+ctrl+d).
4: Once you complete typing your documents and have assigned a shortcut key for Macros, stop Macros recording by clicking on the Macros > Stop Recording.
5: Finally, to run your Macros, click the Button option.
How to Add a Shortcut Key for Existing Macros?
If you have existing Macros then you can assign shortcut keys. This results in Macros being executed. Follow the steps below to assign a shortcut key for existing Macros.
- Choose File > Options and then click Customize Ribbon.
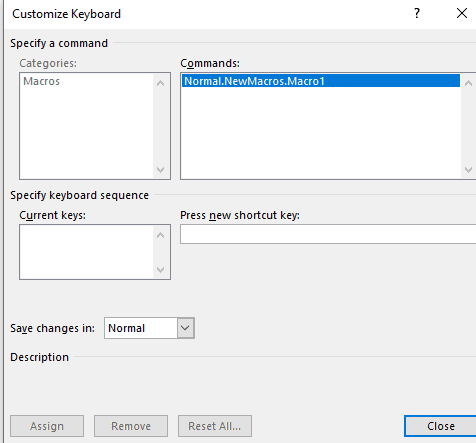
- Click the Customize button next to Keyboard Shortcuts (near the bottom of the dialog box). Now, the Customize Keyboard dialog box appears.
- In the Categories list, scroll down and click Macros.
- A list of the Macros will appear
- Select the Macros for which you need to assign the shortcut
- Then, type the Shortcut Key of your choice and hit Close.
Now try pressing the assigned shortcut key in the same document to which you created the Macros. Your Macro should run perfectly and perform all the actions that were recorded.
Macros are small code written in a programming language, much like any other software program. You cannot rule out the chances of incorrect codes damaging the document or the virus threat to the document. In such cases, you cannot access your Word document.
It is recommended to use Remo Repair Word for free, a powerful word repair tool specially designed to repair corrupt or damaged Word in a few clicks only. This Word repair tool is built-in with advanced repairing algorithms that help to repair the corrupted Word document to recover its content without any alteration. You can recover all your content, formatting, alignments, hyperlinks, images, etc. All of this can be tried entirely free.
Download the tool and start repairing the document now.
Repair Word document with Remo Repair Word
1: Download and install Remo Repair Word.
2: Launch the software and click the Browse option to select the corrupt .doc or .docx file.
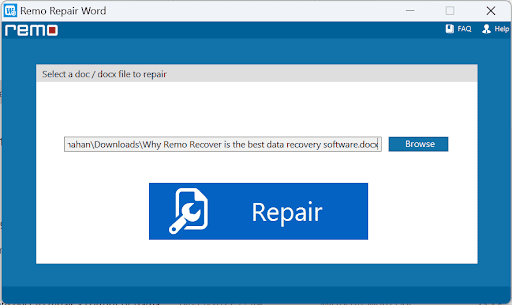
3: Click on the Repair option to start repairing the Word file.
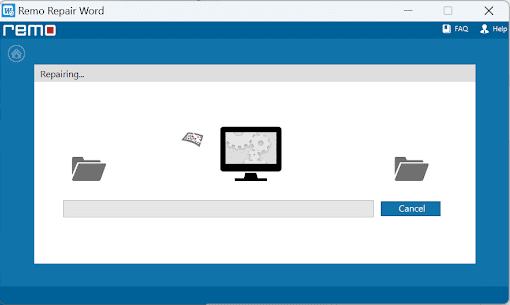
4: Once the Word document is repaired, you can preview the file to judge the success of the software.
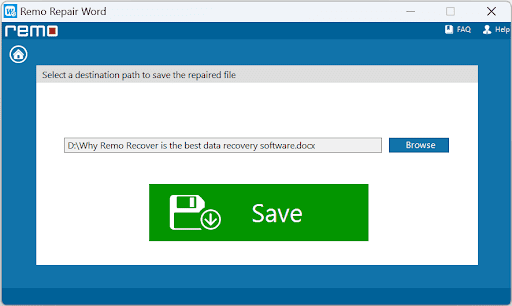
5: Select the Save option to save the repaired Word file to the desired location.