If you are one of the users who uses Outlook on a day-to-day basis. There might be few a tasks that you might be doing regularly daily which can be time-consuming and monotonous.
In case you are sending repetitive mail to various receivers including customers, colleagues, and your boss. typing them over and over hundreds of times is a not-so-productive, kind of boring piece of work. Copying and pasting the content from existing mails is a thing of the past.
On the other hand, Reusable content offers consistency, convenience, and efficiency to users.
Apart from Outlook shortcuts, built-in features like quick parts are a neat Outlook Trick that you could use to reuse existing content to boost users’ productivity and make Outlook easier to work with.
In this article, we will briefly discuss everything about quick parts right from why should you use quick parts in Outlook to how to create or add quick parts in various versions of Outlook including Outlook 365.
Let’s dive straight into it.
What is Quick Parts in Outlook?
Quick Parts is a feature introduced by Microsoft Outlook for Outlook 2007 and later versions. As a potential replacement for AutoText or Autocomplete from previous versions. Quick Parts is a library of reusable pieces of content that you can quickly insert into your emails, appointments, meeting requests, contacts, and other tasks.
Microsoft has termed this feature as “building blocks”.
In simple terms. Quick Parts are basically stored chunks of reusable content, content can be anything long or short, text or images, tables or graphs, shapes or signatures, hyperlinks or SmartArt, maps or even formatting, etc.
The only thing the users are restricted to add is the file attachments.
What is so unique about Quick Parts?
- Quick Parts is a built-in feature in Microsoft Outlook. Hence, it’s reliable and safe to use, unlike third-party add-ins.
- Many of the third-party apps can’t handle tables and formatting within Outlook. In case you want to work with tables, graphs, graphics, or formatting (such as different colors and various fonts). Quick parts come in handy.
- One of the best things about Quick Parts is it’s absolutely free. unlike third-party applications, you don’t need to buy or install anything. It’s simply there.
- Configuring Quick Parts is extremely easy. Some of the applications require additional configuration before you start using them.
Since we just talked about configuring quick parts. Follow the steps below to create quick Parts.
How to Create Quick Parts?
To create Quick Parts in Outlook and use them anywhere including emails, appointments, contacts, meeting requests, tasks, etc.
Follow the steps mentioned below.
Step 1: Launch and run Outlook
Step 2: Click on new email or appointments or any other option
Step 3: write, select and copy the content you want to save as a quick part. For example, salutation, your name, address, the logo of your organization, images, etc.
Press Ctrl+A to select everything, then press Ctrl+C to copy the selected content.
Step 4: Click on Insert, Click on Quick Parts, and Click on Save Selection to Quick Part Gallery

Step 5: Create a New Building Block dialogue box will pop up on your screen,
Configure the following attributes as per your needs.
- Name (make sure it's descriptive and self-explanatory).
- Gallery (select the gallery where you want the new building block to appear)
- Category (sub-folders of the gallery, in case you have 10 reusable content pieces, we highly recommend you organize each one of them in a new category)
- Description (this is optional, in case you want to add, we recommend you type something that describes the entry)
- Save in (this is where your quick parts templates get saved. If you don’t have a strong reason. We suggest you not change that)
- Insert Options (explains how the entry is inserted)
- Insert content only: Default Option used in most cases.
- Insert in its own paragraph: inserts the content in its own paragraph.
- Insert content in its own page: inserts the content in its own page.
Once the above information is configured, Click OK to save the quick part.
3 Fun Ways to use Quick Parts in Outlook
Now that you have successfully created Quick part(s), it’s time to know how to use them. This section talks about how to add quick parts in Outlook.
Method 1: Insert Quick parts by finding them in the gallery
Step 1: while drafting a mail. Click where you want to insert the quick part.
Step 2: Click on Insert, Click on Quick Parts.

Step 3: Few of your saved quick parts will appear on your screen. Click on the quick part you want to insert in the mail.
You can also choose to insert the saved quick part at the beginning or end of the document with a simple right-click.
Note- In case, you have many quick parts. And you don’t see the quick part you want to insert. Right-click on the visible entry and click on organize and delete option. A full list of building block organizers will appear on your screen.
Select and click on the quick part you want to insert.
Method 2: Press F3 hotkey to insert a quick part
Probably the fastest way to insert reusable pieces of content into an email or anywhere else.
Step 1: click where you want to insert your quick part, and type the Name of your building block.
Step 2: Press the F3 button.
Example: - “Weekly Report” and hit the F3 button.
Method 3: Hit Enter Key to Auto-complete Quick Parts
Similar to the F3 method, simply type the Name of your quick parts and hit Enter key to insert the reusable piece of content.
“Weekly Report” and hit Enter Key.
Note - In case, if you ever face issues with Outlook. here is a guide that will help you fix those Outlook issues.
How To Edit and rename Quick Parts?
Here's how to change a Quick Part that already exists:
- Click Quick Parts under the Text group on the Insert tab.
- To edit an entry, simply right-click it and select Edit Properties.
- Edit a Quick Part's characteristics.
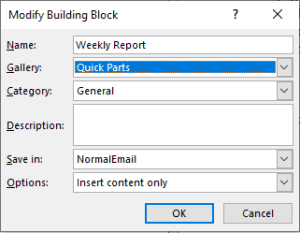
- Type a new name in the corresponding box in the Modify Building Block dialogue box and, if desired, select a different gallery, category, and template. Once finished, click OK.
- Click Yes when prompted to redefine the building block entry.
Conclusion
The quick parts feature was built to help you do more in less time.
In this write up we have explained how can you create or add quick parts with just 5 simple steps. We have also discussed 3 extremely simple ways to use quick parts to insert reusable pieces of content, instead of the plain and boring copy and paste methods.
Below are some of the most common questions, however, if you have any additional questions. Feel free to drop your queries in the comment section below.
Frequently Asked Questions
Quick Parts which was originally launched for Outlook 2007 and newer versions is a more versatile substitute for AutoText. The main difference between them is Quick part requires you to use a mouse and AutoText gives you a mouse-less option.
Click on New Email. Position the cursor where you want to insert quick parts and then click on Insert Tab, click on Quick Tab, and a list of all your saved quick parts will appear on your screen. Select the Entry you want to insert in the mail.
Click on Quick Parts. A list of all your quick parts will appear on your screen. Right-click on the Entry you want to change. Click on Edit Properties.
Modify Building Block dialog box will pop up on your screen, you can edit all the necessary attributes including Name, Gallery, Category, save in, etc., then click on OK.
Click on Quick Parts. A list of all your quick parts will appear on your screen. Right-click on the Entry you want to delete. Click on Organize and delete. A new Building Blocks Organizer screen will appear on your screen.